Adding Highlights To Full Lace Wig
- Posted on 18 June, 2013
- Full Lace Wig
- By Anonymous
This video is showing how to add highlights to a chinese virgin remy full lace wig from Best lace wigs. I purchased this wig myself.
Wig can be purchased here:http://www.bestlacewigs.net/chinese-vi...
Redken Blond Icing can be purchased here:http://www.amazon.com/Redken-Blonde-Am...
If you have, or know someone who has a cosmetology license or is a student, they can get it for you MUCH cheaper at a professional beauty supply store!
- Music written by Tom Cusack
- Composer -- Tom Cusack
- Music from www.freemusicforvideos.com
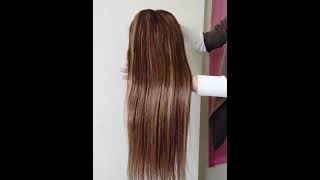
Hi guys, so what we're gon na do today, I have here a Chinese virgin remy lace, wig from best lace, wigs and she's 12 inches long, very pretty, very nice texture, but it's in a natural color, which is basically that whatever the natural color is of the Person that they got the hair from so it's a dark brown like maybe like a level-two Brown, so I want to lighten it up and put some highlights in it. So what I'm gon na use I'm going to do two colors, I'm using my red cane blonde icing: it's an ammonia, free, Lightner! Okay! You can see that and this is what it looks like in the bowl. So I mixed that with the red cane blonde icing developer 30 volume. Okay, so we did equal parts. So I did an ounce of the of the bleach and an ounce of the developer, okay and then for my second color, I'm using Chi cream color ionic color, and this is what the tube looks like. But it's empty. It'S a 7, a which is a 7 H, which is a dark ash blonde. Okay - and this is what that looks like in the bowl, and it is with 30 volume developer. Okay, we want to lift her up pretty light, so what I'm gon na do is I'm gon na alternate the colors, so we're gon na do blonde and then brown well bleaching in color, basically because they're, both kind of be gon na be like a blonde. So I'm gon na start right here. I'M gon na do a sideways technique, instead of a straight because a lot of the traditional way is just to do it straight back, which I do that sometimes. But since this one's gon na be a pretty heavy weave, I'm gon na do it in the side. I just like the way that looks better, so I'm gon na start right here and we're just gon na weave some little pieces in now. Okay, so that's the that's the section we're gon na take your pizza foil, and this is just can't hair foil. So you can get this at Sally's you're gon na. Take your comb you're gon na bend. It put it down. There'S your pieces and you're gon na put your color right on there. I'M gon na kind of leave it off the scalp cut that one a little bit of a root, because I just like the way that looks. It looks Errol more natural to me. I'M just gon na put that color on there get it all the way on the bottom in this oil and then you're gon na make sure those ends get in there too, and go ahead, be generous with the product, because you're gon na make sure it's all Covered okay yeah: once you got the product on then you're gon na, take your oil and bend it up fold. It bend it one more time, fold it and you're gon na take your ends, fold them into lock, okay! Well, you know what I'm skip a step before you do that lock, you're gon na flip, your foil over pull this down, make sure it's all the way down to the park and then flip it back over and then tank that way and your products gon na Bleed out into the other hair, okay, so then we're gon na take our brown next, I'm doing pretty small sections, because I want it to be a pretty heavy weave. So we're gon na take a piece in between that's gon na stay dark, get that out of the way and then we're gon na start. Another weave with our brown get your color put that right on there. This is virgin hair. So I'm expecting it to lift the way normal hair would lift. I really hope it does that what that means. It'S really actually a virgin, so we'll find out soon enough. So next is blonde again make sure if any of the bleach gets on any other hair. You wipe it off immediately because otherwise it will leave a bleach spot on the hair. Okay. So that's what we're gon na do all the way down the side. I'M gon na go ahead and finish that section up and I'll show you guys how the next section is gon na be okay, so we got both of our sides done. This is how it looks: there's all your foils on both sides, so now we're gon na start in the crown and put some foils in there. Okay, so I'm gon na go ahead and start right behind where your roll of foils are in the front. Pin some that hair out of the way and I'm gon na start with a bond piece, just mix it a little bit more developer, because my mixture is getting a little dried out. Okay, so here we go! Here'S this first crown section you're doing what's called a partial which is just the top in the side. I'M not gon na. Do the bottom, I'm gon na just leave it dark, because I like the way that looks anyway with the dark underneath so he's gon na leave it like that. So once you get to the crown you're just gon na go straight down. Instead of you know horizontally down the head, you're gon na go well this just a lot horizontally down there, but you're just gon na go back all the way down on this front, section you're going down on the sides and the back you're gon na go down This way, okay and we're only gon na go about halfway down the head, not even halfway we're just gon na fill up the crown and that's it all down the side, and then in the crown I went about Oh about two halfway down on the head. Okay, so you know what that process about 30 minutes and then we're gon na wear, so we got it all rinsed out, and this is our color that we ended up with. You can see all the highlights in there the two colors I went ahead and washed with my chi keratin. Oh that's the conditioner and in the shampoo. So I'm gon na go ahead and spray some of the Chi keratin leave-in conditioner, all throughout the hair. Okay brush. It on through see all your colors in there, so I'm go ahead and dry it. So you can see the final result yeah. So this is the wig after its dried and everything, and as you can see, that highlights would look really nice. Let me part it so you can see what where they all are. Okay, so you can see your brows and you can see your blonde blonde licked. It really really good, so I'm so pleased and the hair still feels really really healthy and shiny and no breakage or anything like that. So I'd say the hair was in pretty good condition before we started. So it's still in really good shape, which I'm very pleased with, but the lightener that we used was ammonia free. So that has a lot to do with it. If you were to get likes a basic white or something like that from Sally's, it's a little more harsh and it's a it's a lot more damaging to the hair. So you just want to be careful that you're using a light nur, that's not gon na release. You know strip all the integrity out of the hair, but it still lifts. You know the way that you want it to which this one does. So I really love this product. Again it was the Red King blonde. I think, okay, so I haven't shaped this wig. Yet so it's still the original length which it's a 12 inch, so there's no layers than it yet so I'm gon na go ahead and layer it a little bit give us some shape a little bit of a you know thing and things like that. So I'm gon na go ahead and credit um with like a side. You know kind of was okay, so for this section we're gon na do that about this section for the bang, okay, and since I wanted to swoop this way, I'm gon na pull it actually to the opposite sky figure out where you want your length to be Where you want it to start which I'm going to start about right there, so I'm gon na take my scissors. This is the angle, we're gon na just slice it down. Okay and that's gon na give you the angle that goes in this direction: okay and then for the side, face frame, we're gon na basically do the same thing, but on the opposite side, so you're gon na pull it across hold it like this. At this angle, cut it down and you're kind of sliding your scissor down, because you don't really want a blunt line, even though we're gon na go back and texturize that line out anyways okay, so it gives you a perfect face frame every time. If you do it like that, with an angle, okay and then I'm gon na put the rest of my layers in so I'm gon na pull it out. This way straight out, well not straight out but like at a 45 degree, angle, okay and then trim and then use the hair that you already cut, as your guy can just follow that okay. So then, once you have your layers cut all the way around then you're gon na go to the top pull out like a rectangle section on the top, all the way from the crown and you're just gon na meet all the hair up at the top and Make sure that that's cut across even on the top okay, so we're going to take about that much off and I'm kind of point cutting it, because I don't want a blunt line. I want it to blend the motion. I'M doing be very careful when you do this, you guys, because you can chop your finger okay, so you got your layers all throughout and what I'm gon na do next is: if you guys have thinning chairs, these are thinning shades. So one side is hey baby. One side is like a comb and then the other side is a blade. Okay and you just take your ends and you just cut them with the tinctures and that's gon na give you a more wispy. You know edge instead of like straight blunt edges. Okay, I mean it just looks like a lot more blended together, so you're not seeing lines in your haircut, okay, okay! So now we're gon na curl it okay! So first section I'm going to do well. First of all, I'm using my Helen of Troy, one and a half inch iron, okay and for the bank piece we're gon na kind of pull it over directives this way and I'm gon na roll it like that. Okay and I'm gon na roll all my curls going back. Okay, we're gon na. Let that set don't touch! It don't run your fingers to your curls until they're cool cuz, that's what's gon na make them last, and I like to start at the base of the car and then just feed the hair through the iron leaving your ends to go through last, because that's what's Gon na help them not get singed. Okay, if you got one side done so we're gon na do the same thing on the other side. Okay, so once you have all your curls in and they're cooled down, then you just go ahead and just finger style. It just run your fingers through and kind of separate the curl. That'S gon na give you a nice big, wavy, curly, look! Okay, that's not it! You can see our highlights really a lot better. Once you curl the hair cuz, it kind of separates the hair, and you can see all the dimension and all the different colors that we put through there came out really really nice. This is a really nice subtle. You know way to do color and just add a little bit of a pop to your color. If you're, tired of just the one solid you know, brown or natural black, whatever your hair is or whatever your wig is. If you wanted to add a little bit of you know a little something-something to it um, but I'm probably gon na add a little bit more blond to it, because I want it to be just a little brighter and just a little bit more dramatic. So I'm gon na probably just highlight it again and just so it's a little bit more bright, but this actually looks really pretty for people that I like a little bit more of a subtle look. You know, okay, so thanks you guys so much for watching


Comments
Cassandra Henderson Gadson: Awesome tutorial! You're technique is perfect!! You really know your stuff!! Just what I was looking for! Thanks so much!
razgirl67: Applause, applause, applause. You are VERY good at what you do. It looks amazing. Love it! Thanks for sharing. You rock!!
Galynne Duly: Well it turned out beautifully! Thank you for your response. I have two more questions (hope you don't mind). Since I will be coloring/lifting this myself, would I still need to ask them to bleach the knots? Also, when measuring temple to temple, should I measure at the actual indent, below the brow, or where the hair comes out above the brow? I see youtube videos doing both, so I just want to make sure :) Thanks!
Galynne Duly: Great video!!! As I was watching, I was thinking, she HAS to be a hairstylist, she's slaying those highlights! Read the comments and there ya have it, you ARE! Do you have any suggestions on how to bring up a natural Mongolian (which seems to be about a level 4) to my natural which is like a 7 neutral? I am not sure how to protect the lace and what color brand I should use to do this. Thanks!!!
Danielle Frazier: This looks great, I'm excited to try it.
Terri Sargent: How did you keep the color from running into your lace...I love it, you did such a great job for me as a newbie trying to get where you're at, thanks so much.
Mrs. R: Great job girl it looks fabulous.
Lori Smith: Thanks for the tutorial. Your very good. This was very helpful.
Talaia Smith: love it! i am so happy to find another real hairstylist on here i thought i was alone lol!
thejazziediva: thanks---helped me a lot!!
EMoniee' Lock: "Love It!!!" Great Job!!! :)
Sunshyne Smith: I am new to the whole YouTube thing I have another page where I do videos and I'm not really promoting because Im not sure if I have the time to put into because I have younger children. But I love to watch and learn from others on here and you are one of them thanks for putting out videos!
Riki Marione: Awesome video I am gonna try it too Many many greats on your child ♥♥♥
Vernessa Whidbee: I love the highlights
Stephanie DeGange: you are so talented and a genius
Rose Adams: Awesome video....I really need help I have natural black=1b front lace Brazilian unprocessed human hair wig. I am senior with about 30-35% grey in my hair and want wig to look the same as my hair. Any assistance will be appreciated on how to bleach my wig in lightly streaked areas all over to be grey. I've seen several videos that began with bleaching to light platiunum blonde which is close to silver or grey color.
Vernessa Whidbee: I cannot find the Redken developer in 30 vol. Will it make a difference if I use a different brand?
Cath Chen: You're so pretty.