Grwm | Uk Girl Makeup Black Girl, Fluffy/Soap Brows, How To Side Swoop With Frontal, Outfit Details
- Posted on 05 March, 2022
- Full Lace Wig
- By Anonymous
Hey my loves, thank you so much for clicking on this video. Today i'm sharing 3 IN 1 GRWM, UK GIRL MAKE UP TUTORIAL, SOAP BROW TUTORIAL WITHOUT USING SOAP, HOW TO DO A SLEEK SIDE SWOOP WITH FRONTAL WIG. If you enjoy this video, please be sure to subscribe and check out my other videos. Thank you.
#roadto1k #soapbrowtutorial #3in1grwm #ukgirlmakeuptutorial #everydaymakeupforwoc
Music by Youngbodzy - Mixed Feelings (feat. Vkillz) - https://thmatc.co/?l=2EB4610D
Music by Liles Music - Daydream - https://thmatc.co/?l=D51AFBD8
Music by Tiana Kocher - Back It Up - https://thmatc.co/?l=0DB53B25
Music by Tiana Kocher - Westside - https://thmatc.co/?l=1C45AB12
Music by Youngbodzy - In My Feelings - https://thmatc.co/?l=7867D4F5
WATCH MY OTHER VIDEOS
- TOP THINGS TO DO IN JAMAICA
- APARTMENT HUNTING IN KINGSTON, JAMAICA
- I GOT A BRAZILIAN WAX FOR THE FIRST TIME
- HUGE SHEIN TRY ON HAUL
F U N M I W I L L I A M S
My name is Funmi Williams and I am a jamaica based Nigerian youtuber. I make videos on anything and everything (lifestyle, fashion, beauty, challenges, advice, pranks, banter, etc)
I hope you enjoy my channel and be sure to SUBSCRIBE, LIKE, SHARE and leave your suggestions in the comment section.
Welcome to the family
ABOUT ME
NAME- FUNMILAYO WILLIAMS-IDAHAGBON
AGE- 24
OCCUPATION- MEDICAL DOCTOR
BIRTHDAY- MAY 14TH
FILMING GEAR- IPHONE 12 PRO MAX
EDITING SOFTWARE- IMOVIE
FOLLOW ME ON SOCIAL MEDIA
IG- THEFUNMIWILLIAMS
https://www.instagram.com/thefunmiwill...
KEYWORDS
uk black girl makeup,uk girl makeup tutorial,uk girl makeup tutorial drugstore,uk girls makeup,black girl makeup,uk girl makeup tutorial black,uk makeup,uk black girl,uk girl makeup tutorial dark skin,brown girl makeup tutorial uk,makeup,uk girl makeup,makeup tutorial,uk girls,trying uk girl makeup,uk brown girl makeup,uk girl black makeup,dark skin uk girl makeup,dark skin makeup,black uk girls makeup,uk black girl makeup tutorial,soap brows,soap brow tutorial,brow tutorial,eyebrow tutorial,soap brow,soap brows tutorial,tutorial,how to do soap brows,makeup tutorial,brow soap,how to soap brows,natural eyebrow tutorial,brows,natural brows,soap brows without soap,fluffy brow tutorial,natural brow tutorial,soap eyebrows,brow freeze tutorial,brow soap tutorial,soap brows makeup tutorial,brow soap diy,celebrity eye brow soap tutorial,soap brows for thin brows,brow tutorial,bushy brows,bushy brow,eyebrow tutorial,tutorial,bushy brow tutorial,brows,makeup tutorial,bushy eyebrow tutorial,easy brow tutorial,bushy brows tutorial,natural eyebrow tutorial,natural bushy brows (no soap) tutorial,bushy,natural brows,eyebrow tutorial for beginners,bushy eyebrows,fluffy brow tutorial,soap brows,brow routine,easy fluffy brow tutorial,natural brow tutorial,natural bushy brow,laminated brow tutorial,side swoop,sleek ponytail,swoop ponytail,side swoop ponytail,side swoop sleek ponytail,sleek,swoop,side part,low side swoop,side swoop hair,swoop bun,swoop bang,how to do a side swoop,side part ponytail,mid sleek ponytail with a swoop,low sleek ponytail,low swoop bun,braided swoop,sleek look,sleek edges,sleek ponytail tutorial,sleek ponytail with weave,sleek bun,swoop bang hairstyles,sleek hair,sleek pony,mid sleek ponytail,sleek side swoop wig,side swoop,sleek side swoop frontal,lace frontal wig,side swoop bang,sleek side swoop tutorial,side swoop bang wig,sleek side swoop lacefrontal wig,side swoop with wig,lace front wig,how to do sleek side swoop on a wig,frontal wig,side swoop frontal,sleek side swoop,lace frontal,how to do a side swoop bang on a lace front wig,side swoop wig,long sleek frontal wig,wig install,lace frontal wig install,deep side part frontal wig,boohoo try on haul,boohoo haul,try on haul,huge boohoo try on haul,boohoo,boohoo try on haul 2021,boohoo haul 2021,zara try on haul,boohoo try on,try on haul boohoo,huge boohoo haul,try on boohoo haul,try on haul 2021,haul boohoo,haul,boohoo haul 2022,new in boohoo haul,boohoo spring haul,try on clothing haul,huge try on haul 2021,clothing haul,2021 boohoo try on haul,cozy boohoo try on haul,boohoo uk try on haul,new in boohoo try on haul,makeup tutorial,makeup,revolution eye bright concealer,bright under eye makeup tutorial,makeup revolution,makeup revolution bright under eye concealer,makeup revolution eye bright under eye corrector,eye bright under eye corrector makeup revolution,eye makeup,eye makeup tutorial,bright under eye,revolution eye bright illuminating under eye concealer,under eye makeup tips,bright under eye powder,bright under eye tiktok,brighten under eye
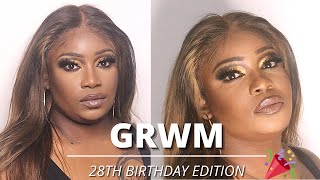
Hi guys welcome and welcome back to my channel in today's video i'm going to be doing a three one here. Reading me, i'm going to be showing you guys how i achieve my makeup. Look, i slayed my hair and my outfit of your day. So if you're interested in seeing how i got to look like this, please keep watching and of course, if you haven't subscribed, please subscribe before we go on into the video hey y'all. So let's go straight into this makeup tutorial. So, first up i'm using a brow brush or you could use a spoolie to brush up brow hairs and then i'm going in with my butter bee glue gel black one to also brush off my hair. You want to do this upward so that the hair is kind of spun and then, after that, you let the air dry or you can use the blow dryer, it doesn't really matter and then i'm going in with my brow pencil. This is the baby brow pencil. I got it from nigeria and i'm just going to be using that to outline my brows. You want really light strokes because you don't want it to look harsh because we're going for a very natural, bushy and soaked brow look, but we're not going to be using soap today. Next, you want to go in with that same brush and just blend it out to make sure it looks uniform and blended, and then i'm wearing my early girl pro concealer in shade toffee. I believe to outline my brows. I don't like to land the front part of my brows because it gives me a more natural look, also and not lining top of my brows for a more natural look. I pretty much go with the natural shape of my brows, but this is the point where you can literally give your brow any shape that you desire. So it really is up to you. So this is a very unnecessary step to be honest, but i decided to blend out concealer on my eyelids my blending sponge, but you guys will see later on why i feel like this was very unnecessary. Then i'm going to be going in with my amazing setting powder the shades on the screen and i'm going to be setting that as well for primer. I use the baby's skin mattifying primer and i use that all over my face, concentrating on the areas that get most oily and then i'm going with my maybelline fit me foundation in the shade 368.. I try not to use as much foundation because i don't actually look cakey or just look like. I have too much product on my face at the end of my makeup routine. So you just want to apply that and then blend it over. So you guys can see, i am actually applying foundation on my eyelid after i already put on the concealer and blended it, which is why i said it was unnecessary. What is let's keep it pushing? The next step is to use your concealer, i'm using the elf concealer. I believe the shade was just showing on the screen and you want to apply that in those exact areas where i'm applying that, like the inner corner of your eyes and outer corner of your eyes and then the usual spots that you would highlight your chin, your Nose and all of that, so you want your concealer to dry up a little bit before you start blending it out, which is why i am now counter contouring with my maybelline powder, just to give it some time this elf concealer actually dries up pretty fast. So you want to blend it out quickly actually took too long, so it was pretty hard to blend it out, but i still made it work eventually, when you're blending out your concealer, you want to blend it out in the exact spots where you put it on Meaning that you don't want to spread it out further, if that makes sense ringing up the show on the loo mana killing up, they should let them know mana cooking up the floor, so you're definitely gon na look crazy doing this, but you just have to trust The process i know it looks like i look very blended, but trust the process guys. So i'm going back in with my other girl pro concealer in the shade toffee. You want to use something really light, but this is really the lightest concealer that i have and i'm going with my under eye area again, because we're going for like a really bright under eye. Uk girl makeup look and you want to leave that to get a bit tacky and then you blend out again. So i decided last minute to conceal the top of my lid area, which is what i'm doing i'm using the same ergo pro concealer in shade. I'M just pretty much blending out my concealer without spreading it further on my face, and next i'm going to be setting all the areas that i have had concealer on with my maybelline setting powder, which i used previously, and you want to press all that into your Skin, as opposed to baking, i like the way, i'm feeling can't touch this feeling for my contour, i'm using the warrior palette by juvia's face you can see. I already have a natural contour line, but i still like to go in with something deeper. I'M using this brown shade um. I really don't know what it's called, but yeah, i'm just putting that on, and i'm also going to be using that for my nose contour, you want to draw the contour, but you don't want it to look too harsh and if it looks too harsh, then definitely Be prepared to blend right here. I really don't remember what i used for eyeshadow and disney, but i believe it was the same palette and i just went in with some brown orange shades a little bit of red, probably - and i just blended that all over my eyelid, you really don't want anything Crazy for your eyeshadow, you want to go very natural and minimal, which is what i did and then you want to blend your contour into your eyeshadow and towards your eyebrows. If that makes sense. So please watch closely and just try to understand what i ivy to set my contour, i'm going with my black radiance powder in the shade every now and then and you just want to um use that to blend out your contour and make sure it doesn't really. Look much, i can't touch this next. You want to blend out your counter. Contour remember. We have started the setting powder, so you want to blend that out to prevent any harsh lines, try to blend them into each other, so it doesn't really look like you. Have a line on your face for blush, i'm going in with the festival by julia's place and i'm using a combination of the orange shade and the pink shade. And you want to apply that onto your cheekbone area and then blend upwards towards the top of your brows. You don't want to blend downwards clean that then for my liner, i'm using this random black eye pencil that i got from beauty supply store and i'm just using that to draw a liner, as i would with a liquid liner and then i'm going to be going In with a black eyeshadow just to smoke that out, so it doesn't look too harsh. Does that make sense? I really hope that i was able to show it properly in this video for mascara, i'm going with my maybe mascara, and i really like this mascara because it definitely does add a lot of volume and lengthens your natural lashes. So i'm going back to set my under eye area with my maybelline setting powder. Ideally, you want to use something really light a white powder if you have to, but this is the lightest powder that i have so you just want to set it again because, like i said we're going for like a really bright under eye, and next i'm going In with this 3d make lashes that i got from the beauty supply, i'm so sorry, i couldn't show that on camera i really haven't reached that level yet and then i'm lining my waterline with the same random black eye pen so that i go from the so I really wanted my brows to look even more natural, so i decided to set it with my setting powder. This just gives it like an airbrushed, very light. Look and now to bring your look together. You want to blend out all the harsh lines, but keep in mind that you don't want to blend out the bright areas too much because you want them to stay bright. They just blend out any lines that might look hard so that your makeup look starts to come together. I'M lining my lips with my davies, brow pencil that i got from nigeria again, nothing serious! I really go for a very natural lip look all the time and i believe i was setting my under eye durian game. So i'm setting my face with my elf setting spray. I don't remember the name, but this is not the original bottle that i came in. I just put it in this bottle because it was easier to use and then i'm going in with my elf lip palette and using a very light shade of pink i'm blending that out with my um lip liner. So i'm highlighting my face with this. I'Ve used the maybelline highlighter trust me. It looks very ratchet because it has really been through a lot, but that just goes to show how good it is. So i'm putting that in the regular areas that you would highlight and then i'm gon na blend that out eventually. So those of you that know me know me: i'm such a lipgloss girl, i'm going in with the most affordable and the best lip gloss out there in the market is absolutely plus. It'S amazing all right. Ladies, it's time to get this hair slayed, i'm really not a professional! Please little disclaimer, i'm really just bringing it! It'S pretty much a trial and error process. For me, i'm putting my got to be glued gel the black one on the perimeter of my hairline and i'm going to be wearing this wig that i go from fabsi hair. I really like it. I'M just brushing it out and then i'm just going to throw it on so i had to get some help from you because i didn't have a mirror in front of me and it was getting too crazy. So you just want to try and lay your frontal wig, as you would any wig, and then you want to have these deep sea parts on your hair and then we're pretty much trying to do my edges and try and blend out the lace to make it Look as natural as possible, just the regular smegola stuff that you do any week so now, moving on to the side swoop, you want to brush out the hair, make sure it's as flat and smooth as possible, and then you want to apply oil or gel anything To just make you flat pretty much, and then you soak that across your face to the back of your ear and then you want to go in with some bobby pins to hold that in place. Please watch to understand better, so i went on and applied some mousse on the side soup area. I really hope that you guys have followed so far. If you would like a more detailed tutorial of this hair style, then please, let me know down in the comment section. Is i
Comments
Just Nella: Love the look
Omodolupohope: Your makeup came out so good babes You are so pretty ❤️
Didi umoren: Love the makeup look
Omodolupohope: The maybeline mascara is actually so nicee Just recently got it too
Omodolupohope: Enjoyed this video babes ❤️
Jacqueline Xoxo: Flawless, Makeup is on point!
Cristobal Dicdican: Hellow my dear friends I'm here to watch your channel how to be you my dear friend