Beauty Forever Hair Review | Blonde Patch Wig Tutorial | Ft Beautyforeverhair
- Posted on 06 January, 2021
- Full Lace Wig
- By Anonymous
Hey #ReesieGang ✌
Hey Babes, Happy Holidays. I’m trying to get back into the swing of things during this holiday season! I hope you guys are staying safe.
22,000 Hugs from me to you !
xoxo,
Love Reesie
☛Get Extra $10 Off Use Special Code:beautyytb
●▬▬▬▬▬ ❤ #BeautyForeverHair ❤ ▬▬▬▬▬●
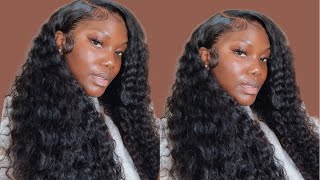
I’m Using Lace Front Body Wig 22”:http://bit.ly/3rPrI4E
https://www.beautyforever.com/ ➤ 13*4 Lace Wigs:http://bit.ly/2Mn5G94
Body 3Bundles&Closure:http://bit.ly/2MkSVfd
T Part Body 3Bundles&Closure:http://bit.ly/3ofXMwg
❤Lace Part Wigs:http://bit.ly/3pOwxJU
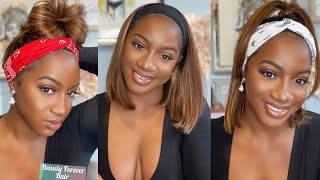
❤Headband Wigs:http://bit.ly/3b6v512
❤Bundles&Closure:http://bit.ly/2JHOQ3Z
Aliexpress Beauty Forever Website:http://bit.ly/356H4Z0
Hot Sale hair on Aliexpress Store:http://bit.ly/3rQ10Zz
Amazon Beauty Forever Hair: https://amzn.to/2KSGkyB
Instagram@beautyforeverhair: http://bit.ly/IGBeautyForever
Beauty Forever YouTube Channel:https://bit.ly/34a1Y8Y
♡ T I M E S T A M P S ♡
Intro: 0:00 - 1:12
Wig Review: 1:13 - 5:14
Coloring Tutorial Round 1: 5:15 - 9:13
Coloring Tutorial Round 2: 9:13- 12:51
Coloring Tutorial Round 3: 12:51- 15:56
Wig Application: 15:56 - 20:05
Outro: 20:05 - 20:32
~~~~~~~~~~~~~~~~~~~~~~~~~~~
♡ W I G S P E C S ♡
Company: BeautyForever
Color : Natural
Length: 22 Inches
Cap Size: 21.5 (small)
Wig Type: 13x4 Lace Front
Density: 150%
Adjustable Straps and Combs
Link to Hair: https://www.beautyforever.com/beautyfo...
Link to Website: https://www.beautyforever.com
♡ H A I R P R O D U C T S ♡
➝ Clairol Bw2 : https://amzn.to/3dVwkzT
➝ 40 Creme Developer: https://amzn.to/31qJoI6
➝ Purple Conditioner : https://amzn.to/3dJNK21
➝ Silicon Treatment : https://amzn.to/2HlQJBY
➝ Foil
➝ Got2B Glue Freeze Spray : https://amzn.to/31CdpVK
➝ Make up Wipes
➝ Jazzing Semi Permanent Hair Color (Blue Black) : https://amzn.to/3mmosdD
➝ Root Touch up Brush
➝ Just 4 Kids Conditioning Shampoo
➝ CHI Silk Infusion : https://amzn.to/3jX0lQW
➝ CHI Hair Spray: https://amzn.to/364nUCs
➝ 5 in 1 Curling Iron Set : https://amzn.to/3ekDoWV
➝ Hair Wax Stick
➝ Silk Hair Serum
➝ Black Hair Spray
➝ Concealer
➝ Wide Tooth Comb
DETAILED WIG APPLICATION VIDEO ⤸
~~~~~~~~~~~~~~~~~~~~~~~~~~
VIDEO’S TO WATCH NEXT⤸
➟CHECK OUT MY WIG REVIEW PLAYLIST
https://youtube.com/playlist?list=PLZ9...
~~~~~~~~~~~~~~~~~~~
♡ MY AMAZON STORE ♡
https://www.amazon.com/shop/lovereesie... ↵
**this helps support the channel
~~~~~~~~~~~~~~~~~~~
✚ W E B S I T E & S O C I A L S ✚
https://taplink.cc/lovereesie ↵
^^^^^^^^^^^^^^^^^^^^^
Want your own Tap Link Profile? Check Them Out
https://taplink.at/invite/4387.4793/ ↵
~~~~~~~~~~~~~~~~~~~
B U S I N E S S I N Q U I R I E S
Contact Management
~~~~~~~~~~~~~~~~~~~~
*some of these are affiliate links
( I get paid a small commission if you purchase anything through some of these links)
Beauty Forever Hair Review | Blonde Patch Wig Tutorial #BrownGirlBlondePatch #blondepatch #lacefront #howtocurlhair #BodyWave #BeautyForever #Review #hair #beauty #hairreview #Update #lacefrontal #wig #bundles
Meditating and taking time away hey you guys welcome back to my channel. If you don't know who i am, my name is risi. This is my beauty channel where we come to sleigh, especially on a budget and if you're new, don't forget to hit that red button down below. Turning on your post notifications and hashtagging reese gank down in the comments below and if you're og welcome back babe, i have another hair review: slash tutorial, happy holidays by the way everybody it's a new year. Hope you guys wrote down all your goals, manifest everything you want to work hard for it as well. We are on a goal to 50k y'all, so help assistant out and start sharing everything all these videos. You know help us this out anyways. So i have a new hairdo hair video review. If you guys are interested in how i styled this wig and how i feel about the quality of the wig, then stay tuned, bye, lisa. Do you think you overdid it with our hair? No, i sure, don't cause we're going to beverly hills now. If i'm gon na do good at that audition, we got to look like stars all right. You guys! You are here for a hair review, slash tutorial, so i'm going to do the hair review first and then the tutorial so time stamps will be down in the description below if you're interested in skipping around, but this hair is by beauty forever. Yes, beauty forever! Thank you so much beauty forever. I am working with them um. They sent me this beautiful wig, i'm so hyped, because i really wanted to try this style in beauty forever. You came through so i appreciate them. They always have beautiful packaging. It came with a 22 inch wig, so they gave me a wig cap. They gave they always add a little jewelry or something that is dealing with any of the season that you buy the wig. So of course, it's christmas! That'S why this box is. You know a little festive and they also gave me a bomb head wrap, which i definitely used in this video as well, so shout out to beauty forever. They sent me a 13x4 lace wig, it's 22 inches, it's 150 density. It is virgin hair. So it is a body wave wig, they don't state what type of hair it is, but i know for sure this is a transparent lace wig. So if you guys are interested in wearing wigs make sure you always get the transparent hd anything in those lines. The cap size is 21.5 inches. My overall opinion i'll have all the rest of the um description down below. If i'm missing anything adjustable, straps combs had all of that transparent lace. All that anyways. My overall opinion is the cap. Size is very, very small. I did have to cut almost into the wig just for it to hit fit. My ears so definitely see if you can contact beauty forever for a better sizing of the wig. If you have a bigger head um, but that's the oh. That was my overall con about this wig, which is definitely fixable. If you communicate with the company the hair it took color. Well, obviously, i added this blonde patch. The quality of this hair is beautiful. I know it's going to last me months. Um yeah! It'S going to last me months. I blended the wig. It was easy to blend. I did have to bleach the knots twice. I might have to bleach them one more time, because the knots were a little thicker than usual, but it still looks like you can't see. My lace, you can't see my lace at all, so i did my job um. That'S all! I really have. I really love beauty forever. I love working with with them just showing you guys different hairstyles that i could do and that i want to try out. If you have any other hairstyles that you would like for me to try out definitely dm me some pictures or whatever follow me on pinterest, i am curating different boards of little styles of my um. You know loft, hair fashion, all that on my pinterest right now. So i have that link down below too so. Yes, i got inspiration from this pinterest video and it didn't even show like it even showed her whole head. It only showed like part of her head, which you can't really see, but i was still able to achieve the same thing that i saw on pinterest. So if you guys are ever like wondering where to get ideas, pinterest is the way to go and following risky on there is the way to go to all right. You guys. So that's basically it. I don't have anything else to say about beauty forever, hair. I'M going to transfer you to the next slide, where i am going to explain how i achieved this hair, so yeah bye, all right, y'all we about to get right into it. This is very, very detailed, video. So take some notes. You know all that. So, first off we are going to apply our wig first and then part your hair. However, you like this time, i'm doing a side part. I always do middle parts, but what i saw on pinterest. She had a side part, so we're gon na do a deep, deep side part. So i try to go as deep as possible once i got the part, i'm going to just part, maybe a half an inch. I want to say of the frontal, as you can see, we're going to create a nice little rectangle make it sharp make it precise, because this is where we're going to bleach the whole thing. So just you know braid that up put that on the side and we're gon na get right into it. So get your wig head, get a plastic bag, something to protect your wig head, pin down your wig, we're going to get some bw2 and some 40 volume developer. This is all the bleach i use. I don't use any other volume developer. I just use this one because i did not feel like going back to the store, so this is just you know the unprofessional way y'all, but it still came out how i liked so yeah. I hope y'all still with me, because this is just the beginning: y'all. Okay, get that got to be blue blast, free spray and spray, the hair spray, the frontal, but not the parted spot that we did. This is going to help protect your wig from over bleaching, even though you will see i did over bleach, and i will show you how i fix that, but definitely do more rounds that i did get your foil ready, prep everything before getting into it. I'M using plastic ziploc bags because i didn't have any gloves like i said: i'm not going back to the store for nothing, i'm using what i have be generous with adding the bleach um. Adding the bleach on the whole thing is very optional. I am going to go back to dye the ends, not the ends, but the roots black. So if you want that just skip that step from bleaching the whole thing get some makeup makeup wipes on hand, because you will get a little messy and get some bleach on the hair that you don't want to get bleach on. So i'm just going back in there, as you can see, i'm not perfect. So definitely have those makeup wipes on hand or any alcohol wipes. If you have them, they work even better so yeah. So once you have the bleach onto the hair, just get your foil fold that up and get it out of the way make sure you clean up any spots that you have got bleach on, that you don't want bleach on and then what we're going to do Is flip that over be careful because bleach is going to get into the hair, so this process needs to be. You have to work as fast as you can on this step when bleaching the knots, so i'm using the same bleach and i'm going to go in bleach. The knots go as fast as you can, but not too fast. Take your time y'all. I speeded it up, but yeah whatever. So, as you can see, i got a lot of bleach on the hair that i don't want to get bleach on. So i'm just gon na go in with the white. Don'T worry, the whites are going to help just have that on hand. I left that in for about 15 to 20 minutes and then now i'm just rinsing the hair. That'S all i did was rinse this hair because we got multiple rounds to do y'all. I had to bleach the knots twice. I had to bleach the hair three times so get your pen and paper out. So this is round two y'all make sure you you know just get all the hair out the way. As you can see, i over bleach the frontal, so we're gon na fix that in a second, so i'm re-bleaching, the bang, bang and, as you can see, it's turning really good, but the knots are a little darker and brassy. So what we're going to do is make some more bleach and just add some bleach to the banyan. Let me stop okay, so this is some black hair dye y'all we're gon na get some black hair dye and a very small brush. This brush is made for applying dye to roots. If you don't have that you can use a toothbrush as well. So what i'm doing while the bang yang is bleaching? Let me stop saying that. Okay, while the bank is still bleaching, we are going to go into the rest of the frontal and dye the roots black, because i over diapen, as you can see, they're all brassy and orange, and that's not cute. We want it salon, quality, okay, sis salon, wallet, hey top tee; okay, so we are going in. This kills two birds with one stone. So, while your bang is bleaching, we are just going in with the black and be careful i like to part it and hang on to the hair, while i'm bleaching the frontal. So i don't get any of the black onto the frontal, because then you're gon na have to re-bleach it again, and that is just a pain. That'S a pain sis. So what i'm doing here is going to bleach the roots and then or not bleach the roots, dye, the roots black and then imma flip this wig over and bleach the knots again, because you can't see it on the camera, but i can see it in real Life, the knots were still black and big. That'S one thing about this frontal is, is very big black knots and we don't like that. We want it to be seamless, looking like scalp, okay, so i'ma stop talking and let you watch this you guys. This is the second round of me bleaching, the knots on my frontal. You do not have to do this step because, honestly, i'm just a very perfectionate person, so this step is just very optional about 15 minutes later, i'm showing you how it's looking the bank is. Looking bomb but the knots are a little orange as you can see, but we are going to go back and dye that black. So now, after 20 minutes we are taking our l'oreal purple conditioner this stuff is so bomb. You don't even need toner for your hair. Just soak your front tool and the bang into this stuff, and it's going to tone your wig and it's going to turn everything very grayish ashy, all that which, for black women ashy blonde, is just the best type of color you could do for any blonde. Looks so i'm taking my little hair crack silicone mix the og's know about this one. I let it soak for about 10-15 minutes. Now we are on round three y'all have patience. I am dying this hair and bleaching his hair, while it's still wet, because you know i'm a very impatient person, i'm an aries. We like to just get the job done. We don't care we're just trying to get it done. So what i'm doing right now is just getting the black dye and using my little root, touch up brush and going back in right here. I am. This is very optional, but be careful with this step honestly by you not bleaching. The whole thing you can just skip this step altogether, but me i bleached the whole thing. Thinking and she's gon na look cute all bleached, but it wasn't. The frontal was still brown or yeah. The frontal was still brown, while the bang was blonde beach blonde. So i'm going in to dye the roots black again, as you can see, i'm holding it up, so i can get more precision in bleaching or not bleaching dyeing the roots black and not the frontal part, the lace part, because if you do that, it's going to Defeat the purpose of you bleaching your knots, okay, so yeah. Now that i have the roots, the bleached i'm or died y'all these words getting confused, but, as you can see, i am bleaching the bang one more time. Three times is the magic number um. I want you guys to be careful with doing this step. I think my mistake was dying, the roots black and bleaching, the bang at the same time, because once the bleach touches the black, it will turn the hair green and it came out into this ugly, green color and to avoid this step, definitely bleach the bang one More time rinse it and then dye the roots black, but still it came out really good um. I can't complain, but that's just one thing i will do next time if i want to re-do this hairstyle. So what i'm doing is washing the banyang first, because that's the most sensitive part of the wig is very brittle and weak, so i'm taking that purple conditioner, letting it soak i'm using some children's shampoo, detangling shampoo i'll, have everything listed down in the description one through Ten of all the products that i did so this time i just got my purple shampoo and the silicone mix, get some very hot water and soak the bang in the water, because it's very dry it was shedding, and we don't like that. So do that. This step to bring back moisture let it condition all the way for about an hour, and now, let's go on to the next day. Y'All already have the wig applied. If you want to see a detailed video on how i apply wigs i'll have that linked in the comment cards and in the description, if you're interested in the products that i'm using it will be in the description as well, because i am speeding this step up. So i'm going to take my wax stick and a hot comb, and i'm just going to lay my frontal as flat as i can just to get rid of any bumps and just to make it look like it's. I came out of a salon. I'M going to take my she products, i did use the serum and the she hairspray to create those these curls. This hair that i got from beauty forever is very silky and very like indian. I want to say this is an indian because it doesn't take. It does take curls, but it's very, very silky, so the curls do fall, but i'm not really tripping about that over time. The curls are gon na hold. But when it's fresh, like that, the curls do follow a little bit so maybe use a smaller curling iron barrel. This is like a half an inch and then i am speeding it up, but towards the bank. I am pin curling it, which again you just wrap. The curl that you already curled get a bobby, pin or a banana clip and pin that up and just let it sit there until it cools down. I'M gon na work on my baby hairs and my makeup and then come back to you on that hair. So now i'm finished with my makeup. I got my baby hairs laid and slayed. Some people be coming for me for my baby hiss. So i didn't show it this time, but let me know if you guys want to see that i'm taking some of this serum. It'S like a pomegranate hair, silk spray i like to put it on the hot comb. This will create a very silky shiny, look like it's just you know fresh out the salon, and now i'm taking a wide tooth comb and i'm going to brush out all my curls. As you can see, the curls are falling a little bit, but don't be a lo, don't be afraid it's going to still come out very loose like i don't even know what i'm trying to say but get a eyebrow razor or any type of scissors. I like using an eyebrow razor, because i get more precise and how i want to cut my bang and, as you can see, this hair is bomb like look at me. I was so high y'all just too hype, because this hairstyle came out so bomb like. I was telling my boyfriend upstairs like look. This is a look. I know this is just people are gon na ask for this hair period, because i did that. What did i do? I did that look at how bomb this is so um. I'M basically done. This is just an extra step. I felt like my parting was a little bit too big, and i want that nice sleek, you know, instagram frontal, sharp heart type of look, so what i'm doing is getting some black hairspray and a rat tail comb. Be careful with this step, because if you do mess up, you cannot go back. You cannot go back sis, so i'm being very careful and i'm trying to make my part as sharp as possible and then after i do that. I'M gon na go in with some concealer and conceal that part make it sharp and precise and just bomb. Because you know i'm a perfectionist and that's basically it thank you so much beauty forever for sending me this wig. So i could try out this hairstyle um comment down below. If you liked it or anything else so yeah all right, you guys that's, basically it that's all i have for you, don't forget to like comment and subscribe happy new year. I miss you guys so much. I know i've been, you know, lagging with my youtube videos, but i'm coming back strong stronger than ever. Okay, that's! Basically it y'all

Comments
its_lelaaas: You did the damn thing ! I love the way it came out and I think your baby hairs have been coming out bomb ♀️
Life with Malikah: I love this! I want to get a 5 x 5 blonde closure and do this. Great Job!
Breion716: You did a great job bleaching. This wig looks great on you.
Donni Blahh: AWESOME job Sis! Don't think I would have been that brave to keep putting bleach on my hair. Oxford minute this weekend with a volume developer I went to Sally's today and got a 32oz 40. Thanks so much for sharing.
Kira: I love this, it looks so good. I was gonna get a warm blonde wig for the fall but i think im try this instead
Shania Campbell: Once I heard “I’m an Aries” *Subscribed* ♈️
Lauren Monty: Definitely want to try this one day! so pretty on you
Nizzy Mac: This is so cute I’m surprised the hair lifted to that color that’s so pretty!
a c: The "how to" tutorial starts @ 6:00 you're welcome
Liyahh xoxo: At this point your just talented‼️ this hair and color looks so good on you
PYGGJR: You did that ‼️‼️‼️ I’m bouta do this for thanksgiving ‼️ Wish me luck
AKCJ: This looks great on you!
TajaJayy: SOOOO PRETTYYY
KellyJelly9976: I like the blonde patch. Pretty
Lakea Brown: Omg love the hair!
OG Parley: Love this look! .. what camera do you use to film?
Trevor: I don't usually do this but LAAAAAAAWWWWWD.... girl u are Gorgeous stay humble n we gonna b good
april G: Really pretty that look amazing on You #Reesiegang
Capn: Lmfao the focusing from the camera made my eyes cross haha. BUT GOOD VIDEO I’ve been waiting for someone to make a video like this
iamqueen.: Beautiful
brrklynx cx: i would pay you bills to do this for me
Nate Lowe: Looking like Rogue
Anniston Adkins: SHE'S JUST GORGEOUS!!!!!
Style x Felicia: The side part
miaa: YOUR SMILEE
In1stPlace: I cant find you on pinterest for some reason, can you drop the link?
Shante Lumpkin: I done turn it green lol
Tony Rosa:
jermaine lindo: 2 colors contours girls