How To: Make A Lace Wig W| Closure (Using Old Hair) Feat. Niorehair.Com
- Posted on 16 May, 2017
- Full Lace Wig
- By Anonymous
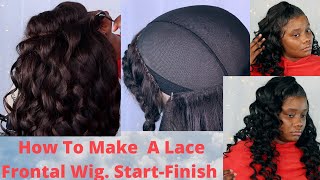
Hey Babes! Here's a video showing you how I turned this old hair (from a previous sew in) into a full lace wig. I used 1 4x4 closure and 2 bundles of hair for this wig.
M A T E R I A L S:
*HAIR 1 CLOSURE + 2 BUNDLES OF VICTORIA COLLECTION FROM NIOREHAIR.COM http://www.niorehair.com
USE CODE: ALANNAFOXX FOR $$ OFF
*WIG CANVAS HEAD http://amzn.to/2qtRBb6
*WIG HEAD STAND http://amzn.to/2rdsWKv
*CURVED NEEDLE & NYLON THREAD (LOCAL BEAUTY SUPPLY STORE)
*TPINS http://amzn.to/2qOUYfv
*SPANDEX DOME CAP http://amzn.to/2pU3bdI
YES. I MAKE WIGS FOR A LIVING! IF YOU DO NOT WANT TO BOTHER WITH MAKING YOUR OWN WIG PLEASE SHOOT ME AN EMAIL AT [email protected] AND I WILL GIVE YOU ALL THE INFO ON HOW TO ORDER WITH ME.
✨✨✨✨✨✨✨✨✨✨
Please Give This Video A BIG THUMBS UP if you liked it =)
✨✨✨✨✨✨✨✨✨✨
S U B S C R I B E (for more videos!): http://bit.ly/1EMFhl6
✨✨✨✨✨✨✨✨✨✨
P R E V I O U S V I D E O S
HOW TO CUSTOMIZE LACE FRONTAL
HOW TO: Apply Lace Wigs & Braiding Patterns
How I Style My Lace Wigs
How I Wash My Lace Wigs
Summer Fashion Lookbook
Affordable Wig Lookbook
My Flawless Glowing Foundation Routine
Foundation 101: EVERYTHING YOU NEED TO KNOW
EYEBROW TUTORIAL: 3 DIFF Ways To Get Perfect Brows
✨✨✨✨✨✨✨✨✨✨
S O C I A L M E D I A
INSTAGRAM: https://www.instagram.com/alannafoxx/
SNAP CHAT: @LANNAFOXX
FACEBOOK: http://on.fb.me/1JNQSUD
BLOG: http://bit.ly/1L7PT2y
✨✨✨✨✨✨✨✨✨✨
C O D E S
Cache Appeal- http://www.cacheappeal.com
Get 20% off with code "ALANNAFOXX"
FAVORITE Hair extensions:
NIORE Hair Extensions- http://bit.ly/2eidQsS
Get $$ off with the code "ALANNA"
✨✨✨✨✨✨✨✨✨✨
S A V E M O N E Y & S H O P P I N G !!
I LOVE EBates! Get instant cash back by shopping online:
EBates → http://bit.ly/260f7eQ
I get some of my favorite shoes from:
Shoedazzle → http://bit.ly/1oYeOj0
JustFab → http://bit.ly/260uoML
Shop luxury on a budget:
Gilt → http://gi.lt/1N8QINR
Rue Lala → http://bit.ly/1Ws7vxv
MyHabit→ http://bit.ly/1SfZ20r
Ideeli → http://gr.pn/1S7dbaX
✨✨✨✨✨✨✨✨✨✨✨✨
B U S I N E S S
NOT a sponsored video. All items purchased by me.
Hi guys welcome back to my channel so today I am showing you how to make your very own lace, wig with a closure and I'm showing you how to do it using old or recycled hair. So, of course, you're going to need a wig form of some sort, I'm using a canvas wig form that I got from amazon.com. I will have that listed down in the description box below I'm also gon na be using this spandex dome cap. This was my first love when it comes to making wigs, but you could also use the one that has the netting on it, or even the one that has a little guy on the front. Just as long as it's made, you know to fit the head nice and flat and not like a do-rag or anything like that. So now you just see me pinning down this dome cap to the head. This is just so that it doesn't go anywhere because I'm gon na go ahead and get started with sewing down the closure. Now all the hair, using this video, I will have listed on the description box below, but this is a 4 by 4 closure and when you guys are holding up a closure, you can tell that the flat side is actually supposed to be the front and the Sides that are curved are actually supposed to serve as the sides, so this hair was originally used for a sewing, and the stylist who put it in did not install it correctly. So he ended up actually cutting off the side rather than the front. But you know: hey, not. Everyone knows how to work with closures and front old, so you just to meet now pinning down the front of this closure so that it doesn't move. I'M just gon na go ahead and put all the hair up in a ponytail, because that is gon na make it so much easier for us to sew this thing down and also using a couple of pins as well, so starting on either side of the closure. You'Re, just gon na take your needle and thread and pull it nice and taut, not too tight where you create like lumps, and you closure, that's the last thing you want. You definitely want this to lay nice and flat because remember when it goes on your head, you want it to lay nice and flat, so I'm just gon na go ahead and sew down this side of the closure, and once I get to the end of this Side, I'm actually gon na stop and I'm gon na move on to the other side, and so this site, nice and taut as well. Now, once I sewed this entire side down, I'm actually going to carry the stitch all the way around to meet the end of the other side and then, of course, I'm gon na go ahead and secure and cut the thread. So once the closure is sewn down. Nice and securely I'm gon na go ahead and move on to the bundles. Like I said, this hair was used for a full install now in the beginning she did have three bundles, but I only think that this right here is about two and maybe a half. Probably to two bundles and the bottoms were pre cut by the stylist when he's sewn when he sews. When he's what what can I talk when he sewed them into her head, he went ahead and layered them, so we're gon na try to the best of our ability to get them in the same layered pattern, but that doesn't always work when you're reinstalling previous install. So sometimes you might need to cut it or trim the ends so starting at the nape of the head, pretty much we're behind the ear like right behind the ear. I'M just gon na go ahead, and so this first track down as close as possible to the edge of the bottom of the wig cap and just as you would a normal so in just go ahead and Stitch this hair to the cap, and you want to Be careful when you are sewing this down, you want to sew through the fabric and not the actual spandex strap that's inside the cap and I'm gon na take this track all the way up to where the other ear will begin. The back of the other ear, and once I get to the edge I'm gon na, go ahead and flip the track over and sew it back the exact same way that we just came you guys, let's see what I'm talking about so here, I'm just gon na Flip it pin it and start sewing now. Spacing just really depends on how many bundles you have. I would have liked to do. Normally I like to do wings with two to three full bundles census was the install. I think it was like a pretty natural install. So I believe she only needs two bundles for this, so I mean you can space it out a little bit if you're trying to fit three or four bundles on a wig. You would definitely have to so they're a lot closer, but if you're only working with like you know two bundles or you're, only gon na use like two and a half, then you definitely want to leave a little bit of space. So really I guess it all. Just depends on how natural you want the way to look, so I literally just did the same exact thing all the way around the head and now that I'm closer to the closure, I'm gon na show you guys what I do up here. So I'm gon na go ahead and cut off this excess lace around the sides of the closure, and I just do that because just in case you know the wind blows or you lay the wrong way or you know whatever. I don't want people saying that extra lace, you know, that's not really part of a closure under your tracks. It doesn't look very nice. So now I'm just doing pretty much the same technique folding the West over at the corner and just continuing to sew around. Basically, at this point, I'm just gon na go ahead and frame weft to fit around the closure. So now, when you get to the last few tracks fray around the closure, you want to sew as close as you can to that closure. You really really really want to transition from closure, two tracks to be very seamless. So that way it looks as if you know the parting is supernatural. If you leave too much space it's you know, people might be able to see it, especially if the wind blows the wrong way. You know, and if you know, if you sew on to the closure like onto the actual closure, you're, not you're parting is not gon na be able to lay as flat as possible. So it is really important when sewing around to your closure, just to get it literally as close as possible without like running over the border of the actual closure. So once everything is sewn down, you can go ahead and take down your closure and find your parting, and I'm just gon na go ahead and style. This wig, which you guys already know how to do because I did a video about it before I style it, though I'm gon na go ahead and cut out the excess cap from under the closure piece, and that should be so easy to cut out, because we Just kind of sewn around that so once you cut that and your wig is pretty much complete, you can definitely go ahead and add some straps, which I totally recommend or some clips to the wig here. I'M just gon na show you guys the parting a little bit this week was custom dyed black. This idea, this hair was actually custom dyed black. Of course, the closure was already customized and I'm going ahead and creating my parting for the wig, which you guys already know how to do, because I made a video on it and I will link that video up above and this is the wig completed. This wig was actually for my cousin and she really liked it. It was so hard to transition her over from sew ins to wigs, but I think after was someone that she got having the hair made into a wig and seeing how natural it looks on her. Really really really made a big difference and she sold. She definitely loves her way. I hope you guys liked this video. I hope it was very informative for you, if you guys try. It definitely tag me and your beautiful pictures hit me up. Let me know how this works out for you, if you guys have any other questions, comments or concerns feel free to leave it down below. Thank you so much for watching and until my next video bye


Comments
Zee Francois: Sis I haven't made the wig yet and I'm scared but you made this look so simple. DEFF Subscribing. Thank you.
Tricey Boo: very pretty ! ❣
Celestial Chef: You make this look so simple.
Adri Nelson: Very nice I'm still trying to get my wig lol in time tho I hope! Great video!
Ronya like Sonya: Thank you for this!!!!!
Etheralery: how long was the entire process?
_.tsholo. _: At the back, Do I start with the longest or shortest bundle ?
Monique B.: Can one use a used in good condition closure (that has bleached part, let's say in the middle) to make a closure or will it need to be new closure?
Beautyby Bry: How do you know where the spandex strap inside the cap? Are you talking about the seam? Love the video.
Jalicia Viltz: Oh yes ma'am hunnii!!!!!!
Jessica Vasquez: How do you know what size head to buy to make your wig on?
Deeworldx: That mask off beat got my silly ass not paying attention
Tyra Nicole: I need to see you tomorrow.