How To Crochet With Braiding Hair: Detailed Tutorial Kanekalon Crochet
- Posted on 29 May, 2019
- Full Lace Wig
- By Anonymous
Instagram: @seunokimi
https://www.instagram.com/seunokimi/
Hair Used:
Tasha Braiding Soft Touch Kanekalon Hair 3 and 1/3 packs
Couldn't find a direct link, sorry, but you can check here for alternatives- https://www.amazon.com/s?k=kanekalon+b...
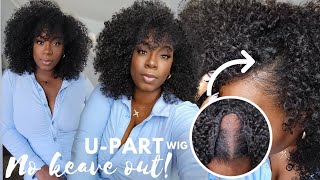
Kanekalon crochet braids with invisible part no leave out. How to make crochet with kanekalon braiding pack hair. This may also work with Marley hair. How to do crochet hairstyle on yourself. In this tutorial I use single knots and the invisible part method to achieve this style with a crochet latch hook. This is very detailed and step by step and perfect for beginners. I also show the best braiding pattern for crochet hair in this tutorial. This is a very natural looking hairstyle for black women because kanekalon braiding hair has a kinky straight texture that is ver natural looking for crochet. This style is cheap and fast and very easy to do yourself.
Hair Used:
Tasha Braiding Soft Touch Kanekalon Hair (couldn't find a direct link) 3 and 1/3 packs
Hey guys, it's Sheila today I'll be showing you guys how to do crochet with braiding hair. Let'S get right into it. The braid pattern that I'm using for this is pretty simple in the front. I'M just braiding a bunch of braids going straight back, so I started from the center and I just continue to braid braids, going straight back that were about this size, not too big, but not too small as well, and you want as you're braiding these braids. You also want to take into account where you want your parts to be. With this braiding pattern. You can choose to have multiple parts where you will be able to part your crochet here. Those parts will lay in between these braids that you are braiding now. So you want to make sure that these braids will allow you to part your hair, where you want it to be parted. So once you finish up braiding these braids in the front and just going straight back you're going to connect these braids by braiding down along both sides, starting from the middle and then once i braid it down like this right side. I just bobby pinned it in place and then braid it down the left side going down. Then originally I thought I was going to do a beehive, but a beehive is very hard to braid on yourself too, and it's hard to braid upside down. But this braiding pattern is much easier and it worked out really well as well. So all I did is like a little zigzag going back and forth starting a new braid from the top and then once I got to the bottom, I started to connect those end. Braids from earlier to this braid that I am doing here in the back, so on this side I connected the Braves from the right to this braid and then once I got over to the left, I connected the one big braid from the entire left side, so That, in the end, I was left with only one braid and then with this one braid, I just tucked it in and crocheted it through the cornrows so that it could be Cheerilee and flatly in place and yeah. That is the grading pattern. It'S pretty simple! So this hair, the hair that I'm using, is just regular pack hair that I picked up for my beauty supply story. It costs like a dollar and nine cents. Super super cheap. Just your regular Kanekalon here I'll try and find a link to this direct brand. But in case you want to get it too, but literally any pack, hair, Kanekalon hair will work for this. So now it's time to start crochet and I've grabbed a piece about this size and I'm just going to loop. It around my index finger like so and grab the latch hook, place it through my braid and then use my finger to glide the hair. In close, the latch pull it through open it up again loop it around my finger, use my finger to light it through close it no slipping, and that was just one knot. I'M gon na go ahead and do all of these was just open Lots. I'M continuing through the rest of my head using pieces of this big and these pieces are actually fairly large, so I am separating them putting quite a bit of space in between them, which made this process super super fast. Okay, I'm really really excited excited tell this. Is going to turn out really really well so now, I'm about to do my invisible part method, so I'll have a part right here and also do it in the middle. So I can wear in the middle part as well. Do the same thing of looping it around my finger so once I go up from under which is very important, you have to go from under where you want the part to be. I loop the hair strand in the same way, but now I'm only taking one piece of the hair, not all of it, just taking one half of the hair to latch and pull through. So that's that other piece, that's hanging there on the side, can fall over the knot and cover up the knots once I flip that piece over, you won't be able to see them off and at the beginning it's always going to be a little bit poofy. So I always use a bobby pin to pin it down as I'm going through my hair and after, like I'm done finishing that section and I can take the bobby pins out and it's super flat, so you don't have to worry about it being poofy. At the end, just go ahead and use a bobby pin to pin it down as you're going through, and so I continue through the rest of the part, the same exact way only pulling half of the hair through and then finishing it off and Bobby pinning it Down so we can stay flat in place. Look how natural that looks you guys, so one half is done and I'm moving through the second half in my head in the exact same way. I love using the invisible part method. We'Re here like this, because it always comes out really really nice. For this entire install. I used a total of three full packs and then a little bit from the fourth pack, so total it was like less than five dollars for everything and less than four packs is pretty good, considering how full this hair ended up being. So if you want your hair to be less full, you probably wouldn't need the full four packs either and then so, once I'm done with that part, then I can move on to the middle part, which is just right there, and I did this middle part. The exact same way I did at the site part and the key to having these parts come out really really nice and natural-looking is one make sure your braids aren't too big and also making sure that you're going up from under the braid, so that the knot Is underneath the braid and the other piece falls on top and as long as you are crocheting them close enough together, especially this type of hair in particular, makes it easy for it to come out looking nice because of the kinkiness of this texture of Kanekalon. Here I am moving throughout the rest of my head, using fairly large pieces and for each corner. Oh going straight back. I use like two or three pieces, but not a lot at all, so this whole process literally took me, like the actual crocheting part, took me under 30 minutes, which is super super fast. I was also using pieces this big because I'm going for the bigger kind of look. So that's why I'm using pieces of this big if you want a more subtle, look at the and use smaller pieces. But if you do use smaller pieces, you'll have to use slightly more to fill in those gaps. But since these pieces are big, they fill in the gaps pretty well themselves. So I didn't have to use too many pieces, and especially if you're using big pieces, you want to be very careful with not overdoing it. It'S so easy to overdo it with crochet and your hair will end up being super super poofy. And so I continue to crochet the rest of the back of my hair in the same way, the first way I showed you earlier not using the invisible part method and yeah you guys get the gist. So whenever I was done, our Swiss super excited like this texture is so so nice and it's so cheap that I just cut a few layers hair in there. If you want to go for a flatter look, you can blow this hair out. I'Ve seen some videos of people blow-drying it or straightening it here. You can see me just smiling, because I really was really feeling this hair. I personally like the way this looks with this type of fullness, so I'm leaving mine like this, as is super cheap super, affordable super fast. This was honesty, we're gon na find favorite, styles and yeah. I hope you guys found this helpful and I'll see you in the next one and you guys can also find me on Instagram, but I'm not here showing you guys my hairstyles, I'm on Instagram, constantly updating that and do the minis tutorials and things like that. So definitely check that out if you're interested and ya see in the next one

Comments
Sharon Sewell: She is so adorable! Im 65, I love to see talented young people doing their thing! We wore our braids and Afros in the 70’s and 80’s. Our culture, our creation, has come a long way since then! I am so proud!
GOoD Vibes: I think you are my new favorite. You get straight to the point. You don’t have loud irritating music. You don’t make absent minded commentary and your styles are awesome! Keep up the good work!!!!
Belinda Mc: Beautiful!! I'm buying a crochet needle and hair today so I can try it out on me. I'm going to a 50th class reunion, yes, I'm 67 years old and I buying a new look for me to style. I love your video. Thank you for slowing it down to show us exactly how to do the crocheting. Your natural hair is so beautiful too...
Afros & Puffs: New subscriber Haven't seen straight crochet done so naturally ♀️
FeeFee 86: Your natural hair is so healthy especially length wise. The crotchet braids looks so natural!!!
love peace: I now have the confidence to do the invisible method!!! Thank you
Sheabutta Baby circa 1990’s: This looks beautiful. I’d be shedding hair in every room I stepped lol
Tan R2: Creative, beautiful, and cost effective. Good to see you back. You came back fully loaded. Thanks for the idea.
Aalaya Cooper: I was so shocked and absolutely in love once I saw that invisible part!!!✨new subbie here!
Deelifull: This turned out so cute, that now I want to try this on my own head. Great Job!! New Subbie here too!!!
Honey Bunni: This is so helpful, especially since I’m a beginner. Thank you!
Linda Hubbard-Brinston: So pretty! I love the invisible part method too. I will be trying this style next week. Blessings & Aloha!
ladynefertitibk: That braid pattern you did is so cute. Add some hair jewelry to it and you have a hairstyle. : ) The hair texture looks so natural and that invisible part is perfect.
SweetTee's hair wraps: You did a wonderful job! I did this over my locs years ago. I'm going to do this again! You are very beautiful as well!
Angela S: I absolutely love watching your videos! You are so talented, beautiful and have a genuine personality/ demeanor. Thanks for being YOU and sharing your gift with the world. I appreciate you so much Seun.
Pixie Tod: Im white british and did not realise just how hard you have to work on your hair...white girs with extentions and especially blonde hair look stupid because you can see them. The way you did it looks fantastic. I also liked the way you braid, you make it look so easy. You are a genius
Katherine Stepney: Love this! Thank you!
Jo Wyrick: I LOVE THIS, I HAVE BEEN TRYING TO GET THIS LOOK FOR YEARS. CAN'T BELIEVE THAT HAIR WAS THAT CHEAP, IT LOOKS SO NATURAL...KUDOS!
70’s Fashion &Hair Channel: I can hardly wait to do this! My only problem is that when I tried this years ago, it seems that I have a problem covering my crown with crochet hair. My cornrows always seem to show. But I like this so much how it came out at the end!!! Really beautiful!
Zainab MT: Love this and you make it look so easy
Maria Conceição: Perfeito, vou colocar onmwu hj so que menor... Amei... Lindo. Parabéns
Rosalind Hewitt: Wow! You’re the first I e seen to use this crochet method. I cannot wait to try it! Thanks for sharing
Anastacia Nelson: She is adorable and relatable .I'm actually doing my own hair now .. saving money I need.thanks Soo much.
Scorpio GirlVA: I've done this before with kanekalon hair. It was very convenient! Love her invisible part method.
HONEEHAZE: I love the way this style came along. Very seamless and makes an insecure person with no hair feel special. Good Job!
jarde Moore B: The braid pattern looks good as is... No extra hair needed.. i love natural hair beauty..
Adwoa Marfo: The outcome was so beautiful
Wise Chebet: Love it! Great job!
Vickie Allison: She really does have naturally beautiful hair, wonderful tutorial ❤
Izabel Vieira: Ela é linda essas tranças ficaram top pra usar somente ela tmb.
Berverly M: You are hyper creative and you have proved self mastery. You are brilliant saving many expense from having it done at a salon. Girl, what you did hear is excellence at it best!!and nothing more that sheer genius!! Keep going your are a delight to watch. Well done!
Chevonne Reynolds: This is a great video!!! I so appreciate this!!
Momma Bear Armstrong: I am impressed with your simple instructions
Carissa C: This was a great tutorial I never thought to do it this way
Dr. Bibi Neumann: So creative and gorgeous! Just subscribed! ❤️
Tee Tee: You look so pretty I will definitely give this style a try.
Allis Possible: Your smile is everything. Oh, and thanks for the amazing tutorial
Slime thrills: Who agrees with me that she is so pretty ..and I love her smile so much..
Marcia Gomes: Que bacana! Eu ja procurei essa tecnica aqui no Brasil mas ninguem faz.
Diana Carroll: Thank you so much the way you put the the braids in is so much clearer than others on the site
Rachel Alves: Muito lindo.
Dominga Senti: Made me want to do it now!!
Ijalade Damilola: This is amazing. I'm gonna give it a trial
shicetea1: Love it!
Rebecca Brazil: Gorgeous! I wish I could do that!
lorine awour: I did mine too thank so much for the details
Tiffanee Green: This an awesome technique. Thanks for the tutorial.
Angie Butler: Seun, you are soooo cute and adorable. I appreciate you showing how to do the invisible part. Great video. Thank you.
Joy Nyarai: When you smile you look absolutely beautiful. You have a winning smile. Thanks for the tutorial everyone seems to be using the pre looped hair.
Gy Sampaio: Nossa amei chou de bola, ficou lindo
Annunaki Arzu: You make it look so easy when I actually I can’t even do anything in the mirror like that and the hooking of the hair. you’re like super woman girl!
Wafa Alrasheed: Super easy super cheap It's just perfect
Fee licia: Thank you for showing us this technic!!!
happi88 ts: Are you kidding me right now?! You are so amazing at putting those braids in. I need to practice!!!
BC 12: I’m interested in the cornrow pattern you did. Bcuz I want to do crotchet braids on myself. That pattern looks suitable for many braid styles.
Mila Cris: Lindo amei
The Makeup Muva: Great job! I don't do crochet but this info would be great for my sis. I will def let her know!
Portia: Yassssss! I love your tutorials! Crochet Queen! ♀️
JustTheresa: Great video! I love it❤
deb jean: Woooo. OMG I am going to do that to the top of my hair. Thank you for sharing.
Tasha's Sewing Tutorials: I JUST bought purple braid hair to struggle and box braids my own hair with (I can braid everybody hair but mine,lol) but now Imma do this. Thanks for the vid. Just subbed
Joannaa Joi: Wow Sissss !!! Thank youu sooo much for sharing this w Us !! I have a twa & I just got a lot of great ideas w this method !!! I appreciate all that youu shared w Us !! This came out beautiful!!
Nyambati Kwamboka: Thank you for your lovely great ideas! Thanks!
Sheree White: The hair type & style are bsolutely beautiful! The double looping in the front looks sooooo freaking natural! You are beautuf as well!!!
hammondgal: Absolutely gorgeous
Lala Ess: Loved it!!! And the crochet tips
Angenet Chaskia: Girl this is the best crochet I've ever seen
MS. Sandy: This is talent right here. Very talented hair styling. I wish I had it.
Gore Family Adventures: Looks easy enough. I'm going to try this method. It just takes so long. I've done crochet braids and they came out good.
Adewunmi Divine Help: I'm stopping right here! You meet my demands for growing and retaining my hair length. Love you!
Rentha Blandin: Love this thank you ❤
MzNaeture: Very cute & creative GREAT ENERGY
Jasmine Chimeré: Great video! How long did it last? How did you care for it daily?
Kiawoods Official: I like this video I’m try this tonight ❤️
JA Queen: Love your crochet techniques! Tfs
Sandra Journet: Really nice it looks so natural
Alissa I: This is the best invisible part with crochet tutorial I’ve ever seen
Dominga Senti: wow I love how you insist. a very easy way to learn. my question is the following, how much pack did you put on?
Joanne Bennett: Thank you very beautiful and easy
tika taylor: Thank u so much. I'm a beginner, never done my hair before but starting now because people do my hair the way I don't want, so thank u
BlaccSwan: Did it. Its a beautiful style
Ronetta Walker: I love it too cute feeling your energy
Trini Mom Beauty: Your hair turned out great I love it
Queen: Absolutely gorgeoussss ❤️❤️❤️
Lefty Bo: Beautiful. Thanks for sharing.
Be Happy: Wow .this so nice.I'm so gonna try this someday
Ricardina Chipewa: Amooooo
sophia sue: This is the first time that I have ever understood how to crochet braid...thank you...and i have watched sooooooo many videos
Chakanabo K8mengele: THANK U FOR THIS VIDEO THIS HAIR STYLE WAS MY DREAM NOW I LEARNED HOW TO MAKE IT AND AM SO HAPPY THATNK U SO MUCH
chilenebernard: Really nice technique!!!
Rashanda Struggs: Thank you sweetheart,so simply [email protected]
sophia green: Great job! I like to see other styles.
Andrea Cooper: OMG!! I love this!!!
Galdino Sanchez: Amazing, hun. ❤❤
Misozi T.C. Nkhata: OMG it looks so natural, you're a hair genie! i am beyond shook.
Scorpion 🦂 83: I love this!!!
OneFootNFront: This was exactly the style I was looking for. It’s encouraging that it didn’t take long. I’m going to do this with Expressions packs. I wonder if that will help the style last a bit longer.
Bukola Pereira: This is dope. I enjoyed watching you do your thing and I love the end product. Job well done, Seun.
VanyBelle Official: You are a legend... Never thought of that. Looks amazing