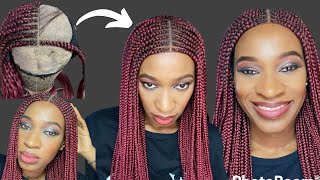
Crochet Braid Wig With Braiding Hair| Easy Crochet Braids
- Posted on 25 April, 2020
- Full Lace Wig
- By Anonymous
A quick and easy crochet braid wig tutorial.
Learn how to make your own crochet braid hair for your DIY crochet wig.
Hey guys welcome back to my channel today I'll, be showing you how I create install and style discussion great week. So what you need is a pack of expressions braids, a wig cap. Of course, your latch hook needle some scissors, a comb, your curling wands you'll - also need a foam head dice. Please don't judge her she's been through a lot now. You can have different variations of curling rods just be sure to have them in a similar size. So your curl pattern looks pretty much identical now. If you only have some large curling rods, that's totally fine. Your curl pattern, however, would look something like this now go ahead and remove her here from the pack, and this hair is pretty long. So one pack is just enough for this project, I'm removing the hair - and you see me folding - to show exactly how I'll be cutting this hair down to a much shorter length. So I'm just folding to here a few times to see the length that I'll get at the end. I have my desired length, so I'm moving on to running the hair. Just take a small section of the hair make a loop at the top, insert the rod and firmly wrap the hair around the rod. It'S pretty simple, just ensure the hair is wrapped tightly so as to avoid any unraveling and close that hook at the bottom, and that will secure it. Now you want to follow these same steps if you're, using just the regular curling wand with the closure. However, if you're using flexi rods, you definitely deter up that ear on even tighter, so as to avoid any unraveling, seeing that these flexi rods have no closure I'd only the pins and you wrapping it on tight enough to stay on there. Setting these three curls only for demonstration, so I have them here in my container and adding boiling water right on top. This was a very hot guys, I'd be careful, and because what is so hard, it only needs just a few seconds for the curls to set. So you can remove these basically immediately after adding them to the water, just ensure that the curls are completely submerged, have a towel or some type of cloth, handy, capacity's, dry and once they're pad and cooled down. You can move on to removing the hair from the rods now, if you already have experience in making a crochet we, you already know this in the right way. Cap girl, but, to be honest, most of the beauty supply stores are closed. So I'm just making do with what I have to remove the hair from the rods. You just want to open the closure at the bottom and unravel the hair. It should slide off pretty easily. You might have a few tangles, but once you smooth their fingers over the hair, it should go right back to normal, seeing the hair on a reflector on his raps outside. You want to go in with the scissors and make a small cut on the bottom and that will have the hair unraveling much easier. My curls are ready for installation, so I'm gon na go ahead and separate them. If you want to look at some more defined, you can definitely leave these curls as it is, but I want something that looks a very fluffy kind of like an afro, so I'm gon na separate these curls, so I can get a lot more flow from them. Also, you want to leave the backup band appear, so you have a lot more stretch at that area and go ahead and open your magic needle insert it into the cap. Push it the rule out of your hair onto the hook, pull through and loop. So that sounds like a lot, but I guarantee it's very very easy once you try it like once or twice so. You want to insert the hook into the cap, make a loop again at the top of the hair and it on to the hook, pull it through and go ahead and loop, the hair, so that loop is what security here under the cap. It'S basically and not so you just want to repeat this process all over the wig and, as you continue around to the front of the week, you definitely want to cover that band. But, as I said before, you want to leave the band appear at the back. Only so the wig has some storage and isn't too tight around your hairline, so I'm definitely gon na be speeding through this process. It'S not that time-consuming to be honest, but it's a lot of individual strands of hair to add so after adding the majority of the hair. This is what the wig is looking like, and I'm just going in with a few remaining pieces in any area that I think, might need some more volume once I'm through I'm just going in with some moves, and this will help to tame some of the phrase That I have going on this is definitely optional. If you don't have any moves, that's fine a week will look just as good without and of course, if it didn't separate your curls also, you wouldn't have a lot of frizz either way. So I'm just using that to go in on some of the girls that are just a little bit too frizzy and giving them some more definition. My next step now will be to cut and shape the hair, so I want to get a nice curved edge, so I'm going in with the scissors in any era that I have some strands protruding out too much, I'm just trying as best as possible, to see How I can get my desired shape? The week is pretty much done, I'm going to take my foundation and a flat concealer brush, and what I'm doing here is just a mark of the center front of the wig. Once you remove this week, it might be a little hard for you to identify the front if you don't have a mark there. So I'm doing this so once I take the wig off, I can easily align this line with the center part. That'S in my hair also, it's almost time to try it on, but first girl we got to do them. Edges. Yes, so have my guts, a big glue, of course. This is the only thing that holds mine up here in place just sweep them in whatever style. You like once they're nice and the needs you can go ahead and flip your wig on. Remember that the line so I'm identifying that 9 nose. I can line it up with my center part girl. You better not be leaving the house looking like this, no ma'am. Just pull that wig back and voila we lookin cute, we lookin yeah. This isn't totally necessary, but you can go in with some bobby pins for extra security girl, better safe than sorry having your wicks light overhead. That is a total disaster, so go ahead, place some pins in there ensure that she said and secure it. That'S it guys. Now, I'm gon na show you a few ways. You can style your wig. If you want, you can flip it over to the side for a little side. Part moment, I think it's cute, it's doable it's nice and I love this also had adding like two small pops in the front. This is really fun and flirty and young. I love this one. Now, of course, we have to f2 throwing some head wraps. You just want to fold a scarf, so it's small enough to cover mostly the back portion of your head just to make a knot in the front nice and tight tuck in the ends and, let's fix the front of no man who waits there, we're having some Technical difficulties: okay - okay, let's just try this again! Well, that's it for another tutorial guys. I really hope you enjoyed this. Please do subscribe if you haven't already and if you have a welcome to the family, fam thanking you feel free to leave any questions or suggestions down in the comment section below. Thank you guys so much for watching I'll, see you on the next one.

Comments
Shamara Forrester: Definitely gonna try this Mo great work as always. Of course you know I wanted to be extra but giving the last time I'll just go easy
Jonique Mccalla: Love this!
Tashana Wilson: I loooove the look
Ronni j: Soo cute and natural looking
Candice Nelson: That wig looks great. Does the hair mat? How long did your wig last?
tocrazyjay: That wig looks Great!
Shey Monroe: ... got to try this one.
Haley Waite: ❤️❤️❤️
Tashana Wilson: Could Marley hair be used? And what’s the right wig cap to use?
Rena:
Carline Thelemaque: Good job baby girl.
Diane Vandiver: Luv this
Monica Lawrence: Are you Jamaican?