Make Bundles & Wig From Braiding Hair|Kanekalon Hair
- Posted on 10 September, 2020
- Full Lace Wig
- By Anonymous
PRO TIP;
To be good at whatever you are doing, you have to practice until you perfect it.
First trial may not be so easy but don’t give up on yourself, you’ll certainly get there
Personal Trainings are available and you can book us for your special day.
Connect with me;
Instagram; https://Instagram.com/Annessignature
WhatsApp or call; +2348106760720
Email; [email protected]
#WEDDINGHAIR
#e
#BRIDALHAIRSTYLIST
#HAIRANDMAKEUPTRANSFORMATION
#WEDDINGHairstyle
#WEDDINGTRANSFORMATION
#MELANINBRIDE
#BLACKBRIDE
#BRIDALHAIR
#BRIDALMAKEUP
#LACEFRONTAL
#naijahairstyletutorial
#MAKEUPFORWOMENOFCOLOUR
#LONDONUK
#MAKEUPTRANSFORMATION
#VIRALVIDEO
#Hairstylistinnigeria
#Naijahairstylist
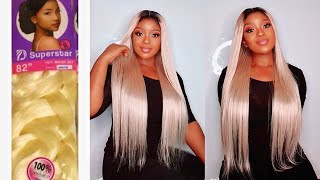
Hello, everyone welcome to my channel so today i'm going to be doing a very quick tutorial, i'm going to be showing you how you can go from a regular braiding hair like so now. This is the braided hair. I can go from this to this. I'M going making a wig with this particular hair and in this video i'll, be showing you guys how i i wefted this hair. Okay, then in my next video i'll, be showing you how i put it in a wig. This is the hair extension i got. This is the braiding hair. I got this synthetic depending on the length you're going for so this is like this is not a whole lens. I actually cut this into two into half this expression braiding hair. So all i'm going to do right now is to feather okay. So after feathering these edges, because i want the edges to be feathered, i don't want it to look. You know thick at the end, so if i drain it out, i'm going to go ahead. You know i'll get to the middle and then divide it. You know i'll use a scissors to divide it into two when i do that i'll get this, so this is like double of that particular one. I just showed you guys so so this is the feathered ends and these ends are thick and this is what you need to get it with started. You will need your expression, braiding hair, you will need thread your sewing machine and then, let's get into work. So what i'm doing right now is to thread my sewing machine and, if you guys want a tutorial on how i do this do. Let me know in the comments section if you want to learn how to thread a sewing machine. This is the manual type. Okay. Do let me know in the comment section - and i will do just that - okay in this tutorial in this whole thing, sorry guys, i'm going to be my stitch length. There is no stitch width when you're using the same action. It'S only applicable when you're using the um industrial sewing machine. Okay, that's the electrical one, but for this one we only have stitch lengths, so we're going to be achieving a straight stitch. That'S what i'll be using to do this so for this my stitch length, i'm leaving it at 10., please, if you're doing this, please just leave it at 10., you're first stitching your second stitches, because you'll be making three four different lines so make sure that your Stitch length is at 10., so spread it apart like so, and then select depending on how thick you want your extension to be. I don't know if you guys can see, but let me zoom it a little bit closer. So i'm just depending on how thick you want your stuff to be so. This is about two inches. The distance from here to here is about two inches. I don't know if you can see so i'm just going to pack these hairs a little bit away from where the paint the needle goes and i'm just gon na spread this hair evenly apart and holding this thread at the back. I'M just going to make my first few stitches like that. So once i do this, just follow up okay, so i'm just gon na be spreading it apart. While i sew like that, so comb, if you need to because you need these hairs to be straight okay, so i think this is the fastest method. I'Ve seen a lot of methods on on youtube and i think this is one of the fastest methods anyone can use, because when i saw the crocheting method i was like man gosh. I don't think i have time for all this, so this method is really fast. You have to run this line four different times, then, when i'm done i'll come back and show you guys what next to do so you just what you have to do now is to grab it at some distance away from, and then you drag it out like So you need a long thread. I don't know if you guys can see, then you divide them into two. This is very important because you'll be needing this shred for a lot of stuff. Okay. Now we have this okay, so, as you can see, i've run my four lines straight stitches on this hair. So next i'm going to do now is to fold it i'm going to fold it like so and then i'll run another stitch. Okay. Now i'm done with this with what i told you i was going to do off camera. So did the second folding still holding on to this thread, i'm just going to fold it like so so i'm going to show you guys the finished look. So let me get back into this and finish it up. Okay, guys, i'm done with this. So this is what the hair looks like. So when you're done, when you're done, you can easily just cut off this extra threads and get right there, and when you pull, you see it's very strong: it's not coming out. Okay, it's not coming now this okay, so i hope this tip was helpful. Thank you. Guys for watching do leave me a thumbs up, don't forget to subscribe to my channel so you'll be alerted whenever i post a new video. Have a nice time love you guys, bye! You
Comments
Chelsea Thembeni: Love this! Waiting for part two :)
Ta9 Ta9: wow what a time saver! Thank you so much!
Middolla Fun: How do you make the closure I'm just getting started, I love the wig I hope mine turns out right.
alhovera: THANK YOU QUEEN
Myra 's 2Blėssėd2BEEStrëssëd: Great video. Did part 2 come out already
NexusTVFM: Awesome
Vivvian Onyinyechi: Wow, so lovely
Chris Geo:
Barbara James: Your sign cover then you was doing I was trying to see was hot plating the hair