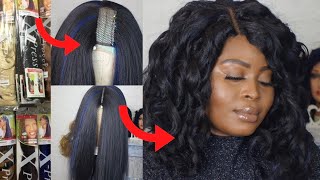
Diy Braided Afro Wig With Expression Braiding Hair.
- Posted on 21 March, 2021
- Full Lace Wig
- By Anonymous
Expression braiding hair
Cuban twist hair
Hot glue
Lace/mesh dome cap.
Hey beauties welcome back to my channel again, it's me ruthie and on today's video i'll, be showing you all how i make this pretty afro hair. If you love this, video don't forget to like subscribe and leave a comment below so on. Today'S video i'll be using this regular mesh, dom and lace recap which i get from my local beauty supply store. If you're familiar with my videos, you know i usually use this always whenever i want to make any of my private wigs. So i'm going to be going in with my braids and i'll be leaving the link to this or how to make this braid in my in the description box below so you could go watch it. So this is the style i'm gon na be using for today's tutorial. It'S gon na be like a two step, so i'll just place them on their right parts and go in next to the next or go on to the next stage. I'Ve actually made something very similar to this style in my previous video, so i really don't need too much explanation, but i'm still gon na explain so on this side. If you're not familiar with wigs like you're a beginner, you could just like mark out the places you want to put all this. So you don't miss your step, okay and in my early videos, like my previous videos, i said something like you: could use a glue to also glue this hairs down, so you'll be able to sew them perfectly if you're not perfect yet so that is it so I'Ll be going on to place the other side of the wig so right now i am going to glue them very fast, so we're all used to the gluing method, but yeah. That'S what you're, seeing i just glue them just the way i laid them down and that's why the pin or the wall pin is also there so you'll be able to like keep track of what you're pinning and like don't lose, and the position of where you Placed your braids earlier, just a quick reminder, please, if you haven't subscribed yet please subscribe to my channel like this video watch other videos and leave a comment below you can ask me whatever question you want to ask me i'll, be there to always answer so the Next stage is to tuck the hair down tuck the braids down at the end or like to the desired length you want it to be at and then you cut it and this stacking method helps in holding the hair down so that whenever you want to cut It or burn it because you have to cut the hair, so whenever you want to cut it or burn it, you'll be able to like it to be able to stay like that, it should be able to stay pulled, it won't loose till the end. You know this time or this tucking and tying would actually help to like not make the hair loose till the end. So whenever you tuck it that's where your hair would unravel to it wouldn't pass that place. You would actually see what i'm talking about during this video. So if you really want to watch it or see what i'm talking about just keep watching this particular clip. You get to the part where i cut the hair and then it actually got loose. But it still stayed there. So if it's actually your choice, if you want to burn it or you just want to do whatever you want to do on that hair that has gotten loose but yeah, if it's just there you're fine, you can still do whatever you want to do with it Or you can go in with burning, but i wouldn't advise you burn, because it's definitely gon na touch your wig cap. You know so this is the kubern twist hair i'll be using for today's video and i'm going to cut the back and parts into four. Then i'm going to cut the upper part into three, so i have that longer length. So i'm going to just divide each strands of hair into two parts and just install it the normal crochet way we install hairs okay. So so, once you get to this part of the hair you're actually going to crochet um we're going to crochet this hair on the braids itself, okay, that would give it a nice closure, look and like it's going to make it come together and make it like A whole hair once you crochet this hair on these braids, just like you're seeing right now, then after you do that you're now going to actually use your hands, you could use your comb, but it has to be a like a spacious comb. It will be really spacious and big, so you don't like pull off the whole hair, but if you don't want to use your comb, you can use your fingertips just like i'm doing right now to just separate the hair and make it align together. Make it look like a real afro hair, and then you bring some to the front and just take care of it and also go in with the trimming just trim the extra hair flying out and all that so guys after the trimming. This is what the hair should be. Looking like girl, i love it already. I love the braids. I love everything about this hair. It'S just that. I don't really really like afro volume hair so guys like i don't always wear a fur hair so much, but i love it. I love it so guys if you love this video don't forget to like it. Don'T forget to subscribe to my channel. If you haven't, don't forget to hit the notification bell to get notified whenever i upload new videos and also don't forget to leave a comment below, i don't know if i've said that before so guys, i love you all so much i'll be seeing you on my Next, video stay blessed stay beautiful, stay, happy, stay, safe, bye! You


Comments
isioma izegbune: This is really nice. I learnt using your video to make my hair thanks
Olivia Chukwu: Looks so natural and beautiful. I love . Stay connected
Zoe Wora Tangui: It's very nice well done
Ife-chi Dora: Ooh Wahoo ...youre such a talent girl ..i love this hair..
Maureen Okechukwu: Wow! This is good
blessing adaobi: Beautiful please what is the name of the glue you used
Oblitei Benjamin: So talented
Phil Omoefe: Waooooo its beautiful.how many Expression was used?