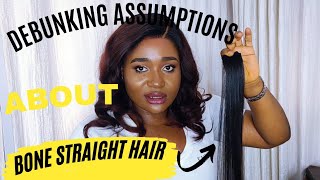
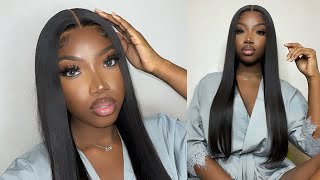
Bone Straight Wig / Using Expression Braiding Hair / 32 Inches Hair
- Posted on 09 January, 2021
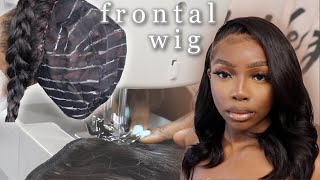
- Full Lace Wig
- By Anonymous
HELLO BEAUTIES
Happy new year to my wonderful fam and you are highly Welcome to my channel so today I will be sharing with you all how I achieve this lovely bone straight wig using expression braiding hair to achieve this crochet wig, I use 2 pack of expression braiding hair but I did not use all the two pack .
thank you so much for watching this video do not forget to thumbs up and most importantly subscribe so you can stay update with my latest video thank you .
_____________________________________________
For sponsorships & business opportunity-
_____________________________________________
PRODUCT USE
Expression braiding
Wig cap
Lace closure net
Crochet hook
LINK TO WATCH MY OTHER VIDEOS
BRAIDS&TWIST / cute &
easy protective style for kids https://youtu.be/kqLbZsTMVyE
LINK TO WATCH MY OTHER VIDEOS
How to make a headband wig / using kids pantyhose https://youtu.be/8Teh-Z1xMzk
fake it till you make it natural hair style / using braiding hair https://youtu.be/b3AYVdXd1Ow
Diy passion twist using braiding hair https://youtu.be/5JjlrDXINEY
Diy: super tight curls using kebab stick https://youtu.be/pSYbQPeA3wI
how to passion twist on natural hair, https://www.youtube.com/watch?v=53uQbG...
Jumbo box braids /Brazilian wool box braids, kids hairstyle ft discoveringnatural https://youtu.be/9ScHVKV7tBU
How to goddess box braids tutorial for beginners,https://www.youtube.com/watch?v=ykU7Ok...
diy needle and thread flat twist cornrows diy hair style with brazilian wool,https://www.youtube.com/watch?v=NKCYRe...
Jumbo box braids using Brazilian wool /butt length braids https://youtu.be/kkzAK4740OQ
Let be friends on instagram https://www.instagram.com/invites/cont...
#bonestraightcrochetwig#crochetbradinghair
Hello beauties welcome back to my channel. It'S your first time seeing my face. My name is atinike, so be sure to assume this god just bone straight with using expression, braiding air. So this is a crochet hair. A diy crochet hair will be ventilating the front. So already show you guys the air we are going to be using from the beginning, just picking the hair out, so that the mouth will be like blown straight and then straight. Do you grab that after picking it i'm going to be using this airbrush to brush the air through, so that it will be smooth and it will be tangle free? Let me tell you using a brush to brush it out. That does not give you 100 percent assurance that you already detangled the air so i'll go in with a brush i'll take a small section of air going with the brush. After that, i'm going to be using this comb to comb it out. You can see what is actually coming out from the hair. So if you want to diy appreciate air, you have to detangle the everywhere, because this is attaching a synthetic air missile. So i section the air on that rack. So after i'm done doing that, i'm going to be sewing down the lace. If you don't mind, you can actually make sure your list is not big as mine. If you don't really want to take a lot of time because it just wants to fake the front. No need of you ventilation, very big lace. Do you understand that? So after i'm done saying that i'm going to be cutting the excess net underneath the lace out of cutting it, we don't need that so that the front skin is flat and it's going to look beautiful any subscriber. Thank you so much for subscribing to my channel. If you're returning subscriber thank you so much for coming back to watch my video, i really appreciate you so much guys, don't forget to turn on the notification bell so that i can be notified anytime. I upload a new now i'll start crocheting the air from the back. I use a small quantity, not really that small, but the front is going to be very smaller than the back. The amount is at the back, so just crocheting, i'm knotting it once not twice. One because i want a very flat look, i'm going to be showing you the method i use in crocheting so that you can crochet a lot of hair. You can see i'm using my hand to demonstrate where i'm going to be crocheting next at the middle, and if you want to make sure you don't stress yourself when you want to detach with the hair, you can see that i raised the air up for you To see the bond, if you can see that lemon bund i using holding it, that is how i'm going to be holding on my hair each each track so that i won't detangle it again. I'M going to be showing you how i'm going to do that after when i finish crocheting small quantity of a. I want like to be too much like a track or two track. Then i would detangle the air together i'll use a bond to hold it. So can see different kind of color of bone speaking through because i said earlier i'm going to be holding the air as i crochet, because i don't want to stress myself by me: detangling the egg. There will be a lot of work. I don't want to do that because you have to detangle it again, the more you section the little amount over you want to use to crochet. There will get tangled with cell back, so you have to detangle it again. So that is what you can see me doing. I'M detangling it again after i'm done doing that, i'm going to be holding it down with a bone. Do not use a rubber band. You have to look for a bone that does not. I would like that air cannot stick to the body. I don't really know how to explain. So that is what i'm using. So we are moving to the top part now i'll, be crocheting a very little amount of hair at the top part, so that that place is kind of flat and not obvious. So do i'm going to be doing the same thing after i finish crocheting the front part again, i will detangle it then i'll hold it down with the band. I'M done with that, i'm going to be moving to the ventilating part yeah. So i'm going to be using a concealer to demarcate the air where i'm going to crochet to already ventilate some parts showing you this part on camera. I didn't actually count how many pieces i'm ventilating. I just make sure i take a very little tiny amount of air to work with. Sometimes i make a mistake by grabbing like not really much, but it will be kind of obvious. I appreciate it like that, then the next one i correct myself. I don't have time to ventilate one one. I still want to challenge myself to do that, but not on this part. Just i took a little very tiny. I didn't count it very, very tiny. Then i vent late you're going to see the vinyl look. It was not really, it was not obvious, i mean so it was not obvious, so we have to watch it to this part. Thank you so much you're the best. I really appreciate this so so much i enjoy doing this kind of video. I'M always happy doing something for you guys to see not even any outing something meaningful something you're going to see and you're going to say wow. This looks so beautiful. You grab that do um um after i'm done ventilating the front part i'm going to be combing. It out - and i forget to mention this: if you want to comb your air, each section do not start from the top unless you're going to damage the wig cap start from the roots. This angle, from the roots then move to the middle then move to the top. Can you see the fly now you can see how the comb is just coming through, as in nothing is the one holding it. Can you see that okay, so this is the living condition, i'm going to be using i'll, be hiding it inside the hot water hold on? Let me explain this part to you. Please do not allow the auto to be out, as in over they are going to cook your hair just make it kind of not hot, not warm in between. Do you grab that, because this water, i can actually dip my hand into it. You can see that it's not hot, so let me explain that to you so that you won't cook the heads after i'm done, dipping it into the other. You have to brush it through. Do not leave it like that, so that it won't get angry. You have to brush it through i'm going to be using this with oil to add some shine to it time. That is all just leave the egg to get dry itself. Do not use android dried, allow the air to be dry ciao, so guys. This is the final look. The hair looks so soft as it's so light, so beautiful. Oh, my god. The egg is 32 inches long. So thank you so much for watching. Please don't forget to like subscribe comment share with your loved one turn on the notification bell. So that you can be notified any time i upload a new video. Thank you so much for watching see my next video stay blessed ciao, you

Comments
Zippi Brown: Another great one, so good at it came out perfectly. I love long straightwigs
Marta Mille: Wow the hair came out perfectly beautiful and I love the longest of the hair, good job well done sissy
Tips with Nikky: Woow, this is an amazing tutorial and the wig turned out beautiful
VICTORY SPACE TV: wow this is super beautiful and long,I love it
Ngozi Atiti Vlogs: This is beautiful, thanks for sharing
CHIZZY DELISH KITCHEN: Sis you are doing a great job from the scratch to the end is excellent
Black jewel body care & Style: This is real bone straight, you did so well. Ciao
MsNike A: The wig look perfect
Toyin Veljko: So beautiful
Lillie: You did amazing job with that hair gal. I like the lipstick you wear so cute
Affordable Luxe TV: Nicely done ✅ weldone sis.
Mary Samuel: Them use bone straight 1,000 dollars me I do my own bone straight with expressions 6dollars.. last last we both use bone straight, thanks for the hack sis
Lewechi Emmanuelle Oluchi: Is one attach enough
Ngozi Atiti Vlogs: Notification gang