*Detailed* Flat Frontal Wig On A Sewing Machine Like A Pro | Easy Wig Making Tutorial
- Posted on 20 March, 2021
- Hair Knowledge
- By Anonymous
Learn how to make a frontal wig with this super easy and detailed frontal wig tutorial! In this video, I'll take you through every single phase and step towards creating a Perfect and FLAT custom frontal wig on a sewing machine. You'll never hand sew a wig again!!
SideNote:
- the picture in the thumbnail isn't the exact unit in this video but it was also constructed using a sewing machine and these exact same steps.
-this is for 3 bundles (18,16,16) double wefted, if you have more bundles or shorter lengths, create more lines depending on the fullness you're going for.
SUBSCRIBEEE!❤️❤️
LIKE & Share w a Friend!
Hope everyone is staying safe and practicing proper hygiene. Stay Safe & Sanitized Loves!! xx
Thanks for watching, If you like videos like this please thumbs up!
#wigtutorial #frontalinstall #frontalwig
PRODUCTS USED
singer sewing machine - https://amzn.to/3m6YASO
cork wig canvas head - https://amzn.to/33IL69n
wig tripod stand - https://amzn.to/3jKraIO
mesh wig cap - https://amzn.to/3jKhvSK
J shaped needle - https://amzn.to/30M2NDf
hair thread - https://amzn.to/30JxyIL
sharpie or white pencil
seam ripper - https://amzn.to/3iJjYvk
Like, Comment, & Subscribe!
___________________________________
S O C I A L M E D I A
-Instagram: https://instagram.com/itslexclusive
-Twitter: https://twitter.com/itslexclusive
EMAIL: [email protected]
-
hair install, sewing machine wig, how to make a wig, frontal wig, step by step wig making, frontal wig, start to finish install, beginner friendly wig, frontal wig install for beginners, easy frontal install melt, frontal wig install, frontal wig on sewing machine, clueless frontal wig, frontal wig tutorial, how to make a wig for beginners, sewing machine method, detailed wig on a sewing machine,
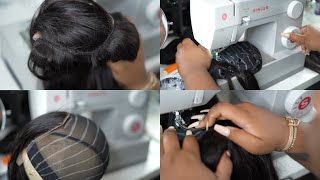
Hey guys and welcome back to my channel so after months of promising after this specific video, today's video is all about walking you through the process of constructing a frontal wig from start to finish on your very own, using a sewing machine. Unfortunately, today there are no pretty poses and being cute, and all of that, as this is a client's wig, so let's go ahead and just move into what you'll be needing to create a wig. So, as you can see, i'm very excited because i know you guys will love this video and i'm hoping that you'll be able to learn a lot from it. The first thing you'll be needing is a wig cap. I know what i am showing is a dome cap. I don't know why i didn't thoroughly read through it, but you will be needing a mesh. One you'll definitely see what i mean as we move along the video, but you'll be needing some thread. This is some weaving thread from the beauty supply. You'Re gon na need a curved needle. I wanted to go ahead and show this one that i also saw at the beauty supply and hopefully it's able to help you with finding the correct needle that you'll be needing, but you'll also be needing a metallic sharpie. I got this trick from taylor crown on instagram, or you can use a white or very bright lip or eye pencil from the beauty supply. It'S definitely a much cheaper option and it also gets the job done. You'Ll also be needing an elastic band. This is the one inch one from walmart you'll be needing a hefty pair of scissors, not the kitty ones. Okay, i promise we're almost done, but you'll be needing a seam ripper and lastly, your bundles, i'm using three bundles that my client has provided and a frontal which has already been pre-plugged styled, and you know just completely taken care of, oh and also before i forget You'Ll be needing a measuring tape. You'Ll also be needing a sewing machine, of course, but we'll cover the specs of that a little bit later. And lastly, everything that i just listed, i know it's a mouthful will be down below so to go ahead and just get rid of any confusion right at the beginning of this video. I wanted to go ahead and just show you guys the difference between a mesh cap and a dome cap. The mesh is almost see-through, which i highly recommend, because one it is breathable and, most importantly, it comes in pretty handy when you're working on a sewing machine. That way, you can make sure that nothing is underneath what you're going to be sewing. Okay, so the mesh cap is on and placed nicely on my canvas head and by the way i just wanted to put in there, i'm using a 22 inch canvas head. I don't know who needs to know that, but now it's time to just go ahead and place that frontal down as well before i place that frontal down it's important, to have everything as symmetrical as possible, so to have the exact middle of the frontal i'm folding. It in half and i'm making a slit right where the fold is then, with this i'm able to line up the middle of the frontal. With the middle indication line on the canvas head, i like to pull down the frontal about an inch or so where the cap ends and just tack it right in in the back as well tack down the middle of the frontal, with the middle indication line on The canvas head and from here lastly, just tack down the sides, don't pull the sides too far backwards or too far forwards, just try to maintain a straight line all the way through the back of the frontal. If that makes sense, this is what your frontal should. Look like and in the next step, you're going to just go ahead and braid that hair down to keep it out of your way for the entire rest of the tutorial, with your measuring tape, measure out your head from front to back and add about an inch Or so to whatever that measurement is onto the wig. So basically, if your head from front to back is 12 inches, then make your wig from front to back about. You know: 13 inches, so yeah make some changes if necessary to your cap, so that it's you know able to align to the measurements that you've created. But anyways moving forward, i hand sewed the frontal down, and these are the only stitches that i make by hand. I'Ve prepped my needle in my thread and created a knot at the end of the thread and to sew down that frontal down. I secure the first two stitches with knots by looping the thread around the needle three times and then pulling it right through. Then i continue by making simple stitches with absolutely no knots at all all the way through the entire perimeter of the frontal. So i do simple stitches for the frontal, because i want the seams to remain as flat as possible. We don't want any room for bumpy wigs around here, okay and i'm keeping that same simple pattern all the way through and finally, i'm closing off that stitch. The same way, i started by looping the thread around the needle three times and pulling it right through, and then i go ahead and cut my thread moving into what i think is the most important part of this video, which is creating your blueprint that the frontal Wig is going to follow you're, going to use any of the penciling options that i showed you i'm going with the sharpie option, and here i will be outlining where the wefts are going to be sewn onto, and it may seem super easy at first, but it All needs to be calculated for how many bundles you have and whether or not you will be single wefting or double wefting, some or all of your bundles. Today, i'm showing you how i created my blueprints for using three bundles in the fullness that i want. You may choose to add one or two more lines. If you want it to be a bit fuller or you know a few less lines, if you want something not as full but just make sure you have enough hair for all the lines that you're creating. Okay, obviously the more you make wigs on a sewing machine, the better you'll be at gauging how many line spaces and such that you need. But as you can see, my spacings are about an inch apart, and i do this because i like to stick with double lifting my bundles. It'S far less work than single wefting, every single bundle, and also with this far of a spacing it contributes to a very flat unit. So i ended up with a total of seven lines in the back and on the top or in the front. I have five lines: the fifth line, being the perimeter of the frontal, so you also want to make sure that the line before the perimeter of that frontal is not too close or crowding that frontal, because again we don't want to walk around with a thick bulky. Wig on our heads, i mean at least i don't, but for those who think that your cap shrinks, when you take it off of the canvas head, it doesn't okay. This is how it should all look when you're done and we can now move into the sewing portion of this video. So here is my current sewing machine. Nothing too, fancy um. I have my tension at six. My needle position is in the middle. My width is at six, and sometimes five, you know, depending on the weather outside, and my length is at three. Lastly, this is the stitching pattern that i work with for wigs. Also, i wanted to just you know, put it in this video, because in my previous video i had a lot of questions referring to the thread that i use on my sewing machine. You want to make sure that the thread you're using is machine friendly thread and i'm just using a regular one that i got from walmart. The first thing we're going to be doing is sewing our wefts together and in shorts. This is just double wefting. Your bundles already come folded in half before they roll it up, so that part is already done for you. Also, when i'm doubling my wefts, i like to start on the folded side just to keep things in order and honestly, this step is pretty easy. All you're doing is just sewing the tracks side by side and, as i'm doing so, i'm pinching them together for extra security. Okay, please also keep in mind that you are not overlapping them or placing them on top of each other. You are literally just putting one right beside the other so that when it's on your wig one is laying underneath the other. You want to take as many steps as possible again to ensure that you have a pretty flat wig okay. So this is what your track should be looking like when they are double wefted, keep how the tracks again are not overlapping. Rather one is right below the other. Moving on, i'm repeating this same exact, step to all three bundles as a beginner. What you would want to do, instead is repeat this to two out of your three bundles and by the time that you're sewing this on your cap by the third bundle you're able to analyze how many lines that you have left - and you know, make a decision On whether or not to double weft or single weft, that last bundle also just a very, very quick disclaimer, like i said in my last wig, making video, although this video is very beginner friendly, i am making this with the assumption that you already know how to Work a sewing machine, if you don't, and you want to learn how to use one. There are plenty of videos on youtube that will show you, the ins and outs. My focus here is simply how to construct a wig point blank period. That was the second bundle. I just did so. Lastly, i'm going to be doing the third again, i'm starting on the folded end, i'm positioning it properly on my sewing machine, i'm reversing a few times to secure the stitch and i begin sewing all the way through until i get to the bottom of that bundle. I am pinching together and holding those wefts down so that i have no room whatsoever for those tracks to move around and, lastly, i'm finishing out this weft by securing it again by reversing multiple times at the end of the weft. So here's the wig layout again, if you haven't removed the excess part of the cap underneath the frontal now is a good time to do so. By this you are making sure that the cap is not constricted, and you know you just have a bit more room to work with, while you're working on the sewing machine. Also, you won't be needing that part of the cap any longer again. Just to remind you, we are sewing on the lines and i'm starting at the bottom line, and the longest bundle goes at the bottom to sew the bundles on. I start by lining the weft to the little blueprint that i have created. It'S my guide to making the entire unit so i'll, be starting by securing the stitch and reversing a couple times and then begin stitching all the way through. So what you're not gon na do is pull on the cap, while you're sewing okay. That is a recipe for disaster. You'Re gon na leave the cap as is, and you're just gon na sew. The wefts right on so yeah after sewing that row all the way through you're, going to go ahead and close that left by reversing the stitch multiple times for extra security. You repeat the same exact thing to every single line, the same tip as my last video with the sewing stuff. Please take your time if you are a beginner. I know you've seen many videos of people saying that they make wigs in under 30 minutes or so, which is very much possible, but you don't want that to be your goal as a beginner with time. Of course, you can aim for that, but your main goal, when you're starting out should be constructing a unit effectively with little to no mistakes. For example, when i started making wigs on a sewing machine, i used to take about two hours, and i was completely okay with that. But now i'm down to about 30 to 40 minutes depending on the number of bundles, be patient with yourself is all i'm trying to say so, as you're sewing, you should be constantly checking to make sure that you are laying your weft right on the blueprint bit By bit also be sure that you are not sewing on top of anything else, which is a very, very ricky mistake - trust me i've done it before, but this is why i love the mesh cap, so so much because i'm able to see through the cap to Avoid sewing on anything else if you do end up having an accident which can definitely happen to the best of us, it's good to have a seam reaper handy so that you're able to correct any of your errors, so yeah. Everything from this point forward is all a matter of repetition and, like i said before, this tutorial is beginner friendly. But with the assumption that you already know the ins and outs of working, a machine - and if you don't please do not play yourself, get some old fabric practice your stitches and learn how to work a machine with control. I don't want to be that person to discourage you, but this looks a lot easier than it actually is. I don't want you ruining your 200 plus bundles going at this completely blindly um. I promise you won't be happy with yourself. So at this point, you're probably asking and if you're not asking it's okay, i'll ask for you, so legs you've shown me exactly what to do. But what shouldn't i do. I'Ve got the answer for you: okay, so when you're sewing a wig on a sewing machine, the last thing you want to do is stretch your cap as you're sewing on this piece of cap that i cut earlier. I'Ve drawn a line just like you have on your wig cap, okay and i'm repeating the process, as i would any other day, i'm reversing a few times. You know to secure the stitch, but this time around, as i'm sewing all the way across that line, i'm pulling my cap to in air quotes, make my cap bigger, well babes. The results of that are not so pretty. Okay, if you were to do this to your entire wig, this is what you'd be left with a lumpy and bumpy wig. The title of this video says flat frontal and you've done quite the opposite. If you are to follow the instructions that i give you in this video, your wig and stitchings should remain this flat and smooth not bumpy and lumpy. Okay, we don't. We don't do that over here at all. So for those who like to believe that my cap is going to be too small, if i don't pull it, while i'm sewing you're only doing yourself a disservice if you want a bigger fit, just get a bigger cap. Okay problem solved so back to the wig, though i finished sewing down the first two bundles and most of my third and again, you can decide to double or single left that last bundle, depending on how many lines you have left and when i get to the Very top, though, regardless of if i double weft or single left, that last bundle, my very last track, where the frontal is is always going to be single wefted. So that's when the seam reaper is going to. I keep saying reaper it's ripper, so that is when the seam ripper can come in handy again, so that you're able to take apart that double wefted piece. So i sew down the very last track down by making sure that the weft is right. Next to the frontal, but it is not overlapping again. We still want to make sure that our frontal is as flat as possible, and once i'm done with that, i just cut away any extra piece and you have completed your brand new wig with this. You can see that, even though the lines looked a bit you know spaced out, it did not result in a see-through wig and also with the wefts being a good distance apart. It definitely aided in making sure that your wig remains as flat as possible and not bulky, especially at the top. So yeah at this point be sure to remove any loose thread that you didn't cut yet and that's it you guys. I know this was a lot to take in and i hope you were able to watch it and you know take some notes on. It especially show some love down below. If you haven't already, i will appreciate every single ounce of love and i cannot wait to see you guys in my next video you


Comments
LexclusiveTV: I hope you're loving the consistency just as much as I am! Leave any questions you have down below & I'll be happy to answer! Virtual Hugs❤️❤️
Carla R: I have watched this video 12 times (I’m a visual learner don’t judge me ) but no seriously thank you for doing this video I have made $3800 off my wigs since I started following you and I just wanted to say thanks for giving me free game I wish you and yours millions
COCO: You’re literally out here saving life’s lol I was just thinking about how I need to start putting my sewing machine to work!
8ZXE: The fact that I was literally about to search this is God !
LibraLyss: I loved this video. Everything was described very much in detail. I make wigs on the machine myself and i still learned a lot.
Angie: I just love how clear this tutorial is like wig class worthy! You heat girl!
Lika Beans: This video was so helpful! I’ve been making wigs on the sewing machine for a couple months and it’s literally a hit or a miss but this video cleared up the gaps for me so thank you !
theohsospontaneous: So helpful! I kept trying to overlap the wefts and I was ready to destroy the sewing machine and wefts for defying me Thank you for sharing!
mimi j: I transitioned to making my units on the sewing machine and will NEVER go back to hand stitching EVAAAA
IamKarryanne: Girl thank you for this I use to make my own clubbing outfits so I know constructing my own wig would be a breeze. Now I need a sewing machine!!
S. BASSEY: Yeahhhh it’s the way I feel like I can make a wig now...time to test this out
Cale: The first video I came across to say “the longest bundle goes to the bottom of the cap” I know it’s such a beginner’s question but it’s SO HELPFUL. Best tutorial
Chae Beauty: This tutorial is awesome! I want to try making my own wigs but I can’t sew This gave me enough confidence to try tho
Itty bitty Winn: I’ve been searching where to get the best beginner friendly and thank God for you! So clearly spoken and detailed, and i especially love the DOS AND DONT ❤️
Felicia McKinney: THANK YOU!!! This was so helpful! I’ve been struggling with my lil raggedy fingers sewing my wigs by hand! This here done saved my life! Thank you so much
Damilola Alimi: Lovely and very informative video. Thank you. Been wondering though..why can’t you sew a frontal or closure with a machine. All of the videos I have seen always show people hand sewing closures or frontals. Is there a reason for this? Just wondering
Monica Turney: Oh yeah! You just got me ALL the way together I truly appreciate you for making this video. Thank you
la vie est belle: This was quite helpful. I look forward to making my own wigs. Thank you
Robin Lynette Wright: Nice, thank you. Totally looks MUCH easier than sewing VELVET my first time.
Missy Coates: THANK YOU FOR SHOWING THE AFFECT THAT STRETCHING THE CAP DURING SEWING WILL HAVE. GREAT TUTORIAL!!!
Brittni Lajai: Yesss!! This was the video I needed. I paid $250 for an online course and this was video was way more helpful for me! Thanks girl subscribed!!
Julie Barnes: Perfect video! Fast, steady paced(but not too fast), clear, informative and straight to the point. It's amazing how many people don't get this when making their videos. THANK YOU!
Pinnk T: You are heaven sent!! This was explained so well! the finish is amazing
Charlie Strong: Thank you very much this was very detailed and professional. Can’t wait to create my wig
Chic Allure Artistry: You’re a doll, new sub here. Loved the voice, very much detailed and well edited ❤️
Vanessa Butler, MBA: Excellent video - when do you afix the elastic band to the wig? I'm thinking after sewing so it does not catch when attaching the bundles but just want to be certain before I try this out.
FANCY: Absolutely love this video . I am a bit confused on the measurements you made in the beginning. So die you measure the canvas head length and pulled the wig cap down one inch more?
C Nowlin: I’ve watched several videos on making a wig using a sewing machine and this is the only video I’ve seen that’s given me the confidence to try it. I know how to use a sewing machine, but I’m gonna use some cheap beauty supply store hair first just in case I mess it up
Tglambeauty: Love your videos. I can’t wait to get my sewing machine. Can you make more beginner friendly sewing machine videos??
Aries born, Virgo lover🧿📿: Your video and you explaining is superb thank you for this tutorial! It was very much needed, bc of you I will not second guess whether or not I should or shouldn’t purchase the Singer sewing machine
Made By Mica Jay: Hands down best video!! You are saving lives out here
KAY MARIE: Bless you! question: where did you get the lace tint?! Do you recommend it? I’ve been using perfect line and tru match and it’s jus not working for me
Ariel Foxx: The ending answered my question about should I stretch but I was wondering how do I keep from overlapping the cap if I don’t stretch it? Like if I don’t stretch it’s going to just sew in ripples tight?
Miriam Njoroge: You are my hero …..your tutorial was amazing.I hope to put all I have absorbed to good use!!
Miss Sheba K: Babe, I've got a question. How do you deal with the hair that forms right underneath the lace front? Like the hair from the frontal is now showing through the boxes underneath the lace?
Convenant Creations: Beautiful job, simple for an advanced seamstress, but always follow the instructions given. I appreciate you
Liesj Deluxe: THE QUALITY OF THIS ALL Subscribed !
Ijeoma Onwunali: You always come just on time ❤️
Kate O.: Do you remember where this hair (specifically the frontal) is from? Or can you recommend places that you like to get your frontals from? Is the one in the video HD lace?
Blessed Life: So glad I found your video you did that ! Get it boo
Amanda25: What number needle do you use ?I find the one that comes with the machine breaks often
Shania White: So much better than most videos I watched… I sewed my first wig two days ago and I didn’t pull my cap or anything. I used a regular size cap and it came out to small. You think I skipped a step or did something work or may need a bigger cap? Btw it was single wefted
mimi j: How do u attach the closure or frontal tho I’m still on the fence about how to do that
Vee James: Very detailed, thank you!
Débora Bongo: It’s look like a wig you buy. You did so good
Wanjiku Muiga: Wow , each video it just gets better and better
Ashley Piggott: Omggg you a the bomb girl so many light bulbs lit up in my head as I watched this . Thankyouuuuu
LifewithAshanti: So whole time I was sewing on the cap and the first weft and I suppose to be just sewing on both of the wefts. Just how I double weft the track but the only difference is that it’s on a cap??
Neikka B: For beginners is there a specific sewing machine that we should start with or is any ok? Should we start on the cheaper side of sewing machines at first? I’m excited to start but don’t know where to start at the same time lol.. love the videos
Obaa Maame: Ur video really helped me cos it made me understand why my wig always turns out not flat cos I always stretch the net.. thanks hun I learnt
Angel Ahusluh: Omggg I’m blown away at the craft and crispyness
Just Araba: Now I gotta make a wig cuz that looks bomb
Emma M: Its time to get my sewing machine out and use it.. i make wigs but i dont use a sewing machine.. this saves tome. Thank you! On the weft did you use zigzag?
Mira-ruby: Hey queen, how do you get the weft to move I feel I have to push them or pull them to keep it moving ?
Taylor Yyaj: Should I buy premade wigs and customize them or just make them by the machine? Which one is better I’m still trying to see which one will be better in the long run ... I also work a full time job ...
chioma tasie: top-tier content!!
Jessewroteit: It came out beautifully
Tera Burns: Do you sew the extra spaces in the cap?
Jackie Davis: Hello Love I am a new subscriber and your instructions are phenomenal!! I might even add Dummy Proof
eunice nomel: Can you do a video on how to bleach the knots for dark skin
Lydia Lorraine: Hey can you try HD GLUE next ? I have heard good things about this lace glue
Siam Soup: Can you explain the measuring part again please? I don't understand how you would make your wig a certain size if the mesh cap is already a certain size. Do you move the mesh cap towards the front or how do you do?
Raylan Lake: I did my first and I did great til i got to the top, not stretching the wig at the top of the head it the hard part for me
Beautifuldenae: what size needle did you use on the sewing machine?
Dear Promises: I want to try but I’m so scared bc it’s my first time making a wig and I’m using RAW hair, I would hate to mess up
My hair Interest: This video is so helpful ❤️
Jalyssa Nicole: How did you add the inner strap?
JenniferAtim: omg you did magic to that wig
Annarika Bosquet: I really love this video! I tapped on the link for the sewing machine but it doesn't seem to be working.
Duon Palmer: Hello you mastered step by step how to make wig via sewing machine keep on keeping on ❤️
Serrina: Appreciate this so much
carolyn coleman: Do you sew all the bundles together before you start? Or are you only overlapping the longer 2 bundles
Delpine Smith: you make it look so easy. thank you
Olayinka Adedokun: Nice wig. How do you add your elastic band to the wig?
Funny Kiki: I love this video OMg this is soo educative
Phoenix Johnson: So I would sew the band on there instead? That would be last correct ?
FutureRN 93: You snapped
Jailene: My sewing machine always get stuck when i sew on the band ☹️☹️ how can i prevent that? Also, how can i prevent the thread from getting loose?
Ms. Atreya: Your browsssssss though in this Thumbnail
Débora Bongo: Hey , just wondering what’s your origin? And btw you’re beautiful
delightfullyME Favors: Very very good teacher. Beautiful work.
Prittannia Campbell: The best ❤️ Love your videos x
posh princess: What model machine do u have ?
Kourtney Harris: THANK YOU FOR THIS VIDEO. I have a hair company and am now considering switching to machine sewn wigs over hand sewing them. This was so easy to follow and simple.
PrettyGurl Paris: I Think I Am Going To Start Making My Own Wigs Again. I Am Tired Of Thin Wigs
Lashawna Woods: Thank you so much .
Asia Basia: How do you get the mesh to not be bulky . Like I tried and tried it gets tight when I’m finished
Tiffany Monet: Loved the video
Vanessa Asilgya: Thank you so much for this video
Courtney Thompson: What’s so bad about pulling on the cap while you sow?
Oma Golden: Can you make a detailed bob wig am so confused with the hair placement were to put the double weft and put single to acheive that very natural looking laid bob...plsssss..this video was very imformative..thank you
Ashla Miller: Girl u got me finna go buy a sewing machine ret nah
MsJLong27: Do you offer one on one classes?
posh princess: I've took a few sewing maching class but they saw what way to position the cap all they say is place ur cap on the machine n start sewing Is there a way u should put the cap on the machine cuz im getting problem for placement ...
Jaiyla Potts: What needle size did you use ?
Jailene: My sewing machine always get stuck when i sew on the band ☹️☹️
Namy Souffrant: What was the length of the frontal??
Noura Claudina: Wow I love the wig
Dominican Kandie: Tfs
mariat t: Soooo detailed. New sub