How To Make A Lace Frontal Curly Wig Ft Alipearl Hair
- Posted on 28 December, 2018
- Full Lace Wig
- By Anonymous
DIRECT LINK TO SUBSCRIBE TO MY YOUTUBE CHANNEL ....... ITS FREE https://bit.ly/1FabbulousC
LIKE | COMMENT | SHARE - Thanks
Hey Loves New Video on how I made this curly lace frontal wig Hair is from Alipearl hair
●▬▬▬▬▬▬▬▬▬♛Alipearl Hair♛▬▬▬▬▬▬▬▬●
Happy New Year (12.27-1.7)
3% Discount no limited with code "Pearl2019"
Up to 30% Off
GOT FREE 3D Mink Eyelash Every Order
GOT FREE 10INCH Lace Closure Over $199
GOT FREE 12INCH Bundle Over $299
GOT FREE 10INCH BOB WIG OVER $599
Hair details: deep wave 18 18 20 20+18 frontal
Get This Hair Now ➤ http://bit.ly/2ScJr3G
★ Alipearl official hair store ➤http://bit.ly/2SbHapE
►Use code:“alipearlyoutb”to save $10
Top selling deep wave 3 bundles with closure➤ http://bit.ly/2ScmDkC
Recommend deep wave lace frontal wig➤ http://bit.ly/2Scd4T1
email: [email protected] (Provide Wholesale)
WhatsApp:+8617719937661
★Alipearl Hair Aliexpress Official Store Links ↓↓↓
Follow Store + Add Hair to Cart= $10 Coupon
More Coupons: Get $5 OFF $199 $20 OFF $599 $50 OFF $999
Deep Wave Bundles with closure➤http://bit.ly/2Gud2nO
Deep Wave Bundles with Frontal ➤http://bit.ly/2GtN9Vi
Deep Wave Lace Front Wig ➤ http://bit.ly/2GucYV6
Recommend Body Wave Lace Front Wig ➤http://bit.ly/2Gyqnvq
Top Selling Straight Lace Front Wig ➤http://bit.ly/2GwJF4i
Any Need or Question, Contact us:
Whatsapp/Imessage: +86 157 3748 4815
Email: [email protected]
Ali Pearl Wholesale Hair Bundles:
https://www.amazon.com/gp/product/B07C...
Straight Frontal with bundles:https://www.amazon.com/dp/B0786YRGQJ?t...
Straight Closure with bundles:
https://www.amazon.com/dp/B078DY18WK?t...
Follow @"alipearl_hair" on Instagram:https://goo.gl/SjMrzq
Follow @"Ali Pearl Hair" on FaceBook:https://goo.gl/GFnwNk
~~~~~~~~~~~~~~~~~~~~~~~~~~~~~~~~~~~~~~~~~~~~~
(KEEP UP WITH ME)
*Instagram: @fabbulousc https://www.instagram.com/fabbulousc
*Facebook: @fabbulous https://www.facebook.com/fabbulousc
( BUSINESS INQUIRIES ONLY )
*BOOK ME* For Clients Custom Made Wigs or My Pre Used Wigs Sale
*If you are in the Philadelphia Area I take APPOINTMENTS ONLY *
BOOK ME for Sew In Weaves and MakeUp Appointments at My Small Home Beauty Salon
Inbox me on Facebook , DM me on Instagram or Email me
My Name is Caroline , i am a License Cosmetologist , a MakeUp Artist, a License Practical Nurse and a Owner of a Small Home Beauty Salon
*THANK YOU FOR WATCHING AND SUBSCRIBING TO MY YOUTUBE CHANNEL *
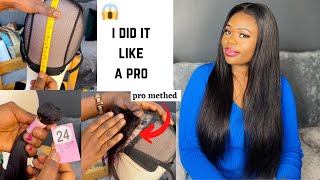
Hey guys welcome back to the channel, so it's Caroline today we are going to be making our curly lace front, awake, okay, so, let's just get started hair that we're using today is from Ali her hair. I will leave all of a leaper links in the description box if you want to check them out this, I mean for bundles of curly. Hair is a little bit short they're serving to 20 inches and then to 18 inches with 18 inch lace front. So this is the Brazilian deep curly there front row there comp replug already. I did went ahead and plug it some more, but this is how it comes and does come with a little bit of baby here, starting off with my mannequin head. That'S on a mannequin stand and a domed captain. I pick up on my local PD surprise. I will list all the brother and material that I used in this video. I will list them in a description, but if you want to check them out start it up. My lace front, so I'm going to position my lace front. Oh, oh, my dome cap and I'm going to position making sure that the front part is flip over, like that. I do not want the front partly on a mannequin head, but I definitely want my back part of the lace to be as flat as possible before I starts to do my sewing once I have my front or back position as flat as possible, I usually take A teepee I take about three T pins and I stick one in the middle and then I stick one on the side near the ear tabs and I stick another one on the other side near the other ear tab after a position my front, so you can See this is how it's supposed to look. The back is flat. I get the hair out of the way and clip it together, and then I take my needle and we're starting from the middle of the frontal. I worked my way down to the left side and then, after that I will come back to the middle and work my way down to the right side and, as I saw down the front, so I usually spaced out the needle tiny spaces. I tried to sew as close together as possible. This just helps because you don't want any bumps, you don't want a frontal to be four there once you're done or you have some lumps in front of the frontal. You want the frontal to be as flat as possible, so when I saw I saw the front so I space out my thread very close to each other. Once I have my front door, sewn down is nice and flat. I start off by putting my bundles. The first thing I start with is I usually pull my dome cap downwards a little bit more and I stick to T pins right at the lip area. This just helped our dome cap scratches right that fits around my head and it just makes out don't cap stay in place as I do the sewing starting off with my first bundle. I am doing my tracks using my thread needle to sew down my we're starting at the neck area. This is how I does my stitching that makes my wegs last. I usually hold the thread through my left hand, and I take the needle and I pass it through the West and I make a loop. Then I releases the thread for my left hand and then I pull they just help. My stitching stays in place. It makes my wealth secure and it's not loosening anytime soon. Now that I have that first track down and it's to kill and in place, I usually just go ahead and cut the track off. If you do not want to cut your track, if you are making a wig, you definitely don't have to cut your track, so you can just do the flip over am ethic, but I wanted this way to be as flat as possible. So I went to here and I've cut my tracks once I have my first set of tracks down at my neck area and it's secured in place moving to then moving on to the next set of tracks. The tracks will start to get longer, so you can place a tee pin at the end of each track and hang the tracks over the teepee. This just helps the track stay in place, as you do the sole in all right. So once I have my second set of track in place once I get to the end, I usually cut off the west and making sure that the thread doesn't Ravel off. Before I cut the thread, I usually go back and stitch about two needle stitches to the west, and then I cut the extra thread off and then I talk about two to three knots um with the thread before I cut off the extra pieces of thread. Now this just helps my track stay in place. It helps my thread not to unravel, and it just makes my stitching look neat moving on to my third set of tracks. I'M just going to be repeating that same steps using my t-pins, placing my webs over the T, pins and taking my needle and sewing the webs down I'm going to just fast forward this part till I get to the top part alright. Now, when you get near your frontal, you will do about four to five tracks. Before you get near your frontal, you do not want to soul your track on your frontal, like I said you can replace your frontal if it shuts a lot or if you need to change it without ruining your wig, so you want to start sewing your tract. A little bit of your frontal making sure that the track is not touching the front so as close as possible, but not on the front row, and once you sold down the tracks when you get to the other side. It'S the same way. You do not want your tracks on your front row, so you want to cut the extra piece off and sew it down as close to the frontal as possible, but not on the front row, and once you cut off your tracks, like I said earlier, you have To make sure your tracks are secure, so you do cut off the excess thread, and you want to i'm tied about two to three knots before you cut off the extra thread. They just make sure that your thread doesn't unravel on your wig or it doesn't get loose. And once you have a good see, kill stitch, you will be able to pull your tracks and you would not see any holes. You will not see and then loose thread. It all will be stitched nicely and it will be flat and no bumps and no lumps. This is how you know your stitch is secure all right. Moving on, starting with my second bundle, I'm gon na continue sewing and working my way upward. I am going to be: I'm sewing my tracks about half an inch to an inch away from my previous tracks and I'm making sure that man I'm sewing is not on my front. So I'm just going to continue sewing from one side and work. My way to the other side and keep moving forward all right as I get closer to the top. This is how much space I have and look at how my stitch is to kill. Okay, that's a nice stitch all right! Moving on I'm starting off with my third bundle - and I only have a little bit of space left, so I'm gon na try to squeeze as much as I can and I'm going to work. My way from one side again making sure that my tracks are not laying or my frontal I'm going to begin sewing, and I think I did about three to four tracks up the top before I got to the front row all right, so we are close to The front so this is all the space that I have left and I did almost finish using a Turk, Thunder. Okay, I'm just going to lay about two tracks before I get to the third track, and that would be my closing piece and I will show that as close as possible to the front row, but I'm not going to show it on the front row. Are you guys, so we are at the end of making this wig? Okay, I am going to be placing the last track. Is a single track, I'm going to lay it right. Besides the front row and I'm going to start sewing, I am NOT going to sew a I'm not going to attach it to the front row, but I'm going to sew it as close as possible to the front row all right once I tie my knot. This is pretty much my stitch. My wick making is complete. This is how the wig look now we're gon na move on to customize me and styling, alright, so for customizing. The first thing I usually do is pluck my front row a little bit just to make the front part look a little bit more natural, most front, rows come creep blood, but some will be bulky and some will not be as free plug as you would like. It so you will have to customize it to your liking, so I went in here and I just tweets out the entire front, lunges, making less bulky in the front and making it look a little more natural all right once I have my frontal plug to my Desire, I don't like my frontal to ball. This is how I like it. I usually go in and cut off the extra lace in the front, and this is how my pre plug is looking. I love the way. It looks right now now so go ahead and move on to making some baby hair. I just take off the front part. The first hairline and I go in with mine, eyebrow razor. It'S like a little shaving stick I usually use, and then I just cut off my baby hair, just making it shorter that it looks a little bit more realistic, all right after cutting my baby here, I just went in here and I took my Nairobi for me. Mousse - and I just um put that in the front just to lay down my baby here, all right. So after lady my baby here, I just took my spray bottle with water in it and the parts that look frizzy on the wig. I wanted to define the curls, so I sprayed the entire wig with some water just to refresh the curls and define it more, and this hair is so pretty. The curls are so pretty after that. I just took my pair of scissors and I chipped off the ends of the wig, just making it look easy and making it look a little bit more nicer. Are you guys without any product on this wig? This is how the wig looks after a customized. It very beautiful the curls are popping okay, look at our hairline, it's very customized. It looks natural and I just love the way the wig turned out all right say so my wig is almost ready to be put on. Okay, but first I need to cut off that extra piece. That'S under the lays the extra cap I just took my pair of scissors and I've cut that extra cap off, and this is how the wigs looks inside all right to make sure that the wig fits on my head and snug my head. I always go in at an elastic band. You want to measure the elastic band I already measured of mine, so I know how it fits around my head. You want to go in and sew it into the wig. You want to sew it on each ear tabs using your needle and thread. You want to sew one side, and then you want to move on to the next side and sew the other side. This will just help the wig still secure whether or not you glue it down. Usually I go and still glue mines down, but if you don't want to blow it down, having a elastic band is a more secure way to have the way safe and snug. On your head, all right, you guys so after you cut off your thread, this is how your elastic band supposed to look it's supposed to be some on nicely and firm that it holds your head. Now, if you like to bleach your knots, you definitely coalition up before you started making awake. I don't bleach my knots. I just turned my lace with my foundation powder and that's what I'm doing, I'm using my Mac foundation powder and I'm just tenting the lace to my skin so erase a so. I am done making my wig, I'm done, customizing my wig and I'm done tinting. The lace I went ahead and put my wig on and look at those curls. Yes, anyway, I did went ahead and added my came to curling condition in the front just to define the curls on the front. So, a little more look at my hairline, I am in love. I love the way this wig turned out. As always. I hope you guys enjoyed this video. Thank you guys so much for watching and I'll catch. You all in my next one bye, you've got ta know what this ain't live: weaker,


Comments
Caroline Fabb TV: Happy New Year (12.27-1.7) 3% Discount no limited with code "Pearl2019" Up to 30% Off GOT FREE 3D Mink Eyelash Every Order GOT FREE 10INCH Lace Closure Over $199 GOT FREE 12INCH Bundle Over $299 GOT FREE 10INCH BOB WIG OVER $599 Hair details: deep wave 18 18 20 20+18 frontal Get This Hair Now ➤ http://bit.ly/2ScJr3G ★ Alipearl official hair store ➤http://bit.ly/2SbHapE ►Use code:“alipearlyoutb”to save $10 Top selling deep wave 3 bundles with closure➤ http://bit.ly/2ScmDkC Recommend deep wave lace frontal wig➤ http://bit.ly/2Scd4T1 email: [email protected] (Provide Wholesale) WhatsApp:+8617719937661 ★Alipearl Hair Aliexpress Official Store Links ↓↓↓ Follow Store + Add Hair to Cart= $10 Coupon More Coupons: Get $5 OFF $199 $20 OFF $599 $50 OFF $999 Deep Wave Bundles with closure➤http://bit.ly/2Gud2nO Deep Wave Bundles with Frontal ➤http://bit.ly/2GtN9Vi Deep Wave Lace Front Wig ➤ http://bit.ly/2GucYV6 Recommend Body Wave Lace Front Wig ➤http://bit.ly/2Gyqnvq Top Selling Straight Lace Front Wig ➤http://bit.ly/2GwJF4i Any Need or Question, Contact us: Whatsapp/Imessage: +86 157 3748 4815 Email: [email protected] Ali Pearl Wholesale Hair Bundles: https://www.amazon.com/gp/product/B07CBNM351?th=1 Straight Frontal with bundles:https://www.amazon.com/dp/B0786YRGQJ?th=1 Straight Closure with bundles: https://www.amazon.com/dp/B078DY18WK?th=1 Follow @"alipearl_hair" on Instagram:https://goo.gl/SjMrzq Follow @"Ali Pearl Hair" on FaceBook:https://goo.gl/GFnwNk
Deidre Rilry: You are amazing I love how you explain everything from start to finish good job
MsTina'sEverything: So beautiful I love it
Lez Macon: I’m just now getting into making wigs so I’m watch this to learn from it
Queen Adora: love this so pretty
LaWanda Belk: Beautiful!!!
Kersha Beaver: Great job as always
Mildred Dawson: Very beautiful Caroline!!!
* Jackson: Very beautiful wig
Rita Osasere Isibor: So beautiful nice one
Caprice Jeffery: yessssssss girl I loooooooove your work
judann brumfield: Beautiful
Teeciya Curly: Absolutely Georgous ♥️♥️♥️♥️
Kelly: Thank you!
Ronda Lomax: Your professionalism is out of this world! If you come to the Washington DC area, I want to come to your class. Do you do make up videos?
Maxine Prince: Nice job
STL CHIC: This wig you made gorgeous. Do you make and sell wigs?
Lee'sa Savage: Can you please make me this wig please