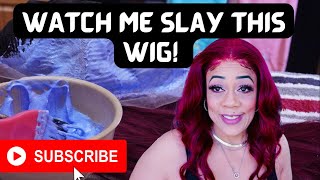
Super Easy Flawless Hd Lace Wig Install | No Bald Cap No Plucking | Clean Hairline | Rpg Hair
- Posted on 12 March, 2022
- Full Lace Wig
- By Anonymous
Hey beautiful people! Today's tutorial is all about getting that flawless wig install with an HD Lace Frontal. I always showed how to create layers in your hair. I did this wig install without doing the bald cap method and without using glue. Hope you guys enjoy!
#wiginstall #flawlesswiginstall #chevb #RPGHair
The Skin Melted HD lace wig is from https://www.rpghair.com/
►► : https://www.rpghair.com/invisible-hd-l...
Discount Code: Chev10 (Valid for the order over $235 )
***********RPGHAIR Tax Return Sale***********
$50 OFF OVER $359,
$30 OFF OVER $259,
$10 OFF OVER $149,
DISCOUNT CODE: TAX
Time: From March.12th to March.28th
-------------------------- --------------------------
Invisible HD Lace Upgrade Clean Hairline 13x6 Lace Frontal Wig Silky Straight Hair [LFW96]
Length: 22 inches
Density:180%
13*6 Deep Parting space
★ Skin Melted HD Lace
★ Upgraded Clean Hairline
★ Whole Front Bleached
Very Affordable Price Starts at $175
More Affordable 13x6 HD Lace Frontal Wigs: https://www.rpghair.com/6-parting-lace...
------------ ------------
Youtube Channel: https://www.youtube.com/c/RPGHair
Instagram: https://www.instagram.com/rpghairwig/ @rpghairwig
Facebook: https://www.facebook.com/rpghair/
0:00 Intro Before and After
0:31 Wig Unboxing
1:09 Lace Frontal customization
2:30 How to cut layers in your hair
3:26 How to prep your natural hair for a wig install
4:02 Flawless wig install
4:21 How to cut a lace frontal / how to cut a lace closure
5:18 How to melt a lace frontal for beginners
6:16 How to create baby hairs on a lace wig
6:38 How to make your lace look like scalp
NOSE CUFF website https://www.houseofchevb.com/collectio...
Intro music: https://www.youtube.com/watch?v=M6AX6d...
Social Media :
Twitter - https://twitter.com/damnthatschev
Instagram - https://www.instagram.com/damnthatsche...
Snapchat - damnthatschev
Facebook page - https://www.facebook.com/Damnthatschev...
For Business Enquiries: [email protected]
Nationality: Jamaican
Based: Canada
Age: 27
First video published in 2017
Camera: Canon 90D https://amzn.to/35nZqYa
Editing: Final cut pro
Disclaimer** This is a sponsored video. All opinions are entirely mine.
GWAN BIG UP UNNU SELF ! XOXO
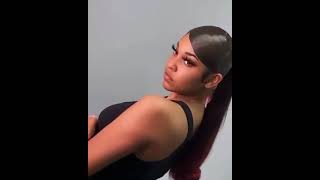
Do well one beautiful people. I am chef b, welcome back to my channel, make sure you are subscribed down below in today's video. We are about to do another wig installation and customization and we'll be styling this unit from rpghair.com. Now the hair that i receive is this 13x6 invisible, hd and clean hairline wig, and i got it in 22 inches and, as you guys can see, it is silky straight. So this is how the clean invisible hd hairline is. Looking. You literally don't have to do anything with this wig. You don't have to pluck it. You don't have to bleach the knots. The wig is perfect straight out of the package. So what i'm going to do is i want a more sleek back. Look. We want to make sure that the wig is flat. Okay, we don't want them humps and grooves on the way. So what i'm going to do is i'm going to take this wax stick and what you want to do. Is you don't want to use too much wax, because i sometimes make the mistake of like putting too much and then the top of the hair look greasy. So you want to be mindful of how much you put on you literally: don't need a lot once you're using the hot comb, so it's just to help to get it super flat, but you don't need a lot. So i'm just going to take my hot comb and go over the parting. Make sure that my part is nice and flat and i'm just going to lift up the corners to get a sleek back. Look so a lot of times. I want to try um to just make my wig lay flat in the front so that i don't have to do like them: big old, baby hair. So that's what i'm going for. So what i did. I used some heat protectant in the hair because again this is human, hair, honey, 100, human hair and i'm not trying to have it burnt and dried out. And none of that, so you got to make sure that you do the proper measures to make sure that your hair lasts as long as possible. So this hair is a hundred and eighty percent density, because i wanted to look more like a silk price. I wanted it to look as natural as possible, so 180 thickness was perfect for me now, with straight hair and the shape of my face, i wanted to do a layered look, so i'm going to show you guys how i cut my layers. Now, i'm not a perfect perfectionist. Is that even how you say that, but it doesn't have to be perfect, i'm not a professional um yeah i it doesn't have to. I just want to make sure that the wig shapes my face nicely. So i'm just going to do the layers to just give that early 2000 type of look silk, fresh perm, all that good stuff y'all know what i'm trying to go for. So i'm just going to continue to do that until i'm satisfied with the shaping in the front. Now, once i get the shape, how i like i'm, just going to take my flat iron and give it that black girl bone. That'S what i call that so we're just gon na bump the front a little bit so that it curves inwards and again. This is all to shape my face now. For this look y'all know, i'm a lazy girl, um we're not about to do the ball. Cap method and my hair is looking like girl. You need to wash this so after this style, i'm about to wash my hair and redo these braids okay, because girl, then birds are tired, but again this is a protective style. I don't feel like touching my hair. So i don't mind my hair being in braids for too long just put some um oil on my scalp put some edge, not edge control child, put some leave-in conditioner on top and that's it so, as i said, we're not doing the ball cap method, i just Laid my edges back and then put on my little stocking cap to um match my complexion as best as i can, and then, because of how easy and effortless this wig is, you don't have to do much like look. How look how natural that looks in the front once you pull it forward away from your edges babes this wig is laying so i'm going to show you guys how i install like most of my videos. I show you guys how i installed. Sometimes i switch it up depending on the type of wig and how much work i actually put in. So the next step is to cut the lace on the side to make sure that it aligns properly with my hairline and also that it fits around my ear. If i want to push the hair back, so i cut there first to see how it's flying up and once i'm satisfied, then i melt the lace now. The next step is that a lot of times companies do a widow's peak with the wig. I don't have a widow's peak. I want the weight to match my natural hairline as best as possible, because that's what suits my face right if i was meant to have a widow, speak i'd have a widow's peak and i feel like it came down too far on my forehead. So i just cut off that extra hair in the front, just be careful with that. You don't want to um over cut and mess up your lace like that ain't, never good! So once i'm satisfied with how it's looking, i'm just going to take this ebin um lace, spray and just spray it directly on the front, as i said, lazy girl method. I'M doing this super fast, because i want to slay this wig in five minutes. If i could so that's what i'm doing, then i'm going to use the tension method and use the um elastic band that you can get at your local beauty supply store like i did, or you can get it on amazon and i'm just going to use the Tension method to melt the lace onto my skin and then, while that's drying, i just take my flat iron and just touch up where it needs to be touched up with this wig now. This is how the hair is looking on the inside guys. This hair is so beautiful in person like i am super impressed now. Right here is an option. Okay, this next step is an option. You know i like the soup as much as i say, yeah, i'm gon na try to just wear the hair sleep back. Don'T do them baby hairs or the edges in the front like you like what you like and everybody got their own preference and i like the soups in the front. So i created my little swoops by cutting um just a little piece in the front and then take a flat iron, a very small flat iron and curl. It upwards, then, do the spray on top, and then i'm just going to take a little bit of my contouring powder on the lace and i'm going to take my fingers and rub that in so. Basically, i'm trying to make sure that it matches my scalp and everything blends nicely together, and this is a completed look. Let me know what you guys think the details for this unit will be in the description box. All the details you need you'll need will be there. Let me know what you guys think don't forget to subscribe to my channel. Follow me on instagram snapchat and twitter and tick tock at damn. That'S chev and i'll see all beautiful people in my next video go on big up on yourself, bye, guys,


Comments
95KyBoo: Slay diss! I’m loving this straight look!
Sybil Davis: Hey Chev, you did an awesome job on the unit!!!! It is fire !!!!!
Sonia Johnson: Love it!
La Wanda Hodges: You never disappoint babies! Sooo
Gill Perry: ♀️♀️This is really pretty Chev
D. Dot: Do you sell your wigs after you used them? I love this unit
Abongile Nyovane: Waa gwaan beautiful lady... Flawless indeed Chev
Daybe Baby: Always laid!
Kimberly Warren: Lovely
Shantana Redman: Babe look these for suree ❤❤
Nishka Anna-lee: Discount code doesn’t work ma’am.
HaPpY ForeverGr8ful: Niceeee
Peter lio soft dancer: Happy Sunday
Sue Walters: Tried getting this wig. That discount code don’t work.