Start To Finish Install Ft Superb Hair | Arrogant Tae Masterclass Review
- Posted on 10 March, 2021
- Full Lace Wig
- By Anonymous
In today's video, I will be doing a start to finish install using Arrogant Tae inspired. This is also a Arrogant Tae masterclass review where I will be discussing what was covered, what was not covered and what I learned overall.
Products Tae used
Slanted tweezers for plucking
LA girl pro conceal for bald cap method
Mesh nude cap
Ericka J hold me down adhesive (watermelon scent)
Climax style me hair spray (for when you are hot combing your hair)
Dye stick, couldn't find the one he used but it has an applicator brush for the tip which is really important because it helps create more precise lines
Wig link: https://bit.ly/3a8Bzud
Wig length:18 inches
Wig density: 150%
Coupon: KIE
Top selling 360 lace Loose wave human hair:https://bit.ly/2TBVWup
E-mail: [email protected] (Provide Wholesale)
WhatsApp: +8613326398647
Superbwigs Wig Category Links ↓↓↓
360 lace wigs Link:https://bit.ly/2SuNMzx
13×4 lace front wig Link:https://bit.ly/2F4Gv3Z
13×6 lace front wig Link:https://bit.ly/2T792e2
Full lace wig Link:https://bit.ly/2HiBV5M
Follow us know more about promotions and fashionable hairstyles:
Instagram:@superbwigs
Facebook: https://bit.ly/2Jc1OG9
YouTube:https://bit.ly/2Ce91Q3
Timestamps
00:00 intro
00:28 plucking
04:50 bald cap
09:06 lace installation
17:50 baby hairs
22:01 customizing part + hot combing
25:06 styling
25:44 outro
Intro song : Solly Bandz x Vibez
YT: @SollyBandz
IG: @Sollybandz
Music provided by:
-------------------------------------------------------------------------------------------------------------------------------------Watch More of my videos!
//
Synthetic Wig Reviews
IS BOBBI BOSS YARA WORTH THE HYPE?
https://www.youtube.com/watch?v=Cy3_R7...
JANET COLLECTION GABRIELA
https://www.youtube.com/watch?v=yBItfr...
Virgin Hair tutorials/reviews
STEP BY STEP LACE FRONTAL INSTALL FOR BEGINNERS
https://www.youtube.com/watch?v=lac_nO...
AFFORDABLE CURLY HAIR
https://www.youtube.com/watch?v=ae9LKa...
DARK SKIN FRIENDLY? MY HONEST OPINION ON TRANSPARENT LACE
https://www.youtube.com/watch?v=Naff9n...
Fashion Videos
HOW TO STYLE THIGH HIGH BOOTS
https://www.youtube.com/watch?v=gAlP3k...
FALL ESSENTIALS: THE CAMO JACKET LOOKBOOK
https://www.youtube.com/watch?v=X-1wBE...
------------------------------------------------------------------------------------------------------------------------------------------
C O N N E C T W I T H M E
Snapchat:@ayethatskierra
Instagram: https://www.instagram.com/kierrachane...
Twitter: https://mobile.twitter.com/kierrachane...
Facebook: Kierra Chanel
FAQ
Age:20
Race:African American
NO FREE VIDEOS, POSTS OR PROMOS! Please email [email protected] for serious business inquiries only!
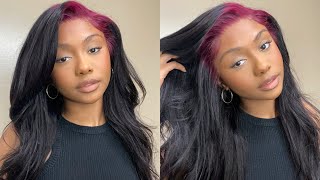
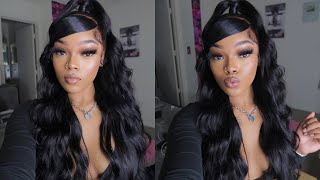
What'S up you guys welcome to my channel, my name is kiara, but i go like cakes kick somebody case with cheeks kiwi, whichever one is following me today, i'm going to be sharing with you guys what i learned from aaron, tay's master class and i'm going to Just discuss everything that was discussed in class, everything that was not discussed in class and what i learned so we're going to get right into it. So um we did not go over bleaching bleaching. The knots in the master class we're just going to get into the plucking. I personally like to use my hot comb and comb everything back just so i can see the areas that need some work and, as you guys can see, this is the very dense frontal um. This hairline does not match mine whatsoever, so i'm basically going to be using some slanted tweezers and i'm just going to be plucking where i see fit. We start off by taking out the perimeter, you're always going to do this because you don't want it to be. Like too ball in the front, so just preserve those hairs, because those are normally the baby hairs anyway. Just be mindful that the more you pluck um, the more natural it looks, the more likely it is to bald faster. That'S my only thing with plucking i like to plug until it's a little bit natural, but i don't like to go too natural because i know that it'll fall soon. So i like to leave a little bit of fullness in there, but just keep its personal preference. But just keep that in mind, so in the video k mentioned that he uses a white towel and i think that's a very good tip, because the white canvas lets you see, everything that you know, dark clothes or even your skin collection doesn't show so always be Sure to use like a white canvas and be on a flat surface when you are plucking so that you can see everything clearly paving this city paving this city. You know you know so at this point, i'm brushing in the hairs that we excluded i'm just going to brush these in and then i'm going to begin plucking that hairline just so everything could be seamless and then also just try to mimic my natural hairline as Much as possible, because mine does not look nothing like that, okay, so at this point the hairline is looking a bit more doable, as you guys can see like plucking is not like a two-minute thing. It takes a while to get a good hairline, so i just want you guys to be patient with the plucking process, because it can be very tedious, but the end results are always good. So just take your time with this: try not to pluck too heavy-handedly always pluck on an angle and then just focus on the areas that you feel personally are just too dense for your liking and just yeah just focus on those areas. And after a while, you will start to see that the hairline starts to become more to your preference and at that point that's when you would just move on to the next step. So i won't do the other side on camera, but i do want to show you guys the difference um. This is the side that i plucked. Clearly, i could do more plug-in, but that was good enough for me and then that's the side, that's unplugged and when you're satisfied with both sides, you're just going to move on so getting into the install we're going to start off with some gossipy gel and i'm Just looking my edges back, you want to be sure to use small amounts of this product so that it doesn't interfere with the adhesive that you're going to be using later on, to install your wig um, so yeah, i'm just using this gel, i'm going to click It back and then i'm going to use my blow dryer to make sure all of the hairs are out the way for when i get ready to apply the cap. Okay, so we're going to be using a nude mesh cap. Tay really stressed that when you're putting these caps on, you need to stretch it so that you're able to see your hairline and honestly, i'm gon na put y'all on game real quick. If i want a really like seamless ball cap method, i use sheer tights personally and you can pick those up at your local walgreens or your beauty supply. Try those out - and let me know like if you see the difference because is a big difference. This step is optional, but you can use the adhesive skin guard, which is from erica j um. I always use her products. I like this gengar because it's one is the prep for your adhesive and then also it's a protective for your skin. It acts as a barrier for any oils, um that you may have while wearing wigs, and then it also acts as a barrier for like sensitive skin. So in case any event that you do like have breakouts or anything from adhesive. I will always go in with a skin guard, so, okay, so we're going to apply one layer of the homie down adhesive in the video tay uses, the watermelon kind of erica j carries. I don't really know the difference between the two, because i don't have that particular product, but i do know that the homie down adhesive has one of the strongest holes that i've ever experienced in wig making years. I'M not even sure if it's a big difference. I just know that that one is scented but um, if you guys are looking for a really good adhesive with a strong hold, then go ahead and check out her products. I'Ll leave her links in the description box once the adhesive dries you're going to take some foundation or concealer of your choice, something that is really close to complexion to your skin and you're, going to apply a very light layer. They stress that it needs to be very light, because if you kick on these products, it could definitely interfere with how the how the adhesive cures and how it melts into your skin so just go ahead and go in with light strokes, but make sure that the Concealer or the foundation, whichever one you choose, that it's close to your complexion, because it's supposed to be a bottle cap you're not supposed to really see it after you apply this product, so okay! So when you're cutting this cap make sure you have some really sharp scissors so that you won't be making like a little fuzzy balls and stuff when you cutting it otherwise, you'd go in with a razor. That'S what i ended up having to do um but yeah. You just want to cut up until where your glue, where you laid the glue, that's pretty much your guide, so just cut as close as you can to there and then any extra fuzzies that you have be sure to cut those off paving this [ __ ] Crank paving the city, okay, so in the video tay made a very valid point, the little combs that they install into into the wigs. They really do be, making the wigs a little bulky depending on how your wig fits you um. So they really not that necessary. Unless you actually use those and you're sticking them into your braids, but if you don't use those just be sure to cut them off otherwise, it'll have your wig all bumpy and lumpy and also be sure to cut the lace in the back. So we're just to get into installing tay cuts his lace before he installs. So what he did was he cut the lace, but he also left a little bit of extra lace. Um i'll tell you guys why he did that later, because you're going to need that. Actually so be sure to cut the lace but don't cut it too close to the hairline, because you're going to need the extra lace for when you're installing it later on. I would steady saying later, like y'all, not about to see it in two seconds but moving on um. You want to take the same foundation or concealer that you used on your cap and you're going to apply that on the inside of your lace and then you're. Also going to apply it on the top part of the lace, okay, we're getting into the fun part y'all. So look at look! Look at it! Look at it! Y'All that look like my skin. I didn't even order yet stop playing. Okay. I was very happy because, like yeah anyways we're about to start applying the adhesive so tay does not. He did not apply the glue from one ear to the other y'all. Oh before i do that. I'M going to put my um i'm going to clean the surface. Again with the alcohol and then i'm going to put the skin guard down, i told y'all this gengar acts as a barrier for the oils and those who may have sensitive skins and experience reactions with the adhesive use skin card, but um yeah so tay doesn't he Doesn'T apply his wigs from ear to ear at one time he does one side at a time so right now, what we're going to do is apply your layers of adhesive um. They recommend you do three to four. If you're like a very active person, and then you can go up to seven layers with this adhesive according to eric j, so i think i ended up doing three layers and here's the kicker y'all. I was doing this wrong the entire time. I did not know that you could apply the adhesive back to back. So before i took this class, i was definitely applying like a layer of adhesive. I was letting it dry completely and then i went in with my second and third layer. No, you don't do that guys, because when you do that, you gave that glue all that time to dry. So, by the time you actually get to, like your third and final layer or whatever layer you're on the glue and dry it to the point where it's no longer not as thick so make sure you're actively applying these layers, you could go in i mean you Could wait until it gets a little clear but make sure you're applying it back to back so that it all dries at the same time and then once it gets to a like a a tacky consistency. That'S when you're gon na go ahead and you're gon na apply it get up, get up. Okay, so something i noticed. One taste sticks the glue down, basically every single hair that you want to be in this glue. It needs to go down right here and right now, so make sure wherever you laid the glue. That'S where you're going to be positioning your hair not put positioning the hair a little bit forward. None of that. You need to make sure that all of the hairs that you want to keep is intact with the glue right here. This kind of basically helps with um speeding the process of installing the wig up because normally like we'll go in and we'll like, apply the lace and then we'll go back and we'll go over the parts that didn't have the glue. No, you don't want to do that, so what they suggest to do is leave that little extra space, but you see that lace right there. He left all of that lace right there, but all the lace - that's not adhered to the glue right now. All of that is being cut off ain't that crazy y'all. We we we be doing too much. We making it hard for ourselves at this point. Basically, all we had to do was make sure everything was laid in place, so we don't even have to go back and apply glue anymore, but it'll get better with practice, because i still ended up having to go back and put the glue where i needed it To go, but that's just something that um he really stressed up in the video so make sure when you are applying this, wherever wherever your hair is laying that's where it's going to be, laying because once you get to cutting that extra lace, everything else coming with It you know, so i'm going to go ahead and do the other side remember not to let all of the glue dry in between you apply your layers. Make sure that you are actively applying these layers back to back so that it all dries pretty much at the same time and you get that little tacky consistency before you place the lace down, and then you guys will see all of the extra spaces that you Know don't have any glue on there. All of that is getting cut off, paving the city leaving this [ __ ], paving this [ __ ] get up so right here. You guys see all of the excess lace that's being cut out, but, as you guys can see, some of my baby hairs are still not adhered to the glue, which is why i went back in there and i applied the glue some more. But the the goal is to not even have to go over your work pretty much and that just helps minimize time. It helps keep you more efficient and it just keeps your work cleaner too. So so now, i'm applying the band. The band is basically assisting your milk, it's helping your lace melt into your skin um. When i apply my band, i personally like to go underneath the dryer for a good five to ten minutes. I didn't demonstrate it in this video because i was already like everything was already set up and i wasn't trying to get up so i just use the blow dryer and i just you know blow dry it over the bin from ear to ear. Oh yeah, the hair is from super b wigs. This is their 13 by 6 body wave 99 j. This was 20 inches. It came like this fresh out, the box um. I think this is like a 150 density. I would say just like on a small. It'S on a smaller scale in terms of the density and then also the knots was as hell, and this also was a medium brown lace, y'all, and i'm saying it to say this because you're about to see this milk just watch hold on wait. Look at that melts on a medium brown lace. Are you kidding like what i don't even need? No baby hairs. Oh my god! Thank you so much today, but no for real. This is on the medium brown lace y'all and i was very shocked because, ideally for you to get the best results, you need to use an hd lace or transparent lace, but yeah um in the video. He didn't really like discuss that much. He didn't go into depth like the different types of legs. I would do a demonstration on that because i already plan to do a video like that. But in the words of tay hd lace, transparent lace, even a little bit of swiss lace, because swiss and hd are like kind of wanting the same. And then, if you absolutely just, has the last resort go with the media brown lace and you guys can see in this video. The medium brown lace is doing me a little bit of justice, though moving on to why i took the class in the first place. Baby, the baby hairs y'all, this freaking tip he shared with us - is about to change our life literally like oh, my god, i was my mouth was on the floor after he showed us this y'all, but so basically um the baby hairs. The deal with the baby hairs, thinner, the hair and the shorter, the more natural, the thicker and the longer the more you know dramatic. It'S going to be so. Basically, whatever your preference is, go ahead and pick out your pieces of baby hairs and what you want to do is for each baby hair. You need to pull it out and you need to hot comb it towards the front. So basically you're training the hair to come forward. So make sure you guys do this step. It'S very important after you do that you're going to cut your baby hairs to whatever length you desire and then we're going to get into the parts that shook me baby because i was just like. Oh, my god, i've been struggling all this freaking time up until now, y'all, so the key to getting the arrogant tape, baby hairs. You just have to curl the baby ears. That sounds so simple, but just think about how important that is. If you curl the baby hairs and then also go ahead and use like a small flat iron, don't use that curling iron like i did, because i burned myself a couple of times, but if you curl the baby hairs down, basically you pretty much training it to Go in the swoop direction, if you think about the logistics of doing a baby hair, let's get real technical, we're basically forming a c. What you think a curl pattern is it's either a c or an s? So if you curl it, you basically just set your baby hairs in place already. The only thing you doing is just you know finishing the work yo. When i tell you that [ __ ] shook me up. I was just so thankful. I i would oh. I would thank him like a thousand times if i have to y'all it's such a small, small, small small detail, but it makes a big ass difference. Oh my god y'all. I really hope they help you all out and then honestly, like this whole entire install y'all saw it was the basics, but it was just the little things that really took it over the top so like. Ah, i [ __ ] love taping this. He was really good for sharing that little tip with us. If you knew about this tip, let me know because why the [ __ ] you're waiting for nobody else, but that i know y'all know so make sure you curl the baby hairs this time. I did it without cutting it first, so you guys will see. I actually curled it and you guys will see like because of that curl. The baby hairs are just going to be laid honey. Yeah, don't forget, don't forget to hot comb it first i coming forward. First training a little bit and then finish it up y'all. I was floored after that. I i'm so much more confident doing my baby hairs. I can't even talk i was so excited. I was so excited to do this and that [ __ ] worked. It worked out a lot, but yeah um after that we're just gon na get into like the final. The final part is install, which is nothing too crazy. Get up get up, get up, okay, so moving on to the party, my part was already pre-plucked, but basically in the video tape plucks, the part you know like you would normally pluck it not too big, because you don't want to handle my [ __ ] wide Ass part and that's just going to look very unrealistic and then he goes in with a die. A die. Stick i'll try to include a picture, and basically you know how some people you take that little spray and you put the comb down and then you spray over the parts so that it creates this crisp line. Basically, tay uses this dye stick. It does the exact same thing, but it gives a more natural appearance. So you basically touching it up yourself as opposed to spraying that really harsh line, and that was very helpful, too um and then, after that, he just pretty much hot comb, the top. But i personally like to go into sections. This is my personal little tip right here. Y'All, he ain't do this in the video i'm doing it. Okay, i'm showing y'all um go in each section, use a wax thick and then he also uses like a finishing spray. I use the erica j holding spray for this part, but just go in with your hot comb. Um use the finishing spray. I don't know which one you use i'll, try to find it and link it down below for y'all and then yeah, just hot comb. It and you're gon na have yourself a really cute ass, install y'all. I really hope this video helped y'all. I really do if this video helped y'all in any way. Please, let me know in the comments um. I really did this video for those who, like couldn't take the class but really wanted to take the class. I don't really mind sharing the information, hopefully i'm in trouble for it, but yeah. If this helps you in any way, please let me know if you know this could help someone. Please share it with other people. Each one teach one. We all need to be out here slaying these laces baby because look all of these little small little tidbits that we've been missing out on all these little small gems. Look at how this man i can't wait. I can't wait to continue to work on this and improve yeah. The class was well worth the 500. A lot of people was just. It was a very controversial subject, but it was worth it. I learned a lot and that's why i'm here helping you guys out if he has another class, i definitely will do it again, there's never nothing! You can't learn! That'S what i learned from this class like baby, those small and he's. Basically, this class really taught me that i was doing everything right and i was well on my way to mastering the lace it's the execution behind it, because, honestly, everybody has been doing wig installs, but those little tidbits, like i told y'all the little gems he shared With us man over the top installs, i really [ __ ] with pay. For that i appreciate the class. That'S all there is to this video, i'm just doing my. You know a little bit of my last little customization get up get up this hair. Some super big wigs super cute wig. I just wish it was a little bit fuller. So that's why i am going in and um using my razor to create some layers, try to get a little bit more body up in this [ __ ]. But if you are into you know the natural look, this was i needed voluminous. I needed to be that [ __, ], okay, it's the it's the color. For me, this wig was good and compared to all of the other colored wigs i had this wig was great. I didn't really receive no shedding other than the um, the hair that came out from plucking. I really didn't receive any type of shading or anything like that. But of course i will keep you guys updated if you enjoyed this video, make sure you hit the like button, comment down below what you thought again and then subscribe to my channel and turn on your post notifications, so that you're, aware of when i post and As always i'll see you guys in my next one bye, you


Comments
Kierra Chanel: Hey everyone! What else would you guys like to see? What do you need help with?
Gabby: She invested in herself. Everyone complaining that she spent $500 to learn a skill that can make her look good AND feed her if she decides to do other people’s hair are the same ones going to the club every weekend spending their last $20 Always invest in yourself. You slayed sis! Thanks for sharing!
Faithfully Asia: Thanks so much for sharing. The baby hair tip and YOUR tip at the end was just what I needed. I let them ads play too babygirl you deserve it.
Aliyah Brianna: I just wanna admire how professional you are and the choice of words you use to really explain what your doing! love this video
Hillary: I love the fact that you’re sharing information that not everyone is privy to, not a lot of ppl like that these days.
Nia Hackney: Bruh thank you! Bc us poor folks still deserve to look cute af
ms. Aayoo: applying the adhesive (or spray whatever) one section at a time is the key ! i learned this myself after practicing a few times. It makes the frontal so much neater and it’s easier too
Mel B: Tae knew what he was doing one way or another his tips were going to get out . The gag is I doubt he tells y’all the real sauce he played it real smart.
Miriam Njoroge: You did great I couldn’t afford the $500 so you saved my ass for real!!I love how you executed this tutorial I really enjoyed.Love you
Shyne5ever: This helped so much !! Especially the plucking part, how many layers of glue , cutting the access lace . This whole video . Thank you
Deja Davis: You slayed this install! Thanks for sharing these tips. I will definitely refer to this video for future installs
kay Popping: I love how well you explained everything I hope he doesn’t get this taken down because in my personal opinion it’s not like you stole the information you paid for it so now it’s yours to do what you please it’s kinda like buying a self help book and sharing game ♀️
DimesValentine: the more you pay attention to his IG Lives when he doing installs, the more technique you pick up on the babyhair tip been loaded in my chamber for a while i just wanted to wait til it came to light
Cierra Shantael: Man I’m damn near about to take these braids down just so I can install a wig thank you so much gorgeous
Taqwa S: Wow, you’re really the plug!!! Not having to wait for the glue to dry is gonna save me so much time on my applications! Thank you!!
TheHoneyPot: Girl!!! I don’t eeen glue my wigs down and STILL took some gems from this!!! The baby hairs!!! Yes ma’am!!!
Shaiya Wilson: Lol yeah girl I knew that “curl the edges hair” hack . it’s technically styled so when you go on and smooth it out with the gel ; you’re just setting it . The outcome just depends on how big /thick you make your curls.
Lo Montez: Thank you tae! And girl thank you you‼️ Took my wig game to the next level!
Dalandrea Mason: You killed this‼️‼️ I’m looking into doing my first wig on myself and you just boosted me foreal!
Tyfanni Made: Thank you for the glue tip, I would apply my glue the same and do another layer once it dries lmao now I know better! Always learning and you look bomb boo
It’s Nya ✨: You’re the bestttt
Spicy Gang: A moment of silence for people who paid 500 for this just for people to leak the video on YouTube and YouTubers showing us how he did it
ShesMelissaTierra: Yeah you ate sis ! This was for me , can’t wait until my wig comes in the mail so I can slay that shit ! All thanks to you ! Cause honey im def tired of trying to chase down stylist to install shit when I can just do it myself ! Salute to a real one sis , you’re appreciated babe
Amber Hasberry: Gworrrllll thank you, thank you, thank you! I just installed my wig yday and I’m going back at it today to make it look the way I wanted from the get go. ☺️ reach one teach one is my motto preciate you
Nae: You're so humble and super dope for this video. Bc I know you paid for this class and the fact that you are so forthcoming to share what you learned and pass it on to other women.... is super dope to me! Sometimes pple don't like to see others win or reach their level. They would rather tear others down than help them build themselves up. You've earned a new subscriber from me. Thanks
Nikki Harrison: You were very detailed in this entire process, which was so DOPE to me! I appreciate all the tips and tricks from Tae class!❤
Cookie Almeida: Bought my first wig and ima be watching this video everyday till I install it you break everything down really well
NHSfLyESTx23: i don’t even wear wigs & you just gave me all the tips to slay! i might have to purchase one & put these tips to the test! shoutout Tae & you girl!!!
Joyce: You are doing the lord's work girl!... Not all heroes wear a cape! Now everybody screen record this before it gets taken down
Sid Alexandria: Thank you for sharing these gems with us! This install looks great on you! ❤️
Gigi 💗: A generous queen! Thank you for sharing especially your tips at the end with the hot comb! I have a red wig too so this definitely came out in my favor new subby!
Kelah Cash: This was super helpful, sis! Thank you!! That baby hair tip, BABYYYY!!! HEERRREEE for it!!! I just gotta find a flat iron small enough!
SHE IS: Girl you did GREAT I just did mine while watching your video. I'm usually impatient and skip through parts of tutorials I dont like or want to hear but I love your personality, professionalism, how your describe things its PERFECT.
ClassicBulletsTV: When you said thank you so much Tae i bust out laughing cause girl you DID THAT
Sammie: Learned so much from this hair tutorial , I will be applying these techniques to my install . You’re very pretty
Cyn: Girl thank you so much for sharing my issue always is the baby hairs and glue. I’m going to try this out
Porshé Nichelle: You are life saver! Thank you so much for sharing girl!! I was doing it all wrong I was about to say F lace wigs all together cause I didn’t know why the hell it just wasn’t looking right
Life With Simply Kay: This was really helpful and I’m thankful for people like you ❤️❤️
A. S: Thank you gorgeous for the tips and tricks you did an amazing job
Juicy Jones: I love the way you explained the methods and why to us♥️♥️ yeah I’m a newbie at laces and your video was very helpful ☺️ thank you lil sis I appreciate you ♥️
ITZNYBAGZ TV: This wig install was so bomb !!
Lucie Brasi: You’re sooooo gorgeous & you most DEF slayed this install honey!
Nazirah Thomas: Yesss I'm so glad you shared this because I was just about to buy a new wig and these tips are gonna make everything easier and slayed
Courtland Iverson: Sis u slayed that !!!! Thanks for the gems as well I really appreciate this video. Hoping my install turns out this good!
SugaGum: your an absolute angel for sharing this video and tips from his class! you a real MVP!!
Our Journey Tarot: You make me wanna take my wig out n reinstall it
OG Parley: Thank you so much for taking the risk to help us, now I can do my own hair & stop going to hairstylists !!!!!
TheOriginalBarbieDoll: I feel like cutting the excess lace off instead of going back in with the glue only applies to the first installment because if you do that every time you reinstall your wig the lace will just keep getting shorter and shorter till the wig won’t even fit no more. It’s happened to me before & tae be putting a new wig on those girls every time. Regular people can’t afford a new wig or frontal replacement every week lol
Garden Of Jaz: No need to screen record I’m definitely gonna remember EVERYTHING! Like you said minor details but HUGE difference! Thanks for spending that $500 on the class bc with all these views you gone get it RET BYKE!
Tomonique Mixon: THANK YOU sister!!! My lace is about to be next level
LaTonya Stylez: Yesss thank you boo for sharing the details I wanted to take that class so bad I love the details the baby hair trick shook me
Tee G: Omg Thank you so much love ,these we’re definitely the Lil tips needed to get them baby hairs perfect ❤️
Biggg Shane: You didddddd that hunni! I needed these tips
ashthon jones: When you learn from others it motivates you to come up with more and New innovative ideas! This was awesome! And great tip from YOU at the end!
TnRedbone615: Girl you a real one for sharing this. Especially helping others. 'Cause a chick like me, is a true beginner at all this wig stuff. U definitely gained a new follower. Great video
Delilah's Jar: Thank you so much for this! I'm going to try this tomorrow because I have plans on Friday and I need this wig laid!
Melnetra Williams: defleeee help me BIG TIME just as you said we were basically doing everything right and on our way to mastering the lace but it was minor enhancements to know truly appreciate
BlackQueenC: The best tutorial! Now I feel more comfortable with the steps
MARIAH DENISE: Girl now I wanna install a wig because of this video and tips you gave I took Jonathan’s class and online girl this is better than the class thank you for sharing
Andrea J: girl i been doing the same thing applying 1 layer let it dry then apply another no wonder it lifts thanks for the tip!!
Da’Sharae: This is absolutely helpful & I can’t wait to try it !!
Cindy Taylor: Thankx for the baby hairs tip, shit I paid a real grand a few yrs ago on a lace wig install class. This sister is freaking bad to the bone, with her lace installs so I was willing to pay what ever, for Chole hair 7 class! You do better than me, because after paying that I wasn’t sharing a damn thing! Thanks again, Sharing is caring!
Monique Chanel: Love this video...and she was legit so funny when explaining about the baby hairs...GOOD JOB BABYGIRL
Flora Bell Adams: Bc of this vid im going to attempt to install my first unit this weekend with the bald cap technique. Thanks for sharing what you learned
robprofectiv: Great job! Thank you for breaking things down. Loved the end result. So pretty and natural looking. It was giving scalp.
Diamond Crook: This wig is Laid !!! Thank you sooo much for sharing these tips boo your absolutely amazing
World Of Model Ashanti: This helped me so much beautiful!!!❤️Thankyou ! I will be rewatching this when I install my next lace ❤️❤️
Cyann Armijo: LIKED AND SUBSCRIBEDDD - THANK YOUUU QUEEENNN!! You have given me some tips about the adhesive and baby hairs that are a GAME CHANGER SIS!! Can you give a review on your fav wig companies from 2020? <3
Loresa Savoy: Love love love this video and all the tips , I definitely learned a lot thank you so much !!! Each one teach one !
TishasaurusTV: You’re a blessing. Thanks for being helpful and not stingy
Maggy Valcourt: Wow you made it look so easy to do ! Thank you for the tips !
samanthaRae: yesss thank you, still trying to perfect the baby hairs but you did thatttt
COURTBUG: Omg thank you so much for this video, crazy how small ass tips make a big ass difference I would most definitely took the class, I’m saving up now just in case he has another class. Thank you again for sharing what you learned I was very grateful for this
Jazz Mowatt: I'm just learning how to do wigs on myself and this made me so much more confident to wear wigs out of my house❣️❣️❣️
Dominique: girl you ate this! thanks for the tips. love it!
Angela Eubanks: Thank you for the tip on curling the baby hairs!
Melanin Queen: Thank you for sharing this information. I’m extremely poor and just couldn’t afford to take his class . I can’t say thank you enough!!! I truly appreciate you helping people who has less then . God bless you
ShaQuavious Scott: This was very helpful, you did a great job !
All Things Lex 2318: Love this that baby Hair trick was a gem can’t wait to try it!!!!
EmpressJay: I just got my wig, this couldn’t have came at a better time
REE J: Girl I am grateful! You did a bomb ass job
Jessica O. Harris: One of the BEST install videos I have ever seen!! Finally some real tip and secrets!
zolaataelor: Yassss girl this video was life. Some very helpful tips that I will be trying out. ♥️
Latrice: Absolutely Amazing,This video has truly helped me to be a little more Tedious and not give up so easy. Thank you for sharing
CallmePhoenix: Sis...... THANK YOU FOR SHARING THESE TIPS
Sharna W: Girl just wanna say thank you thank you thank you. This has been so helpful. ❤️❤️
ashley holloworth: These tips were so helpful! Gonna try them tomorrow!
Kameryn Edwards: You did such a great job hun
Yorlanda Daniel: This helped me so much I really appreciate the help those tips were amazing.. u slayed the install
BaeB's TV: Honestly Jayda Wayda taught me how to do my natural baby hairs like that but I’m super excited to try on a wigggg !!!!! Great video
Zandria Bacchus: Hi! Thank you so much for helping me tame this wig girl
Isis Harden: I’m saying “GET IT GIRL!” through the whole video ❤️
Jus Jewel: Yes you slayed this wig, I def think La La helped asked those questions a lot of us needed! Hoping to slay my wig like you.
SKBD69: Damn you out here doing the lord’s work??? lol thank you!
Barefoot Contessa: I’m mad late but you did an excellent job, and you had me weeeeeak af. Thank you
Ruxy Bratz: Thank you for sharing this not everyone would do it after the investment you made it. You learned because that wig looks omg unrealistic super natural, clean and flat.
Aries Queen: Thanks babe, such a doll. I’m waiting to go get mine installed tomorrow because I struggle bad with trying to do mine, but this video is very informative. Thank you
Maya Hopkins: Great install and helpful tips 10K soon speaking it into existence ️
Isarel Hill: Thank you so much ❤️ your lace looks soooo good and the tips will be used
AstSpring: THANK YOU! Like you really got me laying my wigs like nobody bidness ❤️ just off this one video