How To Ventilate Full Lace Silk Top/ Silk Base ||How To Ventilate A Full Lace
- Posted on 02 September, 2021
- Full Lace Wig
- By Anonymous
Thankx for watching xo xox
LACE VENTILATION SERIES
https://youtube.com/playlist?list=PL3l...
Shop tools on Amazon
1.Brass ventilating needle set
2. Two holder brass ventilating needle set
3. Full lace net
4. Canvas block head
5. Wig stand
6. Tiny crochet pin
7. Styrofoam
8.frontal lace
9. 1yard Swiss lace
10. Coloured tape
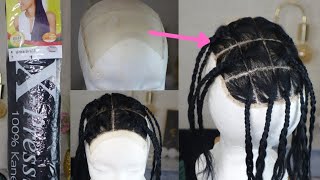
Hey guys welcome back to my channel if you're new here welcome to my channel. My name is sharon and please consider subscribing okay. So in today's video i want to talk to you guys about how you can get relate your silk parts of your full lace nets. Okay, so i've been posting videos about laser ventilation. I'Ve been posting tutorials about this ventilation. I actually have a laser ventilation series on my playlist, so you can check that out and some persons have been asking about this part of the foolishness. If, if it's going to be like, if it's going to be normal or it's going to look good after ventilation, so that's what i'm going to be talking about in today's video and if you're interested you can keep on watching for those that have been wondering if This silk part looks natural or for the insulation, i actually prefer the silk parts after the installation suit, like normal lace, because when you ventilate this part properly, it looks so much like your scalp and it looks so natural when ventilated properly. So i'm going to show you guys how i ventilate these parts. I can already have my stuff set up, and this is just a nylon bag that i use for ventilation. So i'm just going to take this out. Okay, so this cup, i have this kind of available on my page for sale in case you're interested. This is the fullest net and you can see how it looks. You can see how it looks. So i have it available on my page for sale at weeks by sharon. I'M going to also leave that in the description box. So first i'm going to start by wearing the cap on my money queen head. One thing that you want to do is to make sure that this part is properly stretched out, because that's the only way you can easily pick the holes or pink lace. Rather so you want to make sure it is properly stretched out. So you can use you. Can stretch it out, you can stretch it out and use a t, pin or any kind of pin to hold it down to hold down to hold down the base. So i'm going to also do that for this other side. So if you don't stretch it out, kicking the um silk top will be very difficult, so you want to ensure it is properly stretched out. But you have to be careful, so you don't rip, you don't rip your lips. I don't know if you can see that, but i'm going to i'm going to bring it closer. So you see that this stuff, the holes, are now very visible and i can easily pick it called. I can easily pick from this now so guys. I went back to put my nylon bag on the mannequin head, so it's very easy for you guys to see what i'm doing. Okay, so now that we have all this set up, we're going to start ventilating. Okay, so guys! I remember in my um other ventilating videos, i told you guys that i ventilate diagonally, and so i only use that method of ventilation for the lace. For this part of this, when it comes to ventilating the silk top, i use the vertical method of ventilation as i go, and i go with this direction instead of going in this direction. Okay, so the reason i do that is because i have noticed that because then i used to use the diagonal method. But one day i decided to like try the vertical method, which is straight line method, and i noticed that nuts were very well very much smaller than when i went to the diagonally. So what that means is when i've been today it tends to have bigger notes, but when you're, using like one or two strands of hair, it might be smaller, but because i you know use more than that amount of hair for this part of the release. Do not swear bigger, but when i ventilate using the vertical method, the knots are smaller, irrespective of the amount of hair, i'm picking. So that's why i have decided to like stick with using this method rather than diagonal method and also comes out. Well, let's also looks as natural as the diagonal method, so i already have my hair and my ventilating needle in place. Okay and i'm going to start ventilating now, so you want to start from the very first line. You want to start on the very first line. You pick you, you pick the um hole, you pick the hole, you pick your hair, you drag it down to hold it with your thumb and index finger and then you pull it out. Then you wrap the hair around the needle and then you bring it down. So already i already talked about this, like i already did this in my previous videos, but i'm just doing this again for the sake of those who haven't watched the video and they don't know how to do this, okay, but you can still go back to watch My video okay, so now i just did one ventilation, and this is like on the very first line, and so that's like the only hole i can see on this line so i'll, just assume that i'm done with that line and then go to the next line. So for these silk top parts i tend to leave about one to two lines before going to the next line, because it's very tiny and if i should ventilate all of the lines and all the holes, the hairs will be tightly spaced. And for me i don't know about all that's okay, that will look unnatural, so i tend to like leave at least a line or two lines and then move to the left next line to continue ventilating, so we're going to count two lines, one two and move To the next line, so for nestling you pick the first hole, you pick your hair, you drag it downwards and then you bring it out, wrap it around your needle and pull it out. Okay. So that's so you can see how how was it called? How um small the knot is, so i'm going to continue like that, so now, i'm done this line i'll move on to the next line. So i'm just going to continue this way and you can see how easy picking the glaze is. If i didn't stretch it out the way i did initially, it would have been very difficult to pick to pick the list. So that's why you need to make sure that you stretch it out properly. Okay and if you're wondering the size of the mannequin head, i'm using this is um 20. I think it's 24 inches many queen head, so this normally would help you to stretch out this, but you just need to like stretch it out more so that you'll be ensure that it's properly stretched out. So i'm just going to continue ventilating and i'll come back to show you guys. What'S the end result looks like so you see how natural, how much around this silk top looks after ventilation so guys. This is how far i have gone, and this is what it looks like so far. You can see what it looks like, so that's all for today's video guys. So if you like this video guys, don't forget to give it a thumbs up, you can also save it to watch it later and also leave a comment in the comment section below. Please subscribe to my channel for more amazing content. Thanks for watching and bye, you


Comments
Sparkle Update: Thank you Sharon, I remembered I asked this question on ur channel, thank you for explaining further, it looks really natural and real seeing it here.
Whitney Charles: Nice!! ✨ how do you seal the knot?
peepla7: I ventilate stretch panel just like normal...my canvas block stretches it enough and the stretch panel is in the direct center where no one's going to notice it anyway so I don't worry about any special measures for that part.
Mayowa Olatunji: Nice video.. been having problems with the silk part.. your video just helped me figure it out... Please post on how to do those thick parts abeg
miracle christian: Can you please make an in-depth video of ventilating diagonally for frontal and closure.......I hope you do this. It’s urgent
@TerriSpeas49: Am all here for it learning from y'all thank you for the video
peepla7: I ventilate over the seams too ...that way...no gaps.
peepla7: Ahhh I see... That's a silk stretch base, not a silktop panel. That's how I got confused. A silktop panel is more complicated....and doesn't stretch. Currently...I don't use a stretch base...they are annoying...but last time I did...I used power mesh. It has the honeycomb shape ... hexagonal... but blends like lace. Still annoying...but blends better
Mayowa Olatunji: So you did a video on how to start Ventilating a full from the from.. the you did how to ventilate the silk... Can you also do a tutorial on how to start the back part of the full lace???? And how to Ventilate on the band at the back and the thick parts???
peepla7: that's not a silk top ...that's a stretch panel if it happens to be made it so that be one thing but most of time when people look for videos about a silk top... that's a whole different thing and it has a different method of ventilation.
Chibuzor Grace: You are too fast with the wrapping