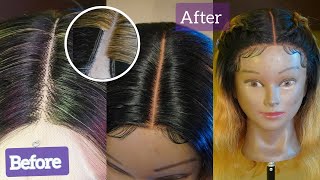
Do’S And Don’Ts Of Ventilating
- Posted on 22 June, 2021
- Full Lace Wig
- By Anonymous
Hi lovelies, welcome to my channel
I will be posting tutorials right here on my channel every now and then and since it’s completely free do ensure subscribe and turn on your notifications, so you don’t miss any video.
PRO TIP;
To be good at whatever you are doing, you have to practice until you perfect it.
First trial may not be so easy but don’t give up on yourself, you’ll certainly get there
Personal Trainings are available and you can book us for your special day.
Videos;
Contrasting backgrounds for ventilating; https://youtu.be/LMW7ZDCOp1o
HOW TO VENTILATE USING VENTILATING NEEDLES; https://youtu.be/HkOj3zc3zlk
VENTILATING CLASS 101(materials for ventilating )
HOW TO CHOOSE THE CORRECT LACE FOR VENTILATING
HOW TO MAKE WIG FROM BRAIDING HAIR
HOW TO MAKE DIFFERENT TYPES OF CLOSURE AND FRONTAL NETS
CLIP ON HOW TO 13 by 4 FRONTAL
HOW TO MAKE 2 by 6 LACE CLOSURE NET;
HOW TO VENTILATE HAIR: https://youtu.be/HkOj3zc3zlk
Link for wig measurement chart;
https://www.hairweavon.com/wig-cap-mea...
Connect with me;
Instagram; https://Instagram.com/Annessignature
WhatsApp or call; +2348106760720
Email; [email protected]
Connect with me;
Instagram; https://Instagram.com/Annessignature
WhatsApp or call; +2348106760720
Email; [email protected]
#ventilating
#wigmaking
#closures
#closuresandfrontals
#ventilatingneedle
#naijawigschool
#360lacewig
#tintlace
#bleachknots
#fulllacenet
#lacenet
#naijawigtoolvendor
#lagoswigmaker
#naijawigmaker
#londonwigmaker
#VIRALVIDEO
#Hairstylistinnigeria
#Naijahairstylist
You'Re fighting to grab hair you're fighting you don't want, because when you're trying to ventilate and then this is happening and then that's happening, and then this finally happens hello, everyone and welcome to my channel in today's videos, i'll be in today's tutorial i'll, be talking about The do's and don'ts of um ventilation so um. It is the first time of clicking on my video to what you're highly welcomed and, if you're, an old subscriber, i hope, you've been learning and i hope you started your business already so um in my channel. I do more of um have ventilation, although we touch other aspects from time to time, but for the meantime, we've been focusing focusing on hair latent. So now i'm going to be talking about the do's and don'ts of um, hair ventilation. Okay, so um every single tool or material i'll be using in this training is available for sale, so ensure you get it tools, because when you get the right tools, it will be easier for you to ventilate. You wouldn't have any issues while ventilating and then, while ventilation is very important for you to know, they have to be very, very patient with yourself. Yeah people um i've trained a whole lot of people. I can't even count um, i think over 500 plus or so and um from my trainings i've. I'Ve learned a lot of things. I'Ve noticed a lot of things and i'll be discussing every challenges. I i have um. I'Ve noticed them make, while you know teaching them while training them. So in case you you're you're having a different challenge that is different from what i've been handling in this video. Do. Let me know in the comment section: okay, so number one thing you have to we have to talk about here is getting the right. Mannequin head, okay, if you're working with the soft one, this is way better. This soft dummy head - you know the one i'm talking about the soft dummy head. You can see it on the screen. This is the best for ventilation or you can actually also use the half head. Your half head is also very perfect for ventilation. If you don't have any of this, and you have a compass head still, okay, but the reason why i prefer this is because it is soft. Okay, sorry, it is soft. You can see the head is soft, so this thing this protects your needle okay, it protects it from breaking and um. It makes ventilation a lot easier. So next we'll be talking about, is um um a white background, and this depends on the color of the hair. You'Re working with i'll be putting the link. I i think i already did a video on choosing the right background color for your ventilating, so you can see there. You can see the video right there um the option right there, so you can click on that video or you can check my description, um and box to um to click on to see the video on how to choose the right um background color for ventilating. I won't have time to go into details so now i'm just going to prep i'm preparing this head for the next thing. We'Re going to be talking about now is um how to place a net okay. Now the way you place on it is very, very important. Okay, so for this um i'm just going to place my necks like this, okay, making sure the lines are vertical. I won't be going into the videos in the into detail than this because i plan to handle them later, so these are pearl. Pins pale paints are very tiny paints and these paints are very perfect for ventilating, okay, so i'm just going to place, use it to secure every part of this. I normally do four corner like one here another one here and make sure sorry guys make sure your net is light is laying flat as flat as possible, because, while ventilating and um well, if you're ventilating and it's lifting up this becomes a big problem. You would find it very difficult to ventilate okay, it should be flat. Okay, guys and i'll see, go ahead and place pins right here. So any area you're working with ensure that um you place the pins. Another thing is: if you go ahead and pin down the the if you're using if you use a big pin, it's going to enlarge this hole, it's going to enlarge this in enlarge this hole, so it is advisable that i use a tiny lot of pinning. Is you don't use a big pin, okay, use a tiny pin and while pinning go through the hole you can see the hole there you guys can see. Then you go through the hole. So you don't end up ripping the nets, because if you should go through the line of course, you'll weaken that particular um line and risk and the stuff from ripping off ripping off. So i'm just going to go ahead and pin every part of this. Now what you don't want to do is to pin, and this side is really really lifting up. You don't want that. Where this place is very, you know you're trying to ventilate, and this one is coming up. You don't want that. You want this to be as flat as possible. Okay, just also ensure the tightness of your knot. So now next thing is the pin the type of pin you use. This is a handmade, and this is a china made ventilation needle. This is very, very important to be very sensitive with you if you're just setting up - and you feel you can't use this fine go ahead and use a crochet needle. But if you're going to be doing this professionally, you have to learn how to use the perfect. The real ventilation needle any of this can work so for this training i'm going to be using this one. This is the one i use for ventilating and this one my workers use. I will also demonstrate with this, but for the sake of oh, should i go ahead? Should i do this? Should i do this? Okay, fine! Let'S do this, let's go ahead and use this, and this needle is a two by three needle okay. It'S a two two by three so, which means it picks only two to three strands of hair now: to arrange the hairs you want to use. Don'T for this, the don't on this! Is you don't pack so many hairs, especially when you're starting up you don't pack? So many hairs and um you pack very little. If you're just a starter, you pack very little, you can even go ahead and just select the two strands you want to. You want to ventilate, okay, select two strands and just work with that until you master it before it starts you pack very few hairs. Now don't do this. I see a lot of people do this. I mean i don't i don't. I don't know how this works. This is a don't for me if you want to ventilate, you turn it this way. Okay, you grab it here and then you pinch and then you twist, okay. So after doing this, this is to do they don't is for you to do this. This is not it make sure you hold it like this, because this will help you and it makes it a lot easier to see the number of strands of hairs you're working with now. Another, don't is this: that's from this um um this for that part to this neck. It should not be long, it shouldn't be too long. Okay, this should not be too long, the closer the better. So this is the dough, and this is the is they don't, especially when you're still starting off? In fact, even if you've been in the game, this is a don't. This is the dough okay guys. So next thing is don't just rush into ventilation. This will also determine how fast you ventilate, okay, if you're doing this, make sure you pull out some hairs now, when you pull out some hairs, you'll see the number of strands you want to work with okay, but when you leave it like that, like a block, This does not just only waste your time, okay, while ventilating, so it makes it really really slow. So they do. Is you bend it hold twist and then you pull out some hairs now, let's go ahead and start the ventilating process. Okay, when you want to ventilate. Okay, guys, it is very, very important that you learn how to pass the needle under the net first learn how to pass the needle under the net and bringing it out successfully before trying to thick hairs to do to accomplish this. Okay, i think there's going to be a part. One of this section then we'll go to the past we'll get to this part two, because i don't want this video to be very long now when you want to pass the hook, you should bear in mind that there is a hook at the end of this Needle you can see it right there, okay, so now, when you're passing this, i've noticed a lot of my just push it in and then you see what's going on it, just it's always going to start hooking. This is the don't. Okay, you have to carefully. You have to carefully go down because don't try to you have to avoid, especially if you're, if you're, trying to ventilate a particular um line. So if you're trying to ventilate a particular line, you're trying to avoid hooking the line, this is what you do. You go down and then you bring it up. I don't know if you guys can see what is going on here and when you want to pull it out, you go down as well and gradually pull it out. Let me get the beginning, though: let's stop with this now you want to ventilate a particular line. You go in through the hole you can see the hole avoid coming in contact with the line. Then you bring it out. Remember, there's a hook at the end of this needle and then when you're, bringing it out, you go down okay and then bring it out. This is very, very important because if you should just rush, you see that you're pulling on this and finally you know what's happening, you see you almost repeat the next. This happens a lot. You don't want this to happen. So the most important is the downs you go down: okay, bring out your needle and as you're coming out, you go down as well and you gradually bring it out. Okay, so now, once you've mastered this step, we're going to the next step. The next thing to do is to pat is to grab this hair. How to grab this hair. You go in as usual. Okay make sure one dot is trying to go through two lines you see what's going on here. This is a big dot. Don'T do this? You have to ventilate a line: okay at a time, one line at a time, one line at a time. So now you go in you see what i'm doing you grab the two hairs you're working with. You can see. What'S going on here, i'm grabbing two hairs. Okay, so ensure that this hand is strong and now the bounce is loosing up your hand and you're trying to and then you're hooking the net and everything is messed up. No, you shouldn't do this. There is, you have to create a tension. You see this part is already weak. You have to create a tension right here, so you grab this okay, make sure you're pulling on this, because there's a hook at the end of this needle there's a hook at the end of this needle. You don't want this to come out from it, so you're holding tight so holding tight. Then you gradually go down and then you bring it out. You see that so you see we successfully brought this out. So we repeat it again: it don't is trying to ventilate when this is like this i've seen my you know, some of my um students are trying to do this and then they're struggling to get their heads. This is a don't it's a big, don't stretch back your hair, arrange it properly. Then you bend it. Okay, pull out some hairs. You go in a seizure. Like i talked to earlier, grab the two hairs. Then you go down pointing points a little downwards a bit, and then you bring it out. Okay. Now, once you have successfully gotten that part, when you've successfully learned how to grab the hair, okay grab your two strands of hair, and then you successfully learn how to bring it out. The next thing now is um how to twist your needle to pass it through the loop. Now you can see i'm just going to open up this. You can see there's a loop here. You can see that opening. So what you're trying to do is to pass this? Okay, it's more like um you're, trying to pass this like this and then you're passing it through your tiny top. Okay! Then you have something like this. Okay, you can see that opening right there. So, okay bring your brush you're, just passing it through the loop, like you can see, you're passing it through the loop, and this is what you're trying to achieve once uh you pass. It through remember always hold very close to the to the hair. Then you grab the hair and then pass it under the neck like so now, next thing is to grab like this i've seen some people go under the hair. This is not advisable, it may work for you. After a while, you notice you're, very slow, there's no shortcut to this thing. You just have to learn this method. Then you grab the hair like this. You go over the hair, you grab it and then you twist, then you lower it. This way, you don't do this, you grab and then you're doing this. I see what i'm doing this is not it. It will work, it may work after a while it will make your work slower. I always advise them to do this. Okay, once it's like this, you lower your hand, you grab it like. So then, you twist, while this hand is going down this one this hand goes down once you grab it. It goes down and then you twist, i don't know if you guys can see what i'm doing so once you twist, then you start pulling pulling this way. You can see clearly what you're doing okay, then, once it's out, you lower your hand, lower your hand, and then you pull so you can see the knot is tight. Okay, now what you don't want to do is this: you grab the hair, you pass it underneath and then you start you grab. Some people would grab it and then they are doing this they're trying to look under to see how it's going to pass. It may work, but after a while, you discover that this is not the best way to do it. The best way to do it, because you want, you really want to see what you are doing is to grab the hair. You see now i'm struggling to grab there, because i didn't pull out the strands i'll be working with. Then you go underneath: okay, lower your hand, like so grab the head twist, the other way until it's flat, you can see how the needle is facing. Now, like it's resting on on that lace. Okay, then you pull until it's out and then you place your hand downwards, and then you know you can see this. So another thing on that, don't is when holding your needle. You don't do this. Let me zoom out, so you can see clearly when holding your needle i've seen them there like this, that they're doing this. Like you see this, this is not right. I need to zoom out to where so now, when ventilating your hand shouldn't be like this, i've seen them. Sometimes they replace it like this, and then they are bending their hands like this, and then this one is coming in like this, i'm like what are you guys doing? What exactly are you doing? So if you want to get it right, hold your hairs. The right way using these two fingers and then you rest these three on the head. You can see that rest it on the head. This is the do, and this is the dot. This is it then this should come in like this. You hold it into three fingers and this two with the resting on the head: don't try to grab everything with all your fingers like this, because when you want to roll, you have to roll with this finger. Okay, so imagine so you have to roll it on this third finger. So imagine if it's resting here to be difficult for you to roll. So that's why this is this is the rolling part and when you're trying to roll to bring it out so now. Let'S do it again, let's just so, you guys can have a better understanding of what i'm doing. Oh you see now i was trying to pass it through two lines. Okay, you see that so now you see the way it is. I'M just gon na just roll. It really this is a lot easier, but when it's like this, how exactly do you roll like it becomes difficult? I don't see them they're trying to do this. You know this is it may work for some people, but the right way is to hold it like. So grab your hair and then you roll and another thing is make sure you hold tight at this point at this point. I'M talking about my left hand, make sure you're holding it because when you're trying to ventilate and then this is happening and then that's happening, and then this finally happens arrange your hair properly when it's too long another don't i've talked about this earlier, but i just Like to talk about it again, when it's too long, this is what happens: you're fighting to grab hair you're fighting to you don't want this. Now you arrange your hair carefully, pull out the hairs you want, so you can clearly see the ones you're working with go down, bring it out. You see that tension right there. This is what you want, and this area this loop here should not. This is a don't it shouldn't be too small, because when it's too small hold on, i think i need to zoom in now, when it's too small, when it's too small you find it difficult to the size of the loop, should be almost equal or even a Bit bigger than this part of this needle just the top part of the needle. So now when you, when it's too small, look at this, you see you see you're, finding it difficult to pass it through. That'S a big problem, but when it's long enough you can easily just twist twist pull it and then it goes through simple another thing: i've seen people do another major, don't is when, when you want to pass it through and then you're going in like this - and I see them there, they're struggling. No, this the hands should go in the same direction, you're pulling it the same direction. So this is it you grab it and then it should go that direction. Simple release your hand. It should just go that direction like voila like that, just like that, you should go the same direction so uh. There would definitely be a part two of this video, but i think i'll be stopping here. If there's any other challenge you're. Having make sure you, let me know in the comments section, so i'm going to be ventilating with the normal when i use the handmade for me, it's faster, so i'm just going to be. It'S almost still the same method, but you know i kind of prefer this, because somehow it just doesn't work for me. Although um you can see that it's a lot easier for me, but you can trust me. You can use any of the needles to still achieve the same thing. You see that you still turn it, but then this one pushes this to the end. It pushes the head to the end and then your knots, so this one gives you a tighter knot, but it doesn't still matter. I see that and then from the back. You can see this one at the back, the one at the back, the hair at the back with the loop okay he's going to push the one in front so the hook, and then your knots okay. So it's understandable when you make some mistakes, we make mistakes while ventilation yeah your hair may snap, it's normal. So when you're going through any of those um challenges, it's normal just be patient with yourself. So i hope you've learned something from this video and um. I know maybe i must have missed a lot of challenges, but hopefully later we'll also talk about it. So have a nice time and practice be patient with yourself and you finally learn it have a nice day and please, when you're ventilating, please you should go the direction. It should go the direction you're not in it shouldn't go this other direction, because you don't want this to show. You don't want these tiny circles to show it should go this direction. We still have a lot of things to learn from ventilation. This is just the beginning, part of it. You can learn this within five minutes 30 minutes, but the main ventilating takes a little while and we'll talk about the arrangement of the hairs and all that, so don't have a wonderful time. Guys, love you guys, bye, bye, don't forget to subscribe to my channel and give me a thumbs up. See you in my next video goodbye

Comments
karen w: This is a very good tutorial. You answered every issue I was having with ventilating. Thank you
Beautyloon: The most detailed and understandable ventilating lecture I've ever come across, Its so clear and I thank you so so much for taking your time to explain it the right way it should be done. Pls I'm waiting for the part two of this. I'm a new subscriber . And I love your videos.
MysP: This is an ABSOLUTELY AMAZING tutorial!! I hope this gets more views and likes because this content is deserving
Ndah Beltine: This is one of the best tutorial of ventilating I've ever seen,very detailed and she answered all the questions I've having to myself,I couldn't just hesitate to subscribe
Bolaji marvel: Thank you so much, like have been having exactly all the challenges you explained here, it’s so detailed, will give it a trial again
Fataï Onifadé: You are such a great teacher. May God lift you higher and enlighten you more. Thank you so much ma.
Divinelove Benjamin: Real definition of a detailed video, I won’t forget to subscribe . You’re good!!!!
Anyanwu Euphy: Well done Sis. You are a good teacher. I subscribed immediately after watching you. Thanks a lot.
Rene Hill: I’ve watched close to 75 or 80 videos explaining this and not one of them helped me..this is the first video where I understand completely 100% what to do. I even purchased an expensive ventilating training course online and still did not understand it and was not able to ventilate after the course. This is absolutely amazing and is the best video on YouTube for ventilating. Wow. Thank you SO MUCH..!! I was ready to give up.
Mauline Tsanga: Merci Merci , j'ai enfin réussi à utiliser ce crochet grâce à vous ✨✨✨
LORI UTSEORITSELA: Like seriously I see the tutorial to be the best I've learnt on YouTube, the steps and procedures wow, I enjoyed it
Tendaishe Tlou: Thank u queen Hv been struggling the whole day This is my first day of trying but after this video sis am ventilating now Am so happy God bless yo hands
MONICA SOKOH: I love your very comprehensive tutorials the basics of ventilation for beginners
Glen Benson: You are awesome for sharing this information. I love how you show the wrong ways along with the right way, it really saves people a lot of time I think.
Nolonwabo Mongikazi Diko: You are incredibly good at teaching
Victoria Nicholas: Thank you so much ma'am for this tutorial. I learnt ventilating from you and i teach people now.
Tiaad Tutorials: Love this well detailed video ❤️❤️
ifunanya kosisochukwu: I’m new here, and I really learnt a lot, am hooked now!
marvellous omerekpe: Thank you so much for this It really helps me when ventilating
Chiburem Chukwuma: This is the best ventilating tutorial I have watched. Thank you for your altruism. ❤
shazallenpc: Hello my lovely fantastic learning curve you have given us today I'm still practising . So proud of myself I have managed to revamp a old wig it looks so good. Thanks again:):)
Оксана Кучеренко: Вы лучший учитель. Я не знаю английского от слова"вообще" , но я все поняла. Даже поняла когда Вы указали на ошибки которые я делаю и мне стало смешно, стыдно. Благодарю
membis faith: Wow this is really helpful you are a good teacher thank you, you just got a new subscriber
Chi Rebrand: This tutorial was made for me, thank you soo much. Please can we also apply this methods for crotchet pin.
vicky ndu: Thank you so much ma... waiting for part 2
Ujunwa Duru: Learnt alot thanks I can now correct my self,I was drawing it right didn't know it should be back backwards more easier for me
classic16 G_nero: Thanks so much , is much clearer to me , so if I may ask , which of the angle or side I am to start my ventilating from ?
Mimi Liebling: Amazing, thank you so much. I hope this will teach me to maintain my wigs
Akano Olajumoke: A very good tutorial I love it
Faith Esukpa: Very good and detailed tutorial. Please which net is the right net to use because each time I tried, the net tore along the line
Blessing Gbaya: Thanks a lot for this video, please is there a particular height of table that should used? My back use to pain me because of too much bending, I'm still learning.
peace kumtap abiodun: Beautiful I really need more of the tutorial thanks
felicity onyinye: Thank you very much. My question might come in part 2 but then I can't wait. Lol. Please when ventilating, how many lines are advisable to ventilate at the back before the center opening. I just hope my question is clear.
nwoke judith: Thank u so much for this amazing tutorial. But I have a question. Pls when ventilating, is it advice able to ventilate all the holes in the lace?
chioma nwaeke: Hello ma’am, such a beautiful video… but I have some questions!!! Pls must it be done on a single line all through? And how do one get a parting too?
Blessed Child: Well detailed, You just got a new subscriber ❤
Tolu Afolabi: Thank you so much.Its very helpful
Zodiac Zozo: Sis, when you do the right hand side of the lace in one pattern, should you change the direction of the pattern for the left hand side? (so the hairs dont go in the same direction for the left and the right side?) Hope you understand my question please respond..
Mauline Tsanga: Merci pour votre vidéo ma cher... You explain very well ❤️
Modestly embellished hair: What causes the hair to come under the lace when washing after ventilating?
Yael Albou: Thank you for your explanation I ll try this evening !!!!! I have to get my knots to make my wig!!!
Elias Henrique: Omg this video.... Absolutely amazing, Ty ♥️
Sohpia Faith: Hallo Anne,I'm new here,and I really graetful to learn from you,a lot of blessing
Jasmine Cole: I swearrr... This is the best tutorial everrrr.... God bless you
LORI UTSEORITSELA: I bought the pin but I find it very difficult to do , how I can do it better... Thanks for the tutorial God will increase ur knowledge
onyema precious: This was very helpful...but I normally use a crotchet pin to ventilate though .....is there a different effect the ventilating pin give???
ogechi okechukwu: I just learnt a whole lot, very be detailed
vera uju nkenke: Thank you very much and God bless. Please show us how to cut the attachment before ventilating for beginners like me. Thank you
Abena Baidoo: Thank you very much please can you do a video of using the normal pin
Jegede Praise: How do I make a center parting when ventilating
Favour Dave: Really grateful for this thanks so much
Queen Esther: You're a very good teacher, thanks a lot dear
Betty John: Thank u very much ma, i learnt a lot from this video but one of my challenges is when I finish ventilating a closure and bleaching the knot, some hairs will start coming out under the net, plz ma is there any way u can help out
olivia chioma: This is very detailed... Thanks
Susan Mwale: Am new here, and i have learnt thank you
oris tosan: Thanks, please how can I get the ventilating needle and hard net?
Annabel Anthony: Your very good Thanks so much ur a great teacher.
promise chidi: Great work.... Is there a way to make single knots never to loose out form the lace? I made one and its all loosing out plus the hairs after been washed its pulling out from beneath the lace... Please help
Ukpere Peace: I'm stuck with this channel forever...Thank you sooooooo much
Francis Anna: This d best ventilating video av watch so far .. been finding it hard to use a ventilating needle . .. please share a video on how to place a frontal neat on wig caps..
Оксана Павлова: Самый подробный мастер класс
Shekinah's World tv: Thank you so much for this. God bless you
TEMITOPE GRACE: Thanks very much i just humbly use 2 stands all the time till i leatn faster you are blessed
Tochi Obasi: You are indeed a teacher perfect
Ikpesa Akpuzo: Thank you so much dear, this is great
promise chidi: I am just going through this video and smiling..... Gurl you have the onions. Thank you for sharing(from Maranma)
Mirembe Sarah: Thank you so much❤
ALEXANDRA DE OLIVEIRA: Gracias
Kelisha Hunte: when holding the hair .. for example a longer length that 12 inches and up do you fold the hair completely in hair or is on side always longer that the other
Nosipho Mbeyiya: Ooh wow what a good teacher.
Taiwo Akhimie: Hello, I am new here. Thank you so much for this video. I am really learning.
Achebi Diane: Thanks so much for . Please can u do a video on how to do a 3 part closure
Odiase Becky: U are the best I have been watching a lot of videos and I can learn through them but urs I love you
Victoria Etuk: U are amazing . Please I have a challenge, when I'm done ventilating some of the strands scatters, like it won't stay in place. Please what could be the cause?
Winni Chill: Nice one very detailed
faith paul: Wonderful,I loved this,am a beginner in wig making,where can I get that hook plz?
vicky ndu: Please ma what if I use double reverse Knotting to make a closure so as not to allow losing while washing?
Adom Agbo: U really don't know how greatful I am...you are indeed a good teacher...do U run online private class?
MAITREYA: Thank you❤
DECENCY BEADS: Well detailed....new suscriber
Sandra Victor: U are best ma,... Pls where is ur location, I would also like to learn physically
Beatrice Moyo: Are there different sizes of nets ?
Blessing Adaku: Beautiful!
Opeyemi Mercy: Wow Thanks so much sis
chidera marycynthia: Please, how do I space while ventilating???
Glory Oladiran: I enjoyed your video ,I like thy way you explain ,but if I want to lean , the detail please
Opeyemi Mercy: I jusr have to appreciate you again,i use to try ventilate before but difficult,i may do 20 nd 16 get hooked,so i loss interest,after watching uour video,by God grace,am now so good and fast,its like magic.As if d video was made for me. Thanks so much. I ve shared u on facebook groups because of dis,i just hope d admins approve the post.Am so happy. God bless you
Olajuwon Alabi: This is very clear
Traycee: I needed this video! Thank u so much! God Bless your hands
Annie&Juju: Hi, can you also use a small crotchet pin
evelyn jabule: Her voice is too sweet and understand, thank you my boss, we are waiting for part 2
Wigs by Loveth: I’m still having issues ventilating, like I still don’t know how to ventilate a full closure
Anitop Temi: Thumbs up. Very detailed
Adanna Nnenna Obasi: I have a problem my knots are not tight when using a soft hair
Arva Haynes: Very very good I am from Trinidad and I want to get a needle can u tell me where can I get one
CoachG: I have Sub... But what type of net is good for ventilating
Tochi Obasi: I love your videos I most say thank u very much
akinrodoye bunmi: Very understandable but my problem is how to get original swiss net ..I don't know if you can help
MH BC: PLease What kinda net is this? Im using the type thats used for creating illusion of nude appearance in clothes design and its so difficult cos the eyes are so tiny! P/s Im using DIY needle
Rakia Fusein: If I skip one hole while ventilation, it’s it okay plss