How To Diy Full Lace Box Braid Wig
- Posted on 23 October, 2021
- Full Lace Wig
- By Anonymous
HELLO BEAUTIES
Welcome to my channel so today I will be sharing with you all how I achieve this lovely diy jumbo box braid wig I use xpression braiding hair to achieve the ventilating i cut one into 6 to ventilate this is a very beginner friendly wig to achieve I know you will learn one or two things in this video.#crochetwig#noclosurewig#diycrochetwig#braidedwig
thank you so much for watching this video do not forget to thumbs up and most importantly subscribe so you can stay update with my latest video thank you .
_____________________________________________
For sponsorships & business opportunity-
_____________________________________________
PRODUCT USE
3X EZ Split Pre-sectioned & pre-stretched braiding hair 60": https://www.janetcollection.com/produc...
Crochet hook
wig cap
LINK TO WATCH MY OTHER VIDEOS
BRAIDS&TWIST / cute &
easy protective style for kids https://youtu.be/kqLbZsTMVyE
LINK TO WATCH MY OTHER VIDEOS
How to make a headband wig / using kids pantyhose https://youtu.be/8Teh-Z1xMzk
fake it till you make it natural hair style / using braiding hair https://youtu.be/b3AYVdXd1Ow
Diy passion twist using braiding hair https://youtu.be/5JjlrDXINEY
Diy: super tight curls using kebab stick https://youtu.be/pSYbQPeA3wI
how to passion twist on natural hair, https://www.youtube.com/watch?v=53uQbG...
Jumbo box braids /Brazilian wool box braids, kids hairstyle ft discoveringnatural https://youtu.be/9ScHVKV7tBU
How to goddess box braids tutorial for beginners,https://www.youtube.com/watch?v=ykU7Ok...
diy needle and thread flat twist cornrows diy hair style with brazilian wool,https://www.youtube.com/watch?v=NKCYRe...
Jumbo box braids using Brazilian wool /butt length braids https://youtu.be/kkzAK4740OQ
Let be friends on instagram https://www.instagram.com/invites/cont...
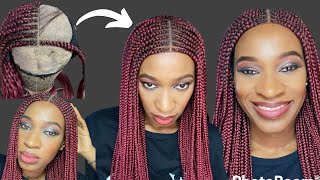
Hello beauties welcome back to my channel. It is always please stop being back to my channel. My name is aznika, so today i'll be sharing with you. How i achieve this gorgeous full cup braided wig, doing the ventilating myself so there's the wig cap, i'm going to be using. I purchased this wig cap from aliexpress. I would advise you to use the full lace net cap, not this kind of half-ness, let's cup at the front and decide the middle is different. Just really came out, so beautiful do not get me wrong. If you want to use this kind of cap, you can actually use that nobody is going to know, but i would advise you to use the full lace net cap. If you want to do that, so you can see what i'm doing i'm trying to mention how i want my box braid to be the sh the length i would like put it. I mean this size, yes, the size i want it to be, so you can see what i'm doing. I use my tape rule to make sure this. The sorry i used my pro to mention the size house for me to get a perfect lens. Let me tell you, i made a mistake, because this is my first time of doing a full cup net braided week, so you'll be a little bit convinced from the beginning. Yes sure, because i was a little bit confused but later on, i systemize it myself. So you can see what i'm doing, i'm using my template to measure this out. If you use a full net lace cap, you won't be confused, but all because i want to add all all these place. They join the nets. With this stretch cup, i want to hide those swing line, so that was what kind of confused me a little bit. I did my best to cover because those side must not show you have to look for a way you are going to cover that. So that was what really convinced me a little bit, so i have to allow you guys to know so you can see what i'm doing now, i'm just sectioning the size i want out. It wants the size to be bigger than this. You can actually do that. As i said earlier, i was kind of confused all because i want to add all this place. They sold um. They joined the cap together with i want to hide it. I don't want it to show, so i'm going to put an arrow to demonstrate what i'm talking about so these they are going to be using to ventilate expression brady, but i will be using expression to braid this air when i'm done with listening so kelly. Please keep on watching. I cut one expression into two, then the half i cut it into three damage, a whole expression pack. I cut it into six, but i didn't finish one pack of expression a to ventilate, so you can see what i'm doing now, i'm just picking the air so that the tip will be sharp. I need to be easy for me to braid after that, just brushing that out. That is what is going to look like when you finish picking out, you can see already gone a long way a long way. This took me five days to achieve because, as you know, i'm a mom of two as i'm doing it i'll be doing some out choice, take the kids to school those kind of thing. So, on a normal day, it may not take you five days, but this took me five days to finish. I started on monday and i finished on friday, late friday because i was doing other stuff, so you can see what i'm doing now, just ventilating. I make sure the video is very close for you to see how i'm doing so. Let me tell you something: you're using a lip liner or a eyebrow pencil to shape out your line, really help you a lot to be on track. It should be easier for you because you can't start ventilating without you knowing the amount of air and the line you're visually, maybe you're so like i know maybe on track or you are not. I hope i'm not taking too much. I'M just trying my best to explain to you guys so that you guys are going to understand better, because i don't like doing a tutorial without you guys, understanding, i'm not a good teacher but trying my best to be one. I know you guys are enjoying this video, so you can see what i'm doing. I'M just ventilating, eventually only two lines. If you want to do that to ventilate more than two lines, you can do that, but my only two lines is okay, so that is braided weak on behavior, because we are makings of expression, ready and synthetic air, not a woman to use to ventilate. So so so after i'm done ventilating the first line you can see, i've started ventilating the second line inside just to cover so that the box - we are going sorry, i said box so that the middle we are not going to be ventilating, it will show. We have to cover that middle so that our secret little secret will be out. So you can see i keep following the track. I mark out with my lip liner pencil. That was what i said. It'S very important for you to know what you are working with. I really tried my best in hiding all those parts where they did the joining of the cup, because it's not a full list next cup, so we are just doing a diy so that we can achieve good just brilliant week. I love this week so much i'm going to be working here out of this week to my kids school this week came out so beautiful it looks so natural just keep on watching. Don'T let me kind of give you the answer yet watch to the end so that we can get the answer, which is for you to see the final look, so i'm at the front part. Now i'm going to explain this four parts, so you guys want to understand, can't see a kind of a line shape, i'm going to be dropping it, i'm going to be using the arrow to point it for you to see kind of a wise airline shape. So keep on watching because i'm going to be telling you guys how you have to ventilate that front, because you can kind of make a mistake at the front just keep on watching when we get to that bridge or cross it by me. Explaining to you guys. Hmm, so this is the where i'm talking about you can see that kind of white line that stand for your airline. This is how i bought this cab. They already sectioned out your airline, so do not ventilate over that line. You have to ventilate at the back. Very close to that line, not on top of that white line, because that is what is going to stand for your airline. You can see that the the way i'm ventilating is not kind of straight, because it really is the trade to shape out your airline, so that is advantage of you buying already made ventilating wig up so cali, please keep on watching. I hope you understand what i'm trying to explain to you guys, because i know we girls, we love diy. Just to save some coins me i love diyo. I love diy, making it myself. I love it so much so if i can do it, you can do it better. So you can see this side. That'S why i said i made a mistake to hide those lines. You can see i'm trying to cover the earpads where they join the listeners with the edge of the cap, so i'm trying my best to hide it, i'm trying so so. This is not my first time of using this l, my channel unit collection, pre-stretch, 60 inches braiding air research pre-section. They really section it out, so i've already done some parts of camera. So i'm going to be showing you guys, i'm going to be using this echo shine jam it's just like shining jam. I really love these a lot. I love using it to braid my hair, so i'm going to use my elastic back to hold it down. Then i'll start braiding. This looks so beautiful. This came out so so just braiding, the normal braiding. So i'm just repeating the same process. I will unravel it i'll use my echo shine jam. Sorry echo shine to lay it down and use my elastic band to hold it down and i'll stop breathing so huh at some stage i wanted to add beads. I was like no i'm not going to do that. This looks so beautiful without beads, so just trimming the body nothing to change, but i just have to do it so now i want to ventilate our baby hair. If you don't want to do that. No problem me: i love some baby hair. So now i'm just cutting the tip of this weave, cutting it off then i'll use my hand to pick off all the excess little little air out. Then i'll start ventilating just to release some edges so that this wig is going to look boring. Then i need to explain this part to you. If you don't want the jumbo to disappear, please do not dip all the air into the hot water i dip only the tip. Then i use my tool i put into the hot water. Then i put it towards the body of the hair. If you don't want the jumbo to shrink, do not dip all the air into the hot water dip. Only the tip so now use my mousse i'll. Add it to the head and i'll use my sheen to add some shine as always then cutting the baby air off, because it's too long, it's too long so now cutting the excess leaves. Please be careful with this part. If you don't want to destroy what you have been working for for the five for the past five days, and this cap does not need a band or head pin, the airplane came with it, i mean the elastic band came with it already. You don't need to add yours, so you can see what we are doing now. Um i'll use my got big blue air to air i'll use. My got to be glueing control, just to lay my edges down, then this is fine. Now look, oh my god! This came out so beautiful you are so feel ready for girl - oh my god, i'm so beautiful with this hair. Thank you so much for watching. Please don't forget to support your girl by clicking on like button subscribe share with your lovers. I really appreciate your love. Can you see the back? I could not add the i my my foundation at the back. I just did it at the front because i really like my i've, already laid the head down before i remember. I want to use my foundation on all the lines you know, because i use a lip liner see my next video stay blessed. All


Comments
Marta Mille: Wow the full wig braid came out perfectly beautiful and neat, well done sis
MsNike A: Wow I can’t believe you did that , came out beautiful
Pixie Dust: Ma'am you did that!!! Stunning
Sweet Dreamz: Beautiful as always Sis❤️!!!
gift home tv: Wow this is so beautiful well done
Claurichman: Gorgeous i will try this thanks for sharing
oghogho StellaTV: Great job weldone sis
Tips with Nikky: Woow, woow, woow
Pamella Jane: Hi sis long time nice one