How To: Fix Your Wig’S Bald Spots | Wig Ventilation
- Posted on 23 August, 2020
- Full Lace Wig
- By Anonymous
Hey Guys, welcome back!
Here is a video I hope will help all my ladies. It’s in depth tutorial and how to add hair back into your balding closure or frontal.
Hope it’s useful!!
Equipment I used:
VENTILATION NEEDLE - https://www.amazon.co.uk/dp/B01FJJ4M28...
Tutorial I learnt from: https://youtu.be/n1xlWiJ0lkQ
Background music: Lakey Inspired - Overjoyed
Like, comment and subscribe!!
Socials:
Instagram - _thejcr
Twitter - _thejcr
Snapchat - Jo1andonly
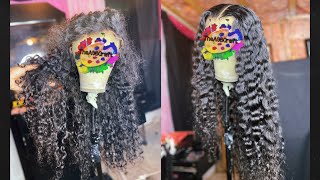
Hi guys welcome back to my channel the jcr touch, i'm back with another video back again with my second video of the week. Speaking about my two videos of the week, i will be cancelling that promise. I made um because i feel like i don't want to lie. I don't want to disappoint all that sort of stuff. I feel like i'm just going to post. Whenever i can post um i'm not going to sit here and say yeah every week, i'm going to do two videos a week and then it doesn't happen and then i'm looking at her. I an inconsistent unreliable person, so i'm not gon na promise anything i'll post. Whenever i post so moving on to the main focus of this video, so as you guys can see, i'm racking a little new, a new hairstyle um, it is the wig that i will previously in my previous video uh. Obviously, as you guys saw, the wig was longer, and i've obviously cut it now um, but before we could even look decent in it longing it sure it looked like a hot hot mess. Pre, as you guys just saw, the wig was a hot hot mess. In particular, the front tool actually is a closure. The closure was bowl ding when i say bolding, it was bolding, so the wig wasn't that bad, i'm not going to lie for the purpose of this video. I did pluck a lot more hair out so that the you can see the evident, evident difference between the bald spot before and the bald spot after, when i've refilled in the hair, pretty sure that everybody's experienced folding in their wig uh, whether that be because of Natural shedding because you've over bleached the knots and they've fallen out or you've just simply over brushed your closure. So the focus of this video is to show you guys how you can add hair back into your front tools. Add hair back into your closures from home. Like you, don't need to go, send it to a revamped service, or any of that you just do it from the comfort of your own home. Let'S get straight into it now, and it's going to be a lot less of me talking and a lot more of me doing that to process. So i will see you guys, probably at the end or some intervals, but i'm going to see the ventilator needle came with four different needles, so already done this side, um, i'm now going to show you how to do this area here. Um, like i did say mentioned previously, i purposely pulled hairs away just to show you guys how to do it, um find it fun, relaxing whatever you want to say um, but yes, i've done this side. I did i added hairs up until the edge, as you can see - um. That'S obviously just because i might add baby hairs and on top of that, i'm gon na be plucking again anyway, because i'm not sure how much i'm gon na pluck et cetera, et cetera. So just best to be safer, then sorry, i'm gon na be doing this side. Now um i've missed the hair back and i've brushed it back so that now that i'm adding hairs here, the hair is not going to be my way type of thing so yeah. So first step you want to do is mix the rest of the hair backwards so that you can see clearly the space you're working with. So as i've previously showed you guys, um you'll see loop, the hair around your finger um. You then take the vent ventilation. Needle you first loop, the needle through the lace you guys, can see that loop, it through the lace you bring your finger close like so the needle then pulls a section of hair out. You bring that through the lace. The needle then goes to collect the rest of the hair. You loop, you turn it into the hair and you tie oh no, that's literally it guys. If you guys didn't see how i did that i'm gon na. Do it one more time i'm gon na. Do it one more time so, like i said you start with the hair looped around your finger, you take the ventilation needle which you can see has a curved end. You take that curved end. You put it through the lace. There'S holes in the lace you put it through the holes of the lace. You bring your finger close, the needle has a point at the end, so it will grab some of the hair. You bring it through the holes. You then pull a bit bring that hair. That'S left outside and you literally tie a knot like so doesn't see that i'm going to show you guys one more time, so you start off with the hair wrapped around your finger in a loop. Okay, you take your ventilation, needle your ventilation. Needle has a curved end and on that curved end, it also has like a little hook. Okay, that curved end is going to go through two holes in the lace like this. Do that, for you guys, one more time, two holes through the lace. Okay, you bring your finger close, you grab a section of hair and you pull it through those two holes. The hair will look like this. You then come and collect the rest of the hair. That'S left you loop and you literally bring it out. On the other side tying a knot there you have it, you can see. I have finished doing the rest of the hair, all of that's done now. So, as you can see, there are still knots now at the front um. So what i need to do is bleach the knots wash the hair dry it and then we'll be back to wash my hair. I tend to use herbal essences um there you go um this one. I used bourbon and manuka honey. This is the deep repair conditioner shampoo, as you guys saw the wig needed a proper care tlc. He needed proper vitamins back into the hair as to why i got the deep repair, shampoo and conditioner went in with um the john frieda turner, correcting conditioner and turn on corrector shampoo of way around. But you get what i mean um. That is just so that the brassiness of the blonde, when i first bleached her hair, could go away and, as you can see it's more of like a nice honey brown type of vibe, which i prefer rather than like an orange blonde. That'S not cute! Hey guys. I'M back from drying the hair so washed it dried it and bleached the knots as well um. So now what i'm gon na do is i'm gon na pluck away and i'll get back to you. I plucked the hair to the best of my abilities um. I also did like a quick c part um, but now i'm gon na fix the rest of the hair, because the rest of the hair is looking crusty. I will be um, releasing a video soon on how you get bone straight hair and how you add, luster luster luster back into your wig, add a bit more shine a bit more flow, so there will be a video on that soon. So, looking back, i feel like i definitely should have left a lot more length to the hair um. This is more than half of the hair gone, but i'm not complaining. It still looks good, it's flowing, it is straight um, i'm definitely not complaining. I love the ways turn out um i feel like the plucking is just the right amount. I might pluck just a bit more on the side, but other than that. I'M happy with the cart with the everything like it's cute. It'S nice and simple. The blonde. The brown it's nice nicely toned in a suit screen and that's there. So i hope that this video is useful to someone um in the description box down below. I will be detailing um the necessary equipment where i got the ventilator needle and also the original video that helped me out um. I tried my best in terms of filming the whole the whole process in terms of getting close-ups. Obviously, the person who did the tutorial that i learned from was definitely more professional, so if you guys want to check that out as well, it's all in description box down below guys like comment and subscribe and share to your girlies um. I hope you guys enjoyed. I hope this was useful to someone and i will see you in my next one bye,


Comments
seghen ghezae: super detailed and informative!
Seun Akinode: Wow this is amazing! Super talented, because this looks very technical x
Chanel S: Love the new look !❤️
Elmiranne Divine: Go Johanne, nice one ❤️❤️❤️❤️❤️❤️
Shizzal Davis: this dont help