Upart Butterfly Loc Crochet Wig | Toyotress | No Cornrow + Huge Giveaway (Open)!
- Posted on 01 March, 2021
- Full Lace Wig
- By Anonymous
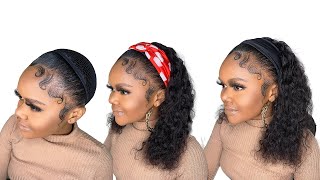
Hey y'all and welcome back to my channel. Can you tell that I am obsessed with this Upart butterfly loc crochet wig. Like I did that am I right or am I right and the best part about it is you don't have to know how to braid or even how to do the loc. This method is easy peasy!
Now this upart butterfly crochet loc wig did last me a few weeks however I'm not sure if the illusion crochet method was a good protective style for my hair. The great thing though is it doesn't take long to install or uninstall so you won't feel like you're wasting time installing it!
Want to see another beauty do this hairstyle: https://www.youtube.com/watch?v=lxC32n...
Link to wig cap: https://amzn.to/3vdvvdw
WANNA ENTER THE GIVEAWAY? KEEP READING!
Alright first of kudos to me for hosting my first giveaway whoop whoop!
All you have to do to enter is:
1. Follow my instagram https://www.instagram.com/shaynaviolet...
2. Follow Totyoress's instagram - https://www.instagram.com/toyotress_ha...
3. Subscribe to my channel DUH!
4. Thumbs this video up
5. Join their FB group - https://www.facebook.com/groups/toyotr...
6. Make sure to comment down below- ENTERED
Giveaway will be open for at least 2 weeks or whenever I pick at least 10 winners so run it up yall!
Any questions you may have leave them in the comments below!
Link to my online store: www.studioninefour.com (currently down but we'll be up and running soon)
Instagram ➔ https://www.instagram.com/shaynaviolet...
TikTok ➔ shayna.violet
Twitter ➔ shaynaviolet
For Promotions/Business Inquires Email: [email protected]
________________________________________________________________________________________________
Watch in HD!
Toyotress Butterfly Locs Crochet Hair - 12" | 1B | Pre-twisted Distressed Crochet Braids| Pre-looped. (Pack of 8)
Link to the hair in the video: https://amzn.to/301XxL2
Link to other colors: https://www.amazon.com/gp/mpc/A3Q5JTIQ...
MARCH SALE!!! 15% OFF (The effective date is from Feb. 13, 2021 to Mar. 11, 2021)
NOTE: If you want to purchase single packs (not the bundle pack of 8 OR buying a couple more single packs in addition to the bundle pack)- Purchase HERE! https://www.toyotress.com/
EXCLUSIVE FB Group: Toyotress Everyday Benefits (Exclusive Member Benefits!)
*JOIN GROUP TO ENJOY EXCLUSIVE BENEFITS LIKE FREE HAIR!! JOIN FOR FREE! IT'S EASY!*
Toyotress IG: https://www.instagram.com/toyotress_ha...
Follow us for the opportunity of free test!
Toyotress Pinterest:
https://www.pinterest.com/toyotresshai...
Business Cooperation:
Hey guys, if you want to see how i created this u-part butterfly, lock, crochet wig, using hair from toyotres no cornrow experience needed only some rubber bands, a comb and a dream make sure you stay tuned for this tutorial, plus i'm doing my first ever giveaway and You don't want to miss it. Here'S all of the things you're going to need the shake and go you part crochet cap, a crochet hook and, of course, your butterfly locks. I was so fortunate that toyota sent me these beauties. I'Ve received eight packs in total and there's 10 locks in each pack, so that's 80 locks all together. Look at me math and whatnot. Of course, i will leave the link down below if any of you guys would like to purchase these, and trust me you're going to want to these locks are literally the perfect amount of distress you don't have to do anything to them to make them look bomb. They come like that and we're here for it, i'm going in with my q reduced steamer, because my hair does not like to listen to gravity, but this really helps loosen up my curls as well as guides it in the direction that i need to go in. So it makes it easier when i need to you know, put it in my little fake cornrows, there's four clips in the cap, the one in the back of the! U part did come loose and ended up falling off the cap. Somehow some way, i'm not really sure, but it's super easy to sew back on now for the ultimate decision, a side or a middle part. I ended up choosing a side part. It came to figuring out where the part needed to be and how big it needed to be. I just put the cap on and parted out wherever the cap ended. If that makes sense, then once i took the cap off, i would just clean up the part, and i kept doing that until i had the right amount of hair out. So here comes the fun part. Now, if you know how to cornrow, you can definitely do that, but it just takes me too long. So i wanted to see if this rubber band method would kind of get me where i needed to go. Um and i've just been seeing that all over youtube. So i was like, let me try this out and let me tell y'all it's a game changer now i wouldn't actually do this for a wig um, but my crochets, even like super curly hair, where it doesn't need to be totally flat because you won't be able To see it, i would definitely use this method. It took me no time at all. All i'm doing is sectioning the hair twisting one section and then sectioning another part of my hair and rubber banding, those parts together and so on and so forth. Until i reach the ends, i do have oil on the rubber band, so they don't rip my hair out and whatnot and i'm also making sure the ones near my edges aren't too tight. I even went ahead and comb some of them out. So i don't. You know come out with no edges, because we don't want that once i did all of them. I braided each side together and i'll. Show you guys that a little later on, as far as the cap goes, i did get this from my beauty supply store. After going to like four different stores, yeah, your girl was on a mission. Okay, i'll also link it down below. For you guys, i really just crocheted the locks in random places. I spaced them out quite a bit because i didn't want to be too full and look unrealistic. Also. They are a bit staggered. None are right, on top of each other, to ensure that the whole cap is covered after i crocheted a few on. I did try the wig on just to see what it was hitting for and it was hitting y'all once i reached the very top. I did crochet locks all around the. U part, because i wanted to make sure that it was unnoticeable. Everything else was pretty much covered, but you know i had to think about the locks. I would be crocheting on my actual hair because i knew it wouldn't be a crazy amount, but luckily it was just the right amount, but in total i used about five and a half packs on the actual wig. I'M following the same method. I used on my hair for the leave out. You can't really do these individual because they aren't hollow on the inside. Like other crochet locks that i've done now, you could crochet your hair like in and out and bob and weave it through, but that was just too much work for me and i did not have time for that. I know a lot of people braid their hair when doing this method, but twists to me are a lot better for my hair. It doesn't break my hair off as much and it's just easier in general. Once i get to my ends, though, i do go ahead and braid them all the way down just for security purposes. The product i'm using on my roots is the edge booster edge control literally love this stuff, the one i have has like extra hold in it. So i'm gon na see if i can find it and link it down below for you guys, and it just does what i need to do every time, and we are here for that, and i know y'all see that parting looking like a ruler in the head, But you know that's progress and whatnot. I need to mention that once my hair was all braided twisted, etc. The wig cap was actually a little bit too big for my head and i had kind of noticed that when i tried the wig on the first time um when everything was kind of braided. So i would try to crochet the hair through a couple of the loops, so it would kind of make the wigs the wig cap smaller, but it ended up not making that much of a difference. So just keep that in mind when you guys are doing this on your own. This is the final look once all of the rubber bands and parts are in pretty neat. Okay, if i should say so myself now i'm putting the wig back on and i actually miscalculated the part i had made mine a little too big, but it ended up working out in the fact that you wouldn't be able to tell for the actual crochet. I'M doing them essentially in the middle of those parts. What i noticed, though, is that the rubber bands make it nearly impossible to put the hair through. I think one because of the thickness and two, because i'm super tender headed so any little bit of pain. I'M like nope not happening, so what i ended up doing is cutting the rubber bands. Essentially, my hair was braided back anyways, so it didn't really mess anything up. But if you're worried about security, what i did that kind of helped was crochet my hair into the uh braids that i had in the back just so it made it a little tighter and taut. That'S yeah, taut t-a-u-t, just so y'all know um, and it definitely helped make the looseness kind of go away and i did end up cutting most of the rubber bands in the front because it was just so painful and i just don't want my hair to be Too stressed with the lock and the rubber band pulling on it like we want edges all 20 21. So you know you got to do what you got to do here, i'm just showing you guys how the braids look in the back and how i crocheted them. We are all finished, we can go ahead and cut that string in the front and put the wig on and that last row that i did only about half of it showed that's the part that i kind of miscalculated. So i just put two locks there to help cover up that area: nothing, nothing too bad. Also, i have to let y'all know these clips on the cap are super uncomfortable, in my opinion, the point where the combs were in the front, mostly at the top, were just so unbearable, but once i took the rubber bands out, it was a little better. I think it's just because the clips are a little smaller um, it's a lot better when the clips are a little deeper in my opinion. So just keep that in mind. You can definitely take them out and put in new clips. If you need to, i didn't. Do that? Because i was being lazy and i definitely paid the price for it, because my hair was on fire. Okay, i did use a mirror to see the back of the wig and see if there's any gaps and use some more locks to fill those in and then in total. I had one pack and a half left, so i used six and a half packs and that's all she wrote folks. I am absolutely obsessed with this, though, like you guys, and i know y'all see that little s walk around like i got an s on my chest on my forehead, like sweetie 4c, where, where i say where looks so good, i'm gon na turn to the back. Hopefully, there's no gaps um, i did go in the mirror and try to fix the gaps as necessary, but you know you never know. Sometimes you get a little mishap and whatnot, but this this is so good y'all and thank you. Thank you. Thank you. So much to toyotas for sending me this hair and you guys i have a little surprise. As you see in the title, i am going to be doing a giveaway on this hair and i get to choose drum roll. Please. 10. Winners. 10, counting! Yes, 10. Okay period, here's what you have to do to enter this giveaway first thing make sure you follow my instagram. It'S listed right down here, make sure you go follow that follow toyotruss's instagram! I will also put that right down here and i also link it down below make sure you're following their facebook group, i'll, also link that down below you see it make sure you subscribe to my youtube channel hit that notification bell so you're alerted when i post New videos, i will be checking okay thumbs. This video up, we'll be checking and make sure you comment down below entered once. I picked my winners, my winners, it's so nice to say that i can't wait to do more giveaways for y'all. Once i pick my winners. You'Re gon na have to dm toyotres directly to get all of the information to get it sent over to you, and i just love that i could just plop this off at the end of the day. This is literally like this is like a crochet. This is a crochet wig, the um. I got the idea from another youtuber. I actually saw her on tick-tock and then i saw her youtube video and she did such an amazing job. I was like i got to try this with this hair. What'S he said to me, i was like i already know what i'm doing all right. It was one. Let me get a little closer for y'all, don't mind my makeup, i'm still learning out here in these screens. But yes, this is what it looks like on the side. This is the clip. If y'all could see it's just not that comfortable. I, like i said i would suggest, putting in um your own clip if you can get one, i'm really mad, that my makeup looks like this. I did not blend guys and i'm so sorry, you can literally see that's beside the point and i just can't get out over how like good my heart, look because y'all know i'll be struggling with the parts these were literally so effortless took me no time. Well, a little bit of time, but really no time at all um. If you know you concentrate and just do it if you concentrate and do that, you can bust this out in like two hours, two and a half depending you get somebody else to help you with the partying hour hour max crocheting, the wig took no time. That was literally like not even 15 minutes. It didn't even take 15 minutes, like i promised you guys scouts on there did not even take that long make sure you enter my giveaway and i'll also leave all of the rules down below, as well as all of the links. Thank you guys so much for watching as usual, and i will see you in my next video bye guys you

Comments
Mo White: This is genius!! Omggg! And the final look was
Anita A: Thank you so much for this!! This is a brilliant idea!
LoveJayMarie: That looks great! I can't wait to try!
jai dallas: Thank you for this!! I ❤️ crochet styles. And this is what I was looking for but wasn’t sure how to put it together.
Aesthetic Alex: Omg thank you for this ! I’m a full time student and I work a lot and I never have time to do my hair and I love the butterfly locs! So I most definitely will be trying this and also I entered ❤️ new subie!
Kbk family: This is beautiful I going to try this thanks
Ms. Floyd: Beautiful
BLANCHE KAMURA: Just came across your channel and I love this, it's so cute . Just got a new subie
Pattyfood respirated Harris: you did that gurl❤️❤️❤️Gg
Tinisha Ricks: Entered! Can’t wait to put this together!
yeah nah: love this!
Shaketta Felton: Entered!! Beautiful
Treceybaby: Entered!! This was . Im definitely gonna try
Trissa Danielle: So beautiful ! How many packs of hair did you use?
Shardena Chappell: Entered ❤️ I love your hair . I want these beautiful butterfly locs
Crystal Monroe: Excited !!! Instagram brought me here.
Jahliyah Hall: Entered!!
Khasity Kandjii: Entered! TikTok brought me here!!!
Sara Leakes: Link to wig cap?
r dh: wow Entered
Gina Bonds: Entered
Shan TheGem: ENTERED
Shayla S: ENTERED
killer bienchen 1: Warum flechtet sie ihre eigenen haare vorher? Verstehe den Sinn nicht. Ich denke dafür sind diese braids Perücken da? Dann brauche ich diese Perücke nicht. Dann war die ganze arbeit vorher umsonst