Salons Are Closed| Diy Pre-Plucked Curly Lace Wig Install |Step By Step Detailed| Divaswigs✨
- Posted on 25 March, 2020
- Full Lace Wig
- By Anonymous
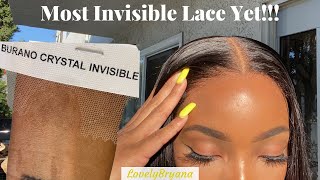
This SUPER FINE HD LACE creates the perfect illusion of hair growing directly out from your scalp.So they can be used with or without adhesive and parted in any direction for a natural look.
Imported From Switzerland
Suitable For All Skin Tones
Invisible, Seamless & Undetectable
Helps Natural Hair Grow Faster
Better Lace Choice for Protective Style
More breathable & comfortable Especially for Summer Use
Thinner, Softer, Lightweight yet Durable Lace Reduces Friction to Natural Hair
High temperature disinfection during production to prevent Bacterial Breeding
♥♥♥♥♥♥♥♥♥♥ DIVASWIGS HAIR INFORMATION ♥♥♥♥♥♥♥♥♥♥
Use Code : HUSTLERTV to save extra $10 off
The wig I'm wearing in this video is from DIVASWIGS :
Direct Item Link :https://www.divaswigs.com/2645-super-f...
Hair Code :LIYAH
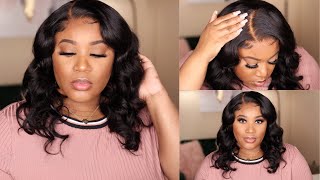
Hair Length : 22 inches
Hair Density : 150%
Hair Color : Available in Natural Black
Bleached Knots: Kamo Knots
Hairline : Upgraded Realistic Hairline
Lace Type : Super Fine Invisible Swiss Lace
Lace Color : Transparent Lace Suitable for All Skin Tones
information:
https://instagram.com/divaswigs/
https://www.facebook.com/divaswigs
https://www.pinterest.com/divaswigsins...
♥♥♥♥♥♥♥♥♥♥ DIVASWIGS HAIR INFORMATION ♥♥♥♥♥♥♥♥♥♥
Welcome to IAmBeautifulHustler Channel
Be sure to SUBSCRIBE & TURN ON YOUR ALERTS
CONNECT WITH ME✨
Personal IG: Iambeautifulhustler
Business Instagram:_Beautifulhustler & @thebeautifulhustlerbrand
Twitter:_Beautifulhustl
YouTube: IAmBeautifulHustlerTV
✨SLAY WITH BEAUTIFULHUSTLER✨
TO PURCHASE MY PRODUCTS :
WWW.iBhSlays.com✨
Lace Melt Adhesive,
Melts Belts,
GLAMWAX
and more ❤️
Hey beauties and welcome back to I'm Rita for Houston TV today, I'll be showing you guys, a hair with you and I'll be doing a lace with installation on myself and today's hair is provided by diva wigs, so we're just gon na go ahead and connect this Box these shows in here. So of course we have the biggest self, the wig brush stocking cap, and I also have their little. You know divas wigs card. Oh, this is my mission in a bath, but it tells you the heirloom density, hair color, the nods hairline everything's. All the information is on there and you also have some instructions. You know, as far as um cutting excess lace, washing the wig lace to me clarify some tips. So this is a lot of information to do before sleeping brushing dry ends. Everything like that. So now, let's get into this week now, okay, so little bit details about this way. This hair is 22 inches, hair density 150. It'S natural black, the nice I already bleach, is called camel nice and mushroom. That is what it says. Hairline is upgraded. A realistic, hairline, superfine, invisible Swiss lace and the lace color is transparent, which is suitable for our skin tone. So this is the way right here. It is, but I'm gon na go ahead and open that up and who is the curly wig? Of course it comes with a little adjustable scraps, which is good if you like, blue this big installs me unless you would like not have that long. But oh, this is a thirteen by the like, maybe a 13, my sticks, pardon spaces is pretty deep and you know the lace was said to be transparent. This is the curl pattern still for super pretty, and this is a 22 inch as mentioned this. Is that the hairline is pre plugs, so I probably won't have to do any plucking whatsoever, but I'm gon na go ahead and bleach the knots on this way. Shampoo conditioning - and I will be back with installation stay tuned this week - is the curly Webb from divas divas legs, so yeah, I'm gon na go ahead and install this video live instead of doing a whole voice over I'm just going to do a top the world Which saves me time in say sometimes we get from better be period so yeah. So I went ahead and I bleached the not - and I did not do any plug-in booyah see how natural his hairline already looks. So I will not be doing any um. What'S the word plucking whatsoever, I'm just gon na go ahead and take the hot comb and just quickly how come is pretty hard. I had to sit in the stove and I just like to take this little paper now real quick. I just want to show you guys something before I even hot color loops. Now, if you are using a stove um one of these first things. First, when you test it out on paper cuz. I mentioned this in a few of my tutorials, where I've never actually showed you guys. So so, if you lay on your hot home-along paper tissue napkin and it's black like this, it is not safe to use. If you put this monster hair, when it's hot, like this, it's the shit's got ta burn out. Okay, um number two: if it's this color, this is gon na burn off and if his this color, this is gon na burn off. So before you put your hot comb, if you are new, make sure you test that on napkin paper first to meet, how do i see how dr. paper tank before you use it? I you'll be safe. Now, once you start getting into a little bit lighter shades like this, it's still really really hot, but it is safer to use and I just took out the stove again, so I'm just gon na go ahead and place it here and you see it's really really Really light brown, so that means safe to use. So I'm going to take this in keep your seal. I'M just gon na go ahead and click in hot cool noises, and just so it's easier for me to like manage the hairline. When I start applying the glue like, I don't have to worry about any flyaways and I don't add any wax sake or anything, and this is just strictly hot combing it back after in the hairline a little bit so yeah, I'm just coming back those two rooms. One, as you can see, it is pre plucked so perfect, so I don't have to do any extra plucking and I'm just gon na go in here. Get that back. Okay, so they're processes. So nothing your head. You remove the wig off of manager trouble there. It is all of the airlines has been ironed Hong Kong's back, and I just love this curl pattern. It is super super super, pretty yeah, not a little a nice finish pretty here so um. You do have like the combs in the end star and you also have their straps and I do have to strap pieces I'll put it somewhere around me, but I usually don't use it and that's why I don't have it in there. But what I am going to do is just go ahead and use these little back clips and tighten up the wing and then I'm gon na cut off this extra lace in the back of the cap, and this is something I learned you actually slip these through. These little pockets I used to like tie the clips together, like on some weird, get on type of stuff. So once I realize high actually goes like this, I started doing it the right way, but nevertheless green want to just take some scissors. I have Nora and my black sisters are so let me use these big, dumb blue scissors right here that won't even cut for me great okay, wait we're getting somewhere, okay, but yeah. It'S just professional associate supplies for this part here, but I did go ahead and cut off that extra piece and now I'm going to go ahead and place my weight onto my head, hey ma'am, it's gon na be still loose finish. Oh yes, baby! I'M here for okay, so this is - and I don't want to do a side part today, um just cuz. I just had 34 inch stray hair part down the middle for my birthday. So this is the second hairstyle after my birthday stop hey. So I really want to a little mamacita look: okay, so kiss as you I can see. The hairline is pull up to perfection like they really did a good job construction this week. As far as the hairline and the lace is nice and thin stock already check is gon na bleed, so so perfect and a little undecided. If I want to do baby hairs or not, I'm not sure but uh. Just hair is giving me life already, but let's go ahead and get into this installation. As you know, before I applied my lace, I do like to use my Ruby kisses foundation and apply the foundation on top and underneath the legs as well. I just do on top as well, because it just gives it they're really really even coat a foundation which helps with the whole blending process like even better like ten times is better. So that's just strength, and I just started doing. But what I also realized is true: with using the foundation you do not want to UM. You want to make sure that you spray it with holding spray. That way, the makeup does not transfer over to, but your skin is tough, because, if it does, it would like, maybe blue, not stick like it's supposed to or make it in your install. My last as long I'm just loving this curl but make sure, is that last as long as it should so um, I'm just gon na go ahead and pull this lace back and I do like to say product. So I'm not going to add foundation all in the inside of the week, I'm only to apply the foundation on a hairline. You know just pretty much where you will. Actually, you know, because it just gon na be a side part, and I could just consider part so I'm just going to add the foundation on a roof, nothing to do but the very front - and I am using the darker shade in this Ruby, kisses foundation. This is the frame foundation that I used on the ballcap video um that I did before actually doing this video now. So if you didn't see that ball cap video make sure you guys check that out, but I'm just going to go ahead and begin to apply the foundation are going inside in the front of this lace. Just so you know, they'd be super super melted in very natural-looking into my skin, and I did go ahead and bleach the knocks on this week. I'M do not they're not come pre bleach, but it's fine because after bleaching, you don't have to do nothing else, but in further week, because so now that I applied, I applied that foundation on the inside. I'M just gon na take a little bit just a little one, two three and make sure I get the front of that lace and just go closer to where the hairs are. But as I mentioned, I always do a little bit of that lace too, because you know, depending on the person's hair line, you might have to use that extra lace, sometimes to you know, get your results down and looking good and the hairline flowing, and everything for That person you may be working on, so I always just use you know, put a little foundation on a little bit of that extra length hanging around because you never know what you would need until another thing. I'D like to do like I mentioned it's great, their hair, and I so it does not transfer over. So I'm just going to take mine. Now you can blow-dry it or you can get an air dryer. We have something else to do, but I'm just going to quickly blow dry now so number dice blow dryer, as I mentioned before. Even I have my ball cap on everything like that. I'M just going to just wipe a little bit other foundation off in front of my cab. Just because I don't know you know where my legs actually gon na laid or if I'm in need. So, if we're getting a bit down, but you just want to make sure that it does stick so I'm going in with my beautiful hustle, a sprayer, which I showed you guys in my ball cap video and I'm just gon na spray. It on my same orange cloth and I'm just going to wipe in front of my ball cap, I'm going to go ahead and begin to get my layers. But first let me just pull the wig down and make sure I get a little visual where it's going to lay and I'm just gon na go ahead and cut one know I used well, no, I was going to cut the extra lace off first, but I, Like to sometimes just place my blue first and then that way, I can lay everything down and whatever else has to go, I just get rid of it at the same time. You know all that one. So now I'm just gon na go in and I'm going to use my spreader and as I mentioned, it could come in pink, black or white. So I want to pick my spreader and also my large lakes me a he stuff and I'm going to begin to apply my layers now for today's installation. I'M Marita's you three layers, I don't do a seven depends on one like if I have some big words or coming on or when I'm going, which I'm actually going to go to a pool party now, but I don't plan on me getting in the water like That just because they're too much cologne about a Stefano, you know I don't mean my pores open and you know all that beer. So I'm just gon na um do three layers today. So I'm just gon na place like some of the glue by the first layer. The glue is pretty much gon na be focused on a planet one, the cap, and that helps. You know we're making sure your installation last number two, because yeah you could just do a thin layer above the hairline. But when you have a bit of a like an inch wide layer and will really help your installation last longer as well. So now, I'm just gon na take my spreader and I'll. Give you to spread out and, like I said, focus mostly on the cab, which you can go a little bit past account, but just make sure everything is spread. It out nice in me, and this is why I also love this spreader, because it really spreads it out so perfectly and you don't have to use like your finger when your comb or these and all your makeup brushes because after a while, they do start to Fall out like the hairs on makeup brushes too far now, especially if you try to clean them, wet alcohol to remove all the gloom so with this spreader you can use to spread your glue, and all you have to do is just clean it off with alcohol And nothing is going to happen to it. So that's why I love these spreaders and I'm just going to spread this layer out really really good and allow the glue to dry clear before adding my next layer. It is like getting caught like as far as sticking wise, so you know this whole people and don't try to focus on putting all the glue like that. You would need, because you can always go back. You know I'm saying like take down any places. That is still lifting a common mistake. Most people make is trying to hurt. You can get all the glue on there when they doing the ladies and then you will have glue past your hairline and everything like that, which is which can be cleaned up, but it's just extra unnecessary work that you don't have to do. If you just you know, be patient and take your time, so that's what I said just really focus on getting that glue on the cap and a little bit past the cap, because once you actually lay the weight down and the glue holds it in place, you Will be able to tuck the rest of the wig or closure affront or whatever you're doing down, and it would be much easier just to slide the glue under those small little lifting places and putting too much glue way past where your wig is going to reach. So just take your time and be patient, and this is layer two and, as I mentioned today, I will just only use three layers. So after this layer I would do one more and then I will begin to tap out and such of df8 other places. I want to start with these things first, so I like to pull my sensor down first and just give it a nice little from Prez, and then I like to work my way on my son. What just got is my left side of the head and I just give that a nice little firm press as well maybe shut up press the sideburn in and now I'm gon na go ahead and pull this side down and get better nice firm purses. So now what I'm gon na do is take my where I took home and this already tight in place. So now, I'm just gon na take the comb and just comb it back, I'm using that extra lace to give it some extra pressure. Just you know, pull it down and call me in call me back do the same thing for both sides. Now you can do this one of two ways: you can cut the extra lights off now and then tuck everything like everything I still lifting down, but because they're super hard for me to do. My only spies like myself like this, I'm just going to go ahead and take the elastic band and, as I mentioned, it does come in black in paint now. So I'm just going to take the black and still stretchy and breathable kind of tilting. My head back. A little bit and I'm going to tie my lace down it'd, be extra lace. The only one just to make sure that everything that needs to be tacked down is down, and then I will be able to cut off the extra lace. So I went ahead and tighten down just for a brief. Second, I'm just to hold everything down and now what I'm gon na do is begin to cut off the extra lace. But I'm going to use an eyebrow razor to give me that nice little unnatural zigzag cut. So just give me a second okay. So now I have to add our razor, even the scissors and I'm just going to start by slitting the weed in little areas. First cuz, it makes it easier to raise oh okay and I just kind of like doing like a little say like here and cuz. It makes me decide okay, so I made all of this list that I needed to make in that one all right, sir. They begin to race it off and resume that motion extra lanes and be careful make sure you don't cut your face or your clients face who's that with someone who are doing and right here. Basically, this is the extra lace around the ear. So I'm just going to go ahead and go in with the scissors and cut that part off here and beat you or make sure you cut around the ear and not the actual, that's around the ear and make sure that is going to be nice and comfortable. For you so yeah and you can see - I just have a little bit and I could choose to either cut that off the Misti. We don't want it to be too close to the eyebrow. So if you feel like you can cut off extra if you cut it about more cutting back more, but if you feel like you need that lace on you know, take it like you need that extra lace then use it. But if you say life is really not necessary, you can just in a sense that motion still get rid of it, just to make sure it's really like okay, so that will be the little pieces. You know just like these little little tiny pieces. I will go back in and fix, but for the most part, I'm gon na get off the rest of this extra. That is not needed, so I'm going to go back a little further here in the center, because I see that I don't need my weight to come way down. You know way down here as far as been on my full head, and I want to start to raise it off. You know the opposite direction, going up a little bit more and towards the hairline and just being very, very careful not to cut my skin. So that would be the little piece I'm gon na take down here is well and then get the side off, and then the extra brownie here go back in my scissors and get that off and like this extra piece here, you know it's not need it go Ahead and chop that right on off so now that I have those three layers, they gave me their Fermi's, I needed you know in their cap area, and this is the part I was saying now. You see that I just have these little little bit of tiny pieces. That'S lifting - and this is why I came out with the two different types of airbrush as far as like the combination instead of cheap use it, because this is perfect, for we need to start spreading your layers, but with this edge brush here these tiny little places. I will be able to just get that glue to just slide under there without getting extra glue on the outside. So that's what made me come up with this idea here with the rat tail one, and that way you can just put the excuse me put the glue on the back of your hand, you can just slide it right under those little cracks and you could use You know your edge brush to push that later on in so um. This is no longer needed right now. For my installation, I will just go in with this edge brush, but I'm going to give everyone this other than use, which is my pink one. So I'm gon na start going in with the pink one and just adding you know the glue under those little Creek's but, as you can see, like I'm Moochi, even with me cutting off some of my hairline off. It'S still pretty pluck and it's still looking super super natural. So when I tell you guys Jesus, we did the dollar okay, they did the dog this one here, and I already know that, once I finished applying the glue and I'm going with my second step melting process by adding my holding spray and then we turn it Down once again, with the melt like the male is going to be a met up. Okay, so I'm just gon na and as you can see, we just look game so good, yeah honey and I'm just gon na handle this other side. Now hon took my blow drying it when the heat setting and just blow-dried my hair line really quickly before timing. Okay, so now that I've blow-dry my hair line before I tie it down once again with the melt belt, I just want to go ahead and make my part - and I just started not to do any baby haters. I don't want baby hairs I'll probably do a video later one during this week and do like a baby hair. Video like animating here is a probably restyling it so for today, I'm just going to do a regular side, part okay, so yeah um. Now I'm gon na just take on my bed head and I want to spray the bed head across my hairline and then tie that down. But as I spray it in what I like to do is comb the hands back. That way, when I tied our master ban on it, it's really really neat like it's like a neat push back and not like hair about all over the place. So I'm just going to come back like I do here and continue to spread across the hairline. So now that you see it's all sprayed, you can do one or two things. You can just really blow dry and you know tap it in with your finger. All of you like me, you want to just make sure like this technique, so I'm gon na go ahead and tie down the lace once again cut them here. Tie my lace down yeah yeah, just like oh my head over. So now, while that's you know, tyranny and everything like that, I'm just gon na go in and take my glamour wax thing and we're gon na start hot comb like the lead out we're not to leave out area, but the part in every on my walk. So I'll just take my Glen wax and I push up and I'm just going to apply this all over the area where my part is going to be so I could prepare two hot coals now I wanted to be like SuperDuper straight bump into you. I just wanted to be straight enough where you can see that the part is separated and my hair is not like falling on the other side of the part just because I want that part to be. You know the part to be nicely and noticeable. Well, I don't want to do it like super super straight or like all of this is super flat like no. I actually want the kind of nice fluffy look, so I'm just focusing on the roots in this area. I'M not gon na do too much hot combing on everything else around the hairline like I usually would, but just focus more so in here I'm gon na like keep you straight away, so I have my spray bottle and one finish: spray bottle up with water. On me - and I just want to put the set of loops in my hand, I rubbed wide the hair and just show you how tight it gets. The curls, though, be right there, because I really really want the wet look today. So I'm just gon na try. The water first we're just taking a brush, so just add, you know as much water as needed, not occurs, I'm being more and more defined, and you see us the ruse is still straight. That'S what I want to just a little bit straight: move in an arrest. Curled just to keep my part clean and I'm going to send you to the other side now, okay, so now that my hair good, they had did just some shedding, but it could be how I'm rushing as well I'm just kind of hurt and get it over It but but nothing too crazy, but so yeah. Now that I'm going ahead - and I added the water in the tangled the hair, I'm gon na just open up my jar - I'm still accommodate and it's just like a white big little creamy texture might be a little too much. But I'm just going to rub that into the hair and with the silicon mix, what it does it gives you that wet tight look even when the hair dries. So, even when the hair is dry, it will still look wet because the silicon is kind of keeps the curl tight, and it's just really as simple as that. Just make sure you use whether they already good Stella doesn't look white and everything's. I'M just gon na continue to UM with my hands. Do it so guys? So now I'm gon na go ahead and remove the norm. Oh just out of here what I've just said, tighter is bad. Okay. I got a little line on this Hamlet. No mommy go away in a few minutes. Oh yes, as you can see, the push in the norm is out of here. What I'll? Just that Tigers fan. Okay, I got a little another 19 in a few minutes. Oh yes, as you can see, the push back is natural because how I sprayed it - and I add it - and I combed it back - that's why I say when you use on coating spray to do the second step, make sure you comment back neatly before you place. The melt belt cuz, then we give you that natural neat push back like you see here, and they do the same thing for me on this side as well. Now you can leave it. Um push back like that hard or you can come, is up to you, but I'm just gon na leave mine and I'm just gon na make this just humph there. I don't already wanted too much in our faces. I hate when I wear lashes in the hair like sit in top of my lash, and let me look like I got a lazy eye or something so. Yes, it's not a final step, of course, we'll be doing on the concealing and black spring. So I'm gon na get into that now, as I said, you do get some shading, but then again it could be. My nails are so damn long and sharp it wasn't pulling the hairs out. So I just let you know you know, I give you guys an update or the week after wearing it for a few days, but yes, Luvdisc. Our pattern is super super cute, but now we're gon na go ahead and next break. So I'm taking my rat tail comb button. Actually, you know what I'm actually going to use the edge of brush thingy, because this thick is a little bit thicker and I'm just gon na watch. Some of this extra stuff off my hand command it's very slippery right now and I'm just going to lay it laughing like I can't spray anything up my hand is super glossy see you have more time spring. Okay, my use is to lifting. Is this really slippery? Now, back to where we started placing the calm in a pot and just spray area here I have a little over and I think that you do not want to bring the black spray up to the hairline, because in turn this whole section blast. So you see I stopped spring about here. You want to stop screaming where it starts to get thinner. So now that I do have, that party is very go back in with the same foundation car that I put on top and underneath the lace and using my angle brush and I'm going to dab that in that foundation and clean up my part and that pretty Much sums up this distillation video, I'm not sure I put it down, but I hope you guys enjoyed this installation video once again. This hair is from deeper wigs and this is their curly 22 inch. I'M curly wait and yeah. So, thank you guys for to the moon. Thank you for watching is


Comments
Shell Shell Beyond Beauty: Yessss boo slay. I'm still learning how to pluck properly. I think I'm starting to get it. Thank you for all you do. That lace release is so easy to use.
PRODIGAL FLOWER: I have to say, this to me was Thee wig tutorial of the 2020 quarantine❤️ Completely thorough and detailed! Good job sweetie
LaLa: You can never do no wrong with wigs
Sam Willis: Sussssss THANK YOUU ONCE AGAIN! I follow all your steps and Issa melt every time. BTW I still have a some lace adhesive left from my order from the brand launch.
Ramonica Radway: Slayed again! Your regular tutorials are great and explanatory... but this was lit! ❤️
JustLing👑: I need that melt belt and rewatching when will the next restock be love?
Antonia Francois: Thank you for your videos. I am getting so much better at my installations. What is the name of the spray you put on the hairline? Bed Head? Is the silicone mix a leave in or the normal conditioner?
Jamilla Worsley: yassss honey you definitely slayed that wig.. you better work it boo.
Beatfacelay: Do you recommend just adding a little silicon mix in the spray bottle with water ?
D'Andra Smith: What shade of the ruby kisses would you recommend for someone with a nc45 skintone
trinai02: Do u recommend cutting out the combs on the inside of the unit?
JustLing👑: Right on time I was just lookin at a curly wig girl the melt
Kheyana: Instantly subscribed
Isabell E: Yes cause the heat of the hot comb will go right through your lace and give you heat damage on your natural hair
Kersha Beaver: Nice job as always. Can you do an Beyoncé inspired color with this wig
Kia: What do you recommend as an adhesive for women tht are going thru menopause? I tried the bold hold active on my mom, both of us forgetting about the hot flashes, and it turned into a hot ass mess..lol..so plz can you help me fig out a way for my mom to be able to slay a beautiful unit. Thank u
Chalanda Billups: Keep Doing the damn thing. Your videos give me life. And that wig....... ooooooh chile!!!! I love it
Kamille Kelly: Soooo pretty
Erica Freitas: Onde comprá esse cabelo?
Emmah Nyirenda: What's the name of the holding spray you used?
Thug_Roman: You must knew we had time to finally practice
Bambam Cohen: Nice
christabella201: Well done
deseraymiles87:
Alexius Mckune: Yes hot comb tips !
Lashawn Robinson: Where is the black spray from?
MissLadiiLace: Do you ever get lifting when you spray the hairline
Deborah White: Yes its giving me life too you know yo did that..
Shandell kute: ♥️♥️
Milaas Playhouse: Dead Slayed ThisI Neeeeed
Quemekia Whatley: You so pretty
Baraka Jenkins: u funny as hell on here