Full Lace Frontal Installation Tutorial|| Rahsworld
- Posted on 08 June, 2022
- Full Lace Wig
- By Anonymous
Hey Guys I know I said I would be posting more & I promise I will.
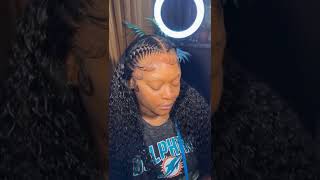
Today we’re installing this 22" deep wave wig on this beauty
Hope you guys enjoy I had so much fun doing this
___________SOCIALS________
Ig: @iamraheem._ https://instagram.com/iamraheem._?igsh...=
TikTok: @iamrahh www.tiktok.com/@iamrahh
___________________________
Don’t forget to Like, Comment, Subscribe & Hit that notification bell
Hey guys welcome back to my channel it's auera and we're back in the game with another video yeah um before the read opening of my channel. I just can't call it that um today we're going to be doing something a little different, we're going to be installing a weight on this head here very enormous pen. Now we're going to put this wig on here we're going to transfer her from the base food read the barbie guys, don't forget to like subscribe comment down below which ideas want to see in the channel. Four songs are going to be down in the description below so let's get into it so first this is going to be like some detail. So first, what we're going to do we're going to skin right here so yeah guys. I decided to do a voiceover because me talking, while doing the video will be very confusing and very hectic, because it's like no so yeah right now. What i'm doing was braiding her hair down because um the one to make sure that our hair is braided so that we can lay flat. So i would advise to try and get it as flat as small as possible so that when the wig is on it'll look lumpy like you, don't evidency the person who is braided, so you want to get it as small as possible and as flat as possible. So yeah, that's what i'm doing right here. So what we're doing here we're just using some wetland extreme gel to slick back her hair that was not caught in the braids and her edges, because when you're going to put on the wig cap, we don't want her edges out as well as when you're going To glue on the wig, we don't want to put glue on her hair so that when she's removing it, it's tearing it out so we're just using the gel and i'm using an etch brush here to just flick it back so that when it's time to put On a wake-up like everything is not in the way it's pushed back and not going to be damaged and with an extra hold. I used that to be freeze through, as you can see here, to give it extra hold. So when you're flicking it back, it just flick about nice neat and pretty so now we are putting on the wig cap and scientific that when you put on the wick cap, i always pull it down as far as possible on the person's head, so that when The spirit got to be sprayed and cut it. You like it, look like it gives like scalp like it look bald so right now cutting all the ears. You have to cut ears on the tool, side and you're going to see me cut eye eye holes which you could say because you couldn't see underneath it so yeah yeah. You got it so so now we're using the cut to be spray and we're spraying that all across the hairline - and this is what they use to mold the ball cap down or the wig cap, so use it while don't spray. It rub your finger against it. Like a two times, it's pretty close, you know, then you use the blow dryer get it reset. I want it set, it was cut it. Let'S say blow dry under here when it's set, i cut it caught it. It was look like scale, but if it was a little ball like no here, no here no here. So what we're doing right here so we're trying to secure the back of the wig cap because most times some people they sold back after we cap down. But we're working smarter, not hard! That'S what we're doing we cut along the wake up without cutting it like cutting it off from the back, and what you're going to do? You'Re going to see me the piece that i'm cutting right now we're going to take that piece, lift it up over the person head and make it steer right, putting it up what that do. It secures the back of the wig cap so that, if the shape of any of the wig drop off - or you know the back part of the wig come up it now going away. So the way kept secure that way. So here now i'm um this her hairline are here, grow lower ish and i'm fired, so i'm just peeling up to where her hairline is so. I can mark where to cut we're just peeling the wig cap following her hairline to mark the initial cut. After i'm going to go ahead and you know customize see where we can cut off and where we cannot cut off, so that's basically what i'm doing here so yeah. So here would also add some makeup to the wig cap. So you can blending with her skin tones that one add the wig look like it's coming out of her scalp and it's not actually a wig and then after you're, going to use a cotton with alcohol and clean up the perimeter of the wig line and remove All the makeup, so here i'm just hot combing, the hair back, because we're going to start putting it on now through a hardcore it back to get all the flyaways out of the way so that we don't go on that to the hair and i'm using the Makeup that was leftover on the brush, just applying it to the wig itself, so that it can give the extra look of natural so that when i glue it on it, don't that persistence is awake actually right here, we're just putting the weight on our head. This is just to get a feel of how we're going to glue it down, for instance, we're trying to align it so that it's it put on straight because we're going for a center part, and we want a line to see how far back, how forward we're Going to actually put the glue so that when it glue down because once the glue done, we can't take it up. It looks disgusting, so i have to get that out of the way from those words trying to see how we can best align the wig, how we can see, how would it look which direction which position etc. So this is the bad part. Now we're at put the glue for cool on the wig. So everything start, you know drastic everything start get serious, so put the glue up when i fire it use liquid tail comb spread it out then spread it out, get the blow dryer, and you want to make sure that it's at least tacky you don't want it Dry fully, you want it at least tacky, so it have hold where you can put the glue down on. Why am i so dumb put the wig down on the part and, as you can see here, so i was being dumb and out of my here cover everything right. So when i get to see how it look with me, i put it down, but i mean first well not first time so can't kill me, but that was dumb on my part and then we're just using the comb to press it in just to make your Side, stick and now we're using the blow dryer and as well as my finger, just press it and get the wig like like hole on the glue. So, basically, that's what you're going to see for the rest of this spider part yeah and guys if you're, a beginner like myself, don't try to do everything i want do it in sections. It'S way easier, trust me. So we finished glued on the way. Guys can see she's feeling ourselves giving breed barbies giving jada wait up. So then, what we're going to do we're going to melt the wig with our mildest and like it's just basically let it look as more natural as possible. So what i do other thing spray! A little and i mean little about to be sprayed along the hairline of the wig and then you're going to get with elastic whether a scarf kerchief do rag, something that i can tie and i'm going to tie that around the hairline. It can blow dry it. It'S optional, i kind of let it see what like tied on for like a good 15-20 minutes to give it that extra security, and so the wig mold down so like it even harder to lift up so remember, i said, ruin center for right. So while it was melting, went ahead and gave it a pre part just to like see what we're going to put apart so take off this curtain, now see it look semi-decent, it's not fully there because they're not finished so now what we're going to do? I'M going to try to get the part like as center as possible, so we're going from the back and part. You know the front that was tied down getting that center part there, because we want to look like a moses himself, but i didn't want to look straight like straight, but and as you can see right now, it doesn't look that straight right. It looks like it lean, however, it's straight the thing is, i don't know who bleached the wig for her, but they over bleach it a bit, but not worry, not to worry like we're going to fix that because i'm the goat in the making so we're going To fix that and you're going to see how i fix it, so it might look lean, but in actuality the part is true, just that here was over bleached, so some of the hair itself is bleached and it looks like make it look lean, but yeah. So now we're trying to get the part to lay flat right, because you don't want a highway. You don't want a humpy wig so using the hot comb to comb it and get the part defined, and i added some mousse just to give it a little extra hole, but normally what i've seen them use is. I think it's wax stick work. Stick. I don't have a wax stick, so i use the mousse and i think the most workshop is that you just have to use more than you'd, normally use so you're using the hot comb and the most so hold it down, see them they're testing the tomato. It'S not too hot, so it don't burn the people that you don't want to burn the people. There don't burn the people, then please so, yes use the mousse on the hot comb in combination and get that as flat as possible, so that we're done it looks like i've been saying it looks like scalp like i talked about it like. I see them here that you want. They want feed them here, all right. So now we want to chew two curls that are here come on, so i put some mousse and i think she says that deep wave here, don't quote me. I think that it's what it is deep well so after i've like put them, also get it. You know, get the curl empty wake up, so the little indian sweetheart could have come out. So that's what i do notice, adding mousse and combination. Hmm! Okay, guys! Note yourself, and you guys please test it. The hot cove is like how hot it is before because, as you can see right here like i never realized how hot it was and it kind of burned her a bit. You never burn our fish getting an internal damage, it's a little burn because you're kind of cold as well, so never that hot. She was just overreacting, so yeah. So that is a notice of mine on the burning people that made and burn yourself. Please, two! Okay, guys now we're going to try attempt to do some baby hairs, so we take off the buns. We put her on the wig line and you see me you know i'm curling the baby hairs that will take out so guys and honestly, i'm trying my best. Try my best to try and lay the baby ears, but i cannot do edges, i'm just practicing something so she had to take over and do her edits herself. As you can see, you see me right there. I tried, but no here so now we're using some contour the same concealer on the wig cap, we're using that to go over the part, so we can have the parts more defined, and so it look more straight and remember. I said that here is over b. So right here, i'm just using some black eyeshadow that she have going over the actual here. So the parts that were overlapped, so it can block out here and so the part can look at least semi-perfect. And then i'm going to go over with some concealer along the edges like the hairline of the edges right here, because you don't want that and the part being two different shades. So that's what we're doing right here just making it look semi-perfect. So yes, guys! This is the finished. Look tell me what you think about it. I actually like it. It'S not perfect but cannot mix my practicing stage, but then what you think about it was trying to make the hair sure about the fun. Never did i give me no option like at all, so so what you think about it? This is a video with filter and then this is the video without filter. So yeah guys just don't forget to subscribe, hit that notification bell like comment and you can follow my instagram and tick tock and i also posted a video on tiktok but i'll insert the video on here as well. Bye! Oh so you


Comments
Trishene Powell: You diddd thatt!! I love it!
Major Lyrics: I KNOW THAT’S RIGHT
Никита Петров: que Kayantanii.UNO encantan tus videos. Bendiciones hermosa Celina que Dios te cuide donde quiera los mortalesf abian apreciado tan hermosa mujer
Iam Brianaa: The baddesssttt!!!!
Maria Mitchell: Hai anna iam Nagendar Anna na age 42 vor.monster qualification m.l.t medical lab techniciang ,Srpt lo jobs unte cheppagalaru anna.with govt Jobs