The Best Body Wave Wig | Detailed Install+Honest Review Ft. Alipearl Hair
- Posted on 26 January, 2022
- Full Lace Wig
- By Anonymous
Instagram: pessiexo
Shop Now➤https://bit.ly/3mv3kUQ
Hair Info: 26inches body wave 13*4 HD lace frontal wig, 200%density
❤#AlipearlHair Official Store:➤https://bit.ly/3qlkoOb
1.Join FB Group, Win FREE HAIR➤https://bit.ly/3JbJ6JL
2.Lace Front Wigs for Sale!➤https://bit.ly/3sM6tnt
3.Invisible HD Swiss Lace Wigs:➤https://bit.ly/3munqyy
#alipearlhairwig #alipearlbodywavehair #alipearlhdlacewig
Instagram @alipearl_hair: https://bit.ly/34I3Oyd
Youtube @Ali Pearl Hair: http://bit.ly/2H0Gmmc
Facebook @Ali Pearl Hair: https://bit.ly/3aKwxX3
WhatsApp: +86 15890076489 E-mail: [email protected]
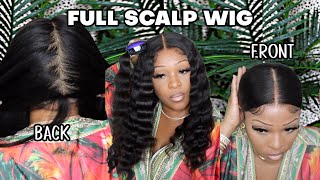
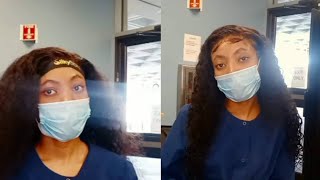
Do you see this hair? Look like a barbie, it's giving barbie, hey guys! Welcome back to my channel today, i'm going to show you guys how i achieved this beautiful glamorous look before we get into the video. Don'T forget to subscribe if you're new and like and comment below, if you have any questions about the hair or you know the videos that i might not have addressed so without further ado, let's get straight into the video. I don't know why. I did that, but anyways we're going to get straight into the install guys. So i have my stocking cap on i've already like blended it to the colors that i want the stocking cap to be. All you need is a 3d palette like a contour color and then just go in lightly and color your stocking cap, which i've already done. So i just wanted to show you guys that real, quick um, it's always good to wear stocking cap. So you can protect your natural hair, your edges and everything else. I'M going to be using three products, i'm going to be using the got to be spray and the glue, and then this wig dealers melting spray. For me, i like to push the stocking cap a little bit back, so that way a little bit of my skin will show here that way you won't see the stocking cap since i'm not doing the ball cap method. Then i like to go in and put my glue on the edge one thing i like about this glue, which i've been using for a really long time with my installs, is that it doesn't rip your edges off, but it still will keep the wig on. For a while, so after we've got the glue, we're going to spray and you just blow dry it or you, let it sit for a while, i'm gon na blow dry, because i want this process to be quicker. So the way that i know that, like the glue, is ready for my wave like to be placed on top of it is if, when you touch it, it's sticky, like you see how, like it's sticky like that, that means you can put your wig on. If it's not sticky, don't put it on because it will not stay on your head and it'll just look a mess. So now we try to adjust it and then just lightly place the wig, where you want it to sit for filming purposes. I'M like standing right here, but you know i need this little mirror, so i could really see up close and then yeah press with your hands or you can use like a rat tail comb and press with the rat tail comb. Another thing about installing your wigs. I find that i get my best installs when i have no makeup on like when i do when i put my wigs on with makeup on, it is looking gunky and just it does not look good. So i like a fresh face, no makeup and then once you've styled it and stuff then put the makeup on and then trust me like you'll notice, the difference so now the glue has you know everything is sitting. I should get a thumbnail with the hair. Looking like this because y'all see how much i must lay this wig okay. So now we spray on top just to make sure the wig stays on a little bit longer and then quickly tie your hair. You got ta, do it quick, because the spray is going to lift the wig up, if you don't tie it quick? Okay! So now i'm gon na leave this head tie on my wig for about 20 minutes. That is a secret to like got to be glue spray like really holding your wig for like a week, you got to keep it like tied up, so it can like really stick if you just spray it and you put the glue, it's not going to stick On your head and it's gon na have like pieces that are lifting like it's just it's not gon na look right. This is gon na really help the wig stay in place, so i'll be back in 20 minutes. Okay, so i'm back! It'S been 20 minutes. It'S time to take this off now, it's gon na look a little crazy, but we're gon na fix it. Let me see cool girl tail calm, so i'm gon na brush everything out and like just separate the hair, because, as you can see, everything is stuck together and then i'll come back and show you how it looks when i brush it apart. Okay, so i have combed out my hair and now i'm about to do my edges for my edges. I use two products. I use the herbal essence for fructis and the nairobi foam mousse, so i like to use a really really old toothbrush, like a toothbrush that literally when you try to move it around like nothing moves. These are the best types of toothbrushes to use when you're doing your edges and as you know, i like to do like a split in the middle like this, and i've already created my baby hair. Since you know, i've been wearing this wig for a while. So i'm just going to go back in, but typically i split it in the middle cut like a piece to the side and then i kind of just work with it from there. So i used the nairobi because it's the consistency is like very watery and loose. So it loosens the hair and it helps me move it around better than the herbal essence. The herbal essence will just keep the baby hairs where it needs to be also when you're doing this just make sure you don't get too much of the mousse on the lace or your lace will lift. So i just swoop it like this go over here, so see how easy the narubi like mousse made it, and then i go in with the herbal essence put a little bit on my hands because i don't want to put too much - and this is literally to Just help the baby hairs stay where i wanted to stay like that, and i go and dab like that, and then you have your baby hairs. So i'm about to do the same thing on this side and then i will come back and show you the next step. Okay, so i have done this side now and then now to finalize the edges, i'm gon na use the wig dealer spray. Oh, this will help with melting and then we're going to just tie it down one last time and while it's tied down, we are going to begin the styling process, the tools that i'm going to use to style. It is hot comb and a flat iron. I think this is like a one inch flat eye. Okay, so while the tools are heating up, i'm just gon na brush my hair, so i recently just moved and i actually did not pack my heat protectant spray, so i just have to work with no heat. Protectant, but i do recommend putting heat protectant on your wigs, because it helps with the shine and everything like that and also brushing helps a lot um. It makes the hair like curling it just a lot smoother but yeah so brush that through look at these inches. Okay, i'll see all of this hair, it's so long. It goes all the way down my butt. Then i'm gon na like grab a scrunchie and scrunch, so i'm gon na do half up and then we'll do the top half after it doesn't have to be fancy. Just put it up, and now we curl so as i curl, i still go through brush the hair because it just makes it like so much easy and then i go through. And if you have not watched my video on how i curl my hair with a flat iron, um i'll put the link in the description box, i'm not gon na go over how i curl my hair in this video. I kind of just want to show you guys that i am doing uh hot apply iron curls, but i'm not going to give you an in depth. So this is the curl and i'm just going to continue that throughout the entire back and then i'll do the front i'm coming back, say you got ta work from three to nine. Oh, i get you home by a decent and the crib and the liquor too. I, your soul. I release in your spiritual. I be your muse, bring your easel and pencil suit here you go you trying tease with them pictures you can ride on me. Just like your idea. Okay guys, so i'm done curling the hair. I'M going to take this out. It is so hot in this bathroom chat every time i take this off. It just looks a mess, but it's okay. We gon na fix it girl. So now i'm gon na, like get this middle part to be a real middle part like emphasize it a little bit more, so we're gon na go in so now i'm gon na go in with the hot comb should be hot yeah, it's pretty hot and i'm Gon na glide, the hot comb on the top, so these flat the trick to getting your wig really flat, is hot combs and what you need to do with the hot comb is make sure you're like like you're pressing it like inwards like this and then you're Gliding it but you're doing it slow, don't just brush through, because it's not going to work. You have to like really go in there and then press, and do it very slowly trust me this will get your wig flat. Okay, like really flat. I need a new hot glue. Oh my god, i should have ordered a hot comb on amazon. I ordered a whole bunch of stuff yesterday and the one thing i didn't get was a new hong kong and then you do the same thing for like your edges. All right, so this is what we have so far and i'm about to put the wax stick on my hair, so this wax wax this wax stick. I got it from amazon. I think - and you just place it so it can like get rid of all the flyaways and whatnot, and that is basically it. So this is how the hair looks. Yeah squirrel, okay, but we know that a look is not complete. If you don't have a big face, so i'm about to go. Do my makeup it'll literally take like one. Second, this is the final look of the hair. Let me pull everything, so you guys can see the whole entire hair when it's pulled all the way over. So this is how it looks when you pull everything to the front: there's no hair back there um this is their 26 inch body wave textured hair. It is hd lace, of course, because you know we only do hd lights over here. We don't do regular lace. Okay and um: it's a 13x4 200 density, so i've been wearing this hair for two weeks and this hair has been in good condition. The amount of compliments i got with this hair is it's insane. Okay, every time people see me wearing this hair they're, just like. Oh, my god, where hair is that, oh, my god, the hair is so pretty, and i'm just like. Thank you. It'S ali pearl. It'S definitely giving you know what it's supposed to give i'm just really obsessed with this hair like this is like my fourth time doing. Another install so you know clearly i'm obsessed that is all for this install. I hope you guys enjoyed this install and i hope it was helpful. Like you know, doing a talk through install all the details of the hair will be in the description box below. Thank you for supporting me and watching my videos. If you enjoyed this video, definitely leave a thumbs up. It helps me a lot in the algorithm, so my videos get out there and subscribe if you're new, and i will see you guys next time, bye, guys
Comments
Ali Pearl Hair: So informative Install! The wig looks great on you~ Thanks for your sharing!❤
ILL REEL: You killed that Sista!!! Great Job!!! I know without a shadow of a doubt, before it's over your vids are going to be helping out millions... #Salute...✨ #GreatVideoPessiexo...
Dee Luther: Great Video As Always Stunning thumbnail tho U Did a Good Job Beyond Pretty you are Makeup always on Point Nice Cheeks Structure Keep them Coming
Bri Ailene: Looks great! Did you pluck the hair at all? Or bleach the knots?