Watch Me Install This 30” Loose Deep Wave Wig Ft. Ishowbeauty Hair✨
- Posted on 16 June, 2022
- Full Lace Wig
- By Anonymous
My 15$ off discount code: "IshowHU15"
Ishowbeauty hair official store: https://bit.ly/3Q71DdD
I'm wearing Natural color Loose deep frontal 30in wig: https://bit.ly/3aLBroL
———————-
All wig types from Ishowbeauty.com: https://bit.ly/3Qb0iCp
13x4 lace frontal wig: https://bit.ly/3zqXqLS
Cheap 4x4 lace closure wig: https://bit.ly/3NGq3cg
Long length(30in-40in) wig: https://bit.ly/3zoHo5c
New HD transparent lace wig: https://bit.ly/3aNWR4g
[ Daily human hair units ]
3 human hair bundles with 4x4 closure: https://bit.ly/3aHy6H8
3 human hair bundles with 13x4 frontal: https://bit.ly/3NDFxhh
**** Contact #Ishowhair *****
Email: [email protected]
Whatsapp: +86 182 3684 8017
Follow #Ishowbeauty on social media:
YouTube (@ishowhair): http://bit.ly/2PTT7Bb
Instagram (@officialishowhair): https://bit.ly/3QcYCbF
Facebook (@ishowbeauty): https://bit.ly/3NM8844
Tiktok (@ishowhair): https://bit.ly/3zsN5im
Welcome to My Channel
Be sure to SUBSCRIBE & TURN ON YOUR ALERTS
HAIR CHANNEL @iambeautifulhustlertv
——————————————————
MY PERSONAL YOUTUBE CHANNEL : @Life with ShaeTV
https://www.youtube.com/channel/UCB9xX...
——————————————————
Follow My Socials:
PERSONAL
@iambeautifulhustler
BUSINESS
Instagram:_Beautifulhustler
@thebhslay
@girlsniteoutapparel
Twitter:_Beautifulhustl
YouTube :IAmBeautifulHustlerTV
✨For Sponsorships ,Reviews,& Questions
Email:[email protected]
786-571-1313
To Purchase Hair & Products Www.ibhslays.com
Allow 3-14 Business Days For All Orders
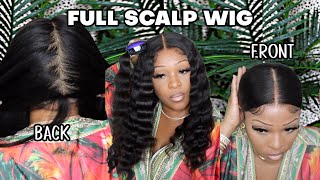
Hey beauties and welcome back to, i am beautiful, hustler tv. Today we are back with a new video and today's hair is provided by. I show beauty hair. Now they sent me over uh this package and it has the lashes in it. A stocking cap and a 200 uh density percent density 30 inch like a loose deep type of curl pattern. Wig and it is a regular lace, front wig. It does have a few combs on the inside. It does have that four inch parting space in the middle and like about two inches on the sides. So yes, it is a regular lace front now excuse to get on this y'all, but i decided to record this video in my room because yeah at this time it's supposed to been a tropical storm coming to miami and yeah um didn't want to be at the Shop in the middle of a storm, so i just said you know what i'm just going to bring my stuff home and just make it do it to do. But nevertheless, you guys i'm going to show you guys how i installed this wig and, as you can see, the lace is very like white. I guess it's supposed to be like transparent lace, but it was just like wider than normal, but it doesn't matter because i'm still going to go ahead and blend that thing into perfection with some foundation. So, for starters, people actually uh take down my wig, i'm just going to cut the extra lace from around the ears. That way when i do lay down my glue that it would just you know, it'll just stick um in place. The way it needs to and just helps with the melting process, much better, but this is what the wig looks like after putting it on my head. I did go ahead and bleach those knots and i let it air dry overnight. So now i'm just going in with my ruby kisses foundation, i'm using my actual color in that palette, which is the lighter brown shade and just applying that foundation all over uh the inside of the lace, and i would go back in probably like two more times With the foundation um, once i install the wig because honestly y'all, like i mentioned, the lace was very white and you know the wider, the lace, the more steps you have to do to get it blend. You know to get it blended. So with that being said, i'm just going to go ahead and add my layers of glue and once that's done, i will go ahead and begin to tuck down. Do so. I'M just going to continue to you know, add all my layers and, like i mentioned once it's done. I will go ahead and begin to take down the wig and at this point i just really got impatient. I just wanted to be done so before it dried. All the way i just went ahead and began to tuck down my wig now, usually when i see other floors influencers do that like still apply the blue when it's still like white. I get very crunch like don't do that, but at this point at this point, y'all did not even just care. I was just already irritated. It was raining and i was just like i'm ready to lay down because y'all know when it starts raining and storming you'll. Be ready to go to bed so i'm just like you know what let me just go ahead and just lay this down and once i blow dry and all that it'll do exactly what they need to do anyway. So um, i just you know, went ahead and placed it down, taking a hot comb and just hot comb, the roots back, and then i'm going to blow dry that lace with the heat setting and then, of course tie it down with that milk belt right. After so now that i let the meltdown sit for five minutes, i'm going to go ahead and remove that, and this is what it's looking like. As soon as i remove the mailbelt. As you can see, you can already kind of see the parts. That'S melted, and you know everything else. That'S not, and it's not needed we're going to raise that off. So everything that you see me pulling down right here that mean um. The glue was not placed there because, if it was, my wig would have been too far down. So you only want to apply your glue to match what your natural hairline is flowing like and then that way everything else that's not glued gets cut off. So i went ahead and parted that section down and the reason why i mentioned that, because people sometimes ask me: why do i uh like part off some of the hair before i cut it off, and that's just simply for that reason. But, however, i'm just gon na go in with my razor and just start, razoring off all the extra lace, and you guys will notice that once i remove that lace, the extra lace i still have like a white cast around my hairline and that's simply because, like I mentioned this lace was very white, so it will take a few extra steps to get it to blend, but do not worry y'all know i'm going to get that together. So once i finish erase right now, you know the extra lace and everything like that. I will go back in with that foundation and actually use the darker shade in that level. 16 palette and you know, tap tap tap tap across the hairline, so get it to blend perfectly so um also. I wanted to mention guys, like basically you're, going to see two styles in this video, so the style i initially did um, which you will see shortly. I wasn't sure how i was feeling about it, so you will got you guys will see me like. Do my whole hair do my whole install and then do like one look, but then my finishing look is going to be a whole nother look, but i will show you guys um that finished look so, but right now what i'm doing is taking that foundation like I mentioned, and what i was noticing is when i first was going in with the natural color um. It wasn't blended how i wanted it to so that's what made me go back in with the darker shade of foundation and then tap it across the hairline and then once i used the darker color, i noticed that it started to blend way way more so um, That'S pretty much how you fix that you get that all settled, but um. Now i'm gon na go ahead and pull down a section for the baby hairs, and you guys will see me like i mentioned prep my style for a whole nother look and then end up changing it at the end, so um. I just still wanted to give you that content, just in case somebody who was watching this video, like their first style, that i did um and you want to you know recreate that look. But for me i don't know, i just wasn't telling you so me know down below so now that i have that um, you know parted and everything like well. The baby hair is sectioned out um. I went ahead and did a part down the middle, because i knew whatever i was going to do is going to have a middle part. So um i just went ahead and parted down the middle and, of course, i'm going with the hot comb, hot comb, hot home, hop home and, of course, we're going to go in with the whack stick as well, and at first, like i don't know where my Head was at today y'all, so at first i was gon na do like two ponytails um at the top, and then i was like. Maybe i should just sneak it back into one ponytail, a little middle part. You know we'll do a half of half down like i was just all over the place mentally today. This week, like i did not know what look i wanted to do so then i also thought about just keeping it simple but down the middle, but i was like kind of boring, so my finished look, it was, it still ended up coming out to be simple, But just put a little, you know put a little twist on it, so um i decided to just go ahead and part the wig down the middle still undecided at this point, but i was like you know. At least i can get my wig nice and prepped as y'all can see it's looking nice and sleek soft looking and at this point this is where i was like. You know what i'm gon na do like a little half up down. You know what i'm saying, but more so like a straight back ponytail with the bus down the middle, so y'all see me getting that thing all sleek, i'm hot combing it. You know what i'm saying: i'm going in with my olive oil um holding spray and the holding spray molding it all into place, and you know getting my rubber bands and concealer i'm talking. I did the whole nine yards concealed apart and everything and i was just like yeah - i'm not feeling it, but it's so crazy because while i was recording this video, that's how i was feeling, but now that i'm you know actually editing this video and doing a Voiceover right now, i still like you know what maybe i actually did like it. Maybe i was just overthinking, i don't know but, like i said y'all, let me know how y'all feel about this style, but this was going to be the original look like a nice. You know pullback um, you know middle part and just do my little baby hairs and probably just one curly hair at the bottom or crimp it i didn't know, but you know this is what i was doing at this point i feel like i had it all Figured out yeah so um i went in did the rubber band everything i concealed the part i black sprayed it and basically, you know, tie my hair down my lace diamond candy with that mailbill and you know i'm going to come back for one and do the Baby hairs and then once i do the baby hairs and i decide i don't want to wear my hair like this. I will go ahead and take down that ponytail and just do me a simple bust down the middle and i added like a little braid, which i will see based on this thumbnail. Y'All know what it's gon na, be so um yeah, so uh. Let'S just watch me be on the slices yeah. So basically what i mentioned i was going, you know, re-tie the hairline down and all that you know wig is melted, turning it into the baby hair. So i'm just taking the scissors cutting it down and i'm going to take my little curler. You know curl them underneath and then going in with my holding spray and my edge brush. Just you know, swoop smooth and i just kept it playing. I just kept it simple. I didn't do too much. You know what i'm saying. I just still want that little fluffy look with a little hole to it, so i just curled it and using that holding spray, just went and swooped some soup up the baby hairs. Like i said plain and simple straight to the point and then once i finished the baby hairs and i realized i didn't like this style, i will go ahead and you know take this down and just do a simple part down the middle and just add a Braid, so just watch me play this little baby hairs, real, quick, quick and simple. You know make sure you guys cut them, curl them and then scoop them. It makes your life so much easier when you curl your baby hairs before you swoop it. That is the best thing that ever can tell but taught us for real y'all like that right there. That was some real golden, just letting y'all know so um you just take that holding spray, get your brush and just swoop it, and just do you whatever look you're going for just go for the keel and just do so. This is what the hair looks like. I got ta finish my baby hairs and, like i said yeah i was really trying to feel it and get into it and because it was a lace front wig i was trying to make it do what it do, but i got irritated so what didn't happen? What ended up happening was that i actually took it down and thank god that the holding spray is not so harsh, because i was able to just comb it right back out and it made my hair soft again. So, instead of me just being plain and just leaving it like a middle part, i decided to hey. Let me just add a braid everybody kept saying why you didn't do two braids, i said cause. I just wanted to do just the braid. I don't know like. Maybe i should have did a crown braid, you know i never do that, but it was just real heavy on my chest. You ought to just have a braid. I don't know why, and i decided to do one braid, so how i did it was kind of like made all the hair come into their braid towards the front, and then i had like some butterfly clips. Well, i only had two because i had a whole pacquiao and then i gave them away, but then i ended up finding two of my um little vanities. So i'm, like you know, i'm just taking advantage of these two little butterfly clips and put them in my head. Just i don't know i don't know y'all i just be so i don't know so i end up doing this one behind bring um. I didn't plan it all the way down. Just you know down good enough to where i could add the little butterfly clips and i decided to just you know: kind of wand curl, the hair just a little bit. So all of the curl pattern can kind of like just blend in because it was a loose, a loose deep weight wig. So it already had that you know that little curl look to it already and i just had to you know not make it so straight, especially because i hop home so much of it at the top. So i just wanted to put that curl back in there. So i just went ahead and did my braid and i you know, touched up on my baby hairs because they are soft, so you know it will move as i you know, change the style up or whatever like that and then, like i said y'all, i had These butterfly clips, so i just wanted to add that in and then i'm going in with my little curler and just you know, wand curling, a few of those pieces to get that more curl look and then i went and you know added. I only added one uh butterfly clip one. You know well in this clip like on this install, but i just added the other one off camera, but you guys will see it. I have one blue one, one orange one, but i just went ahead and one crook up um the front of the hair and the ends of it. So you know i could have more of a completed style. Look versus i just did or whatever type of thing. So i'm just going to curl those up and then once i'm done curling that i will add my other clip off camera and then show you guys the finishing look so yeah. I know this video was a little awkward um because i started off in one style but ended in another. But if you like the before style, let me know like i would just probably have to you know redo it with you know more parting space or whatever, but um. Let me know what you guys think, overall, the finishing look, i don't know what i was going for at this point. I don't know, but yes curled it up and added another clip and you guys will see in the next um clip of this tutorial. The finished look, but thank you guys for watching this video. Nevertheless um. I hope you still learn something as far as the installation process, because yeah when it came to styling this time. Y'All my mind was all over the place, but thank you guys for watching this. Video um, i still hope you learned something like i mentioned and hey. Maybe somebody like this style too, but i will see you guys in the next video, don't forget to check out the description details down below when you um looking to purchase one of these um, affordable, lace, wigs as well - and i will see you guys on the Next video stay here for the finishing, look and drop a comment down below leave a thumbs up, comment, questions concerns, requests, leave it down below in the comment section as well, and if you're not into my channel, don't forget to click the subscribe. Okay, see you guys. Next time you
Comments
lneal2800: Hey boo! This is Gorgeous keep the slayage coming!
Christine Zapata: Omgggg I need this lol it’s a lot of hair but it’s perfect for me thanks for another slay boo!!
Shaletha Quenton: Can't click the thumbs up button!!!!!! Beautiful install, serene voice,detailed and informative too. Thank you,
Lillian Powell: Simple and very cute
Sam Willis: Yesss we got a 2for1 both styles were ‼️
CourtStylez: love it , does the lace tint come out better when using transparent lace on dark skin or you prefer the makeup?
Sweet MiK.: Your videos are always a success and whatever was bothering you that day I hope it has passed sis.
MrsQueen LadyRed: I love both hairstyles you did
Felix Manj: Beautiful ❤️
Sade Hinson: I love your work
Elizabeth: Another slay. I love it
Vannessa Johnson: I like the braid and a crown braid would look cute on you
Brandie Riggins: I lovelovelove the 1 ponytail
Certainly Cee Caldwell: BEAUTIFUL SHAE QUICK AND EASY BUT GORGEOUS TOO.
Sammy Da Goat: Second Comment Stunning Hair Lovely Thumbnail
Senichkin: que vor.monster encantan tus videos. Bendiciones hermosa Celina que Dios te cuide donde quiera los mortalesb abian apreciado tan hermosa mujer
O'Shea Brown: Video is still a success
Princess Toyia: GORGEOUS FRIEND!!!! ❤❤❤❤❤
ItsQueendom: For some reason when i put the elastic band on it makes my lace slide back , what al i doing wrong girl
modelchiic17: Yazzzzzz sis !
Life with Leah: You got some pretty brown eyes period