Ultimate Lace Melt Down! | Install This 30” Loose Deep Wave Wig With Me | Wiggins Hair
- Posted on 15 June, 2021
- Full Lace Wig
- By Anonymous
Like, comment & subscribe!
Instagram & Tiktok : @zoenahabwe
════════დ #WigginsHair დ═══════
Get $10 off with coupon code”wiggins“!!
❤Direct Link➤https://bit.ly/34XsbHL
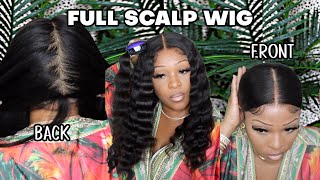
Hair details:#loosedeepwave lace frontal wig 250% density 30 inches
You may also like:
1.Hot selling #lacefrontalwig➤https://bit.ly/3g2hiuC
2. Invisible skin melt #hdlacewig ➤https://bit.ly/34Z28jE
3. Premade colored wig➤https://bit.ly/3w8immw
Follow @wigginshair on instagram:https://bit.ly/2TbNW3O
Tiktok@wigginshairbest
Facebook @wigginshair:https://bit.ly/3g0BL39
Email: [email protected]
WhatsApp Wholesale: 0086 18339906150
❤️For tiktok:@wigginshairbest
Direct wig link:https://bit.ly/3v0PBXw
For instagram:@wiggins__hair
Direct wig link:https://bit.ly/3pwOPQX
Hey guys it's zoe and welcome back to my channel, so i'm going to show you guys how i installed this 30 inch wig on my head today, um it's from wigan's hair. As you can see his diesel, just you know, being nosy, as always in the background, but um yeah in the books i got. I got this like headscarf thing, which is actually pretty cute, i'm going to tie into like a top or like a bandana or whatever. It also came with an elastic band, so you can adjust to your head shape. I'Ve got a little edge comb and i got a wig cap and also it came with um a little bag that you can put your wig in after you know, when you need to store it so taking the wig out of the packaging. This is what it was looking like. You know, you know standard hairnet. It came with some some tissue to stuff the lace to keep its shape. The texture of this, i believe, is, i think, it's a loose wave i'll double check and put it up on the screen. I think it's a loose wave and the wig is 200 density as well. So the first thing i noticed about the wig is how good of a lace was? I'M not even capping guys, like the lace, just looks so nice and i feel like the netting, is really really small as well um. I do think this is the hd lace, i'll double check again um, but yeah. The lace was amazing and it was really easy to tint the knots weren't that bad either. I still ended up bleaching them, but this is what the knots were. Looking like nothing too major, nothing too bad um and it came with some baby hairs at the front as well, which really helped me when it came to cutting them and laying them later on. The texture of the wig is again like really loose and, like i don't know it's just it's just pretty like it's giving me tropical barbie tropical beige. Now i mean like i want to be on an island wearing this wig and just like coming out of the water in the beach, and just you know, i mean that's the vibe, i'm on with this wig, so getting into bleaching the wig. I use my jerome rustle bleach as always: i'm 40 developer. I mixed it all together in a bowl um and i used a knife this time as well instead of a brush, so you want the consistency to end up being like a toothpaste um. So you don't want it to be too runny or too thick either. It'S just. It needs to be like just slightly thinner than toothpaste consistency, so this is kind of hard to do on camera um. So you just want to lay your lace out, as you can see i've done here and just spread it on like you're. You know buttering a piece of toast just be really gentle to make sure that you're not pressing too hard down onto the lace that ends up transferring onto the actual hair on the wig. But this is what i was sort of left with, and i left this bleach on for about 35 minutes 30 to 40 minutes, i'd, say and then this is how it looked once i washed the hair out, as you can see the knots lifted quite evenly. There were still a few - you know that were still black but um. This was good enough for me. As long as the front section was bleached, that's all i needed so again. Here'S a closer look to it now onto plucking the wig. I always put my wigs on my mannequin head, because i can really see where i'm plucking and where what hairs i need to remove um. As you can see, the hairline wasn't super super dense. I'Ve defo worked with, you know worse, but she still needed a bit of work so yeah. I just got straight into that. I start off my plucking process by just wetting the hairline and just brushing it back. This really helps me to be able to see what hairs need to go, and you know i clip it back as well, just to make sure it's extra visible as well. I grab my tweezers and i just start at the front of the hairline and just tweeze. The key point is to make sure that you always keep your tweezers moving guys, that's the main main main important thing, because that's how you end up with bold sports, if you, you know, keep your tweezers in the same place for too long and then once i've Done a little bit there, i just take my hair brush and just brush out all the hairs that we've plucked. The next step is, i don't know if you guys can see that, but there's like a line of demarcation there, where you can really see you know where it starts getting denser. So what i do from there is. I grab my rat tail comb and i just section a section off from just before that: little dense area and that's what you want to focus on blending in with the front of the wig so again grab your water, wet the hairline and just start plucking. That area, that's the main focus you want to work on and, as i said before, just keep the tweezers moving and so once i've done that i grab another section from that. Little dense area and i pull it forwards and then i just focus again on plucking backwards from that section. Um again, it's all about creating like it's almost like a gradient effect. That'S what we want with the hair um. You want it to go back gradually. Instead of you know having light hair on one bit and then it's just suddenly going into like a dark line, so you want to just remove that dark line and just keep plucking now every once in a while. You want to make sure that you do check on how the hairline is looking, as you can see, i'm doing here. As you can see, the line of demarcation is fading away a little bit. I did end up plucking a little bit more on that section, but you just want to repeat this process all the way around the hairline now onto installing the wig. I grabbed my lace tint from glamour, hair london in the shade coco delight, and i grabbed my wig make sure you shake the ball, guys um and i just sprayed the inside of the cap. I did about two layers of this and just dried in between each layer. Now for this wig, i decided to do the bald cap method not necessary, but you know i just decided to switch it up a bit since i am using actual lace glue today. Instead of my normal um everyday got to be glue, so i just cut a hole for my ear on either side and grabbed my got to be glued blasting free spray and just sprayed around the perimeter of my forehead. Then i just dried the section that i sprayed. You want to make sure that this is a hundred percent dry, because when we cut it, you don't want anything to start lifting and doing madnesses as we're cutting the lid um, not the lace as we're cutting the wig cap. So once everything's 100 dry, i grab my scissors and just cut the ear tabs off first and then i just cut around my hairline. Please be careful with this, because i ended up cutting a little bit of my edges off which really hurt my soul. But you know we move just be really careful, please and just make sure you remove any excess of the wig cap. That'S like not glued down just make sure everything's smooth. I grabbed my face powder. It'S the mac studio fix powder in nc50. I believe nc50, and i just put that at the front of the forehead, so it doesn't like look completely different from my skin now it's time to put the wig on my head. So here she is in all her glory, so i just popped her on and then adjusted the wig to my hairline and made sure that the cap was completely covered. I ended up cutting the sides of the wig cap by the way um because it was still showing through the wig, which is really annoying so yeah. That'S that's why you can't see them here anymore, for my glue today, i used ghost bond platinum, um wouldn't actually recommend it. Wasn'T that good, if i'm honest with you, i've really struggled with this. It was so hot in england this day. I think it was like 25 6 degrees, and i was just boiling hot in my room. So me sweating didn't really help either. But i just went ahead and applied about two layers of this and made sure each layer was dry and completely clear before i stuck down at the wig. So, as you can see, i'm just you know sticking it down here and then once i've positioned the wig in place, i grab my hair dryer again and just use my little comb and make sure that you know everything's blended and you can't see any of the White bit, which is really difficult to burn by the way, because that's why i'm saying i did - i don't recommend this glue because it was so hard to get completely clear. I really struggled with it, but we got there eventually. At this point i was hot above it i'm sweating, so much, but basically what i did is i took an elastic band and i just tied it around my head where i've glued down my wig, so i just did all the glue off camera and then you Know tied this around my head to make sure it was extra secure and it didn't have a reason to start lifting for me. I grabbed my eyebrow razor, which guys i don't know what i was doing before yeah, but everyone needs to get an eyebrow razor for their wigs. This actually changed up how the lace was looking. So i just grabbed this and i just started cutting in a zigzaggy motion. It just blended everything so much nicer and it just looks so much better than using scissors. Now i moved on to getting some baby hairs in order um. I love doing baby hairs with curly hair, like especially like nice, big dramatic ones, so i just grabbed a little section like this and i grabbed my tweezers. I don't know if i do have a clip of that. Yes, i grabbed my tweezers and just you know plucked it a little bit, so it wasn't as dense um and then i grabbed my ors hair mousse and i just put that on the area behind the lace just to make sure it was. You know staying in place while we cut it, then i grabbed some more of the mousse and just started swooping my baby hair. So it doesn't. I don't really have a technique to this. I just you know: um use the little brush the toothbrush thing and then i use the comb at the end of the brush as well just to help make everything shapely shapely and in order that's what we're going for we're just going for a nice sweep guys. That'S the best i can describe it as, but i do use my finger to like help, keep everything down and keep everything pressed down as well. Um yeah, so you kind of just want to freestyle. Whatever works with your hairline, whatever works with your head shape. Just go with that guys, then i just grabbed a little sideburn area as well, and i just again made sure everything was sweeped nicely and grabbed some more mousse and just applied it to the rest of the hair. Now we're basically done to be honest. I just let my hair down and here's me just trying to decide what part i want to go for. I feel like side, partings, look so much better with curly hair like it just looks more effortless like a little like. I just you know i just woke up and just sweat, my hair to the side. That'S the look we're going for like you know. I woke up like this period, so i grabbed my comb and just um parted, my hair to the side and yeah. Once i did this, i grabbed my spray bottle and just started spraying the hair a bit i didn't go in with product in this wig because it is really really loose in texture like you, don't need to define it as much as kinkier textures. So i just went in with water - and you know brushed it through with my fingers, and it gave this really nice, like fluffy voluminous, look, which is what i was going for, and the curls are still defined. It'S just not as like wet. I don't want a wet look basically so yeah. This is what it was looking like now, what guys this is my new summer hair, i'm loving it like. I said, tropical barbie doll is what we're going for it's long as hell. I'M five foot six for reference. So on me, the hair reaches like my hip bone or like slightly below that. I hope you guys enjoyed this video, make sure you guys like comment and subscribe, and i will see you in the next one bye guys


Comments
Patience Pierre: A little tip when using ghost bond you have to put it on the cap and a little bit of your skin and spread it out to about 3-5 layers and wait for it to get clear and tacky then put on the wig Press it down with a comb and blow dry it but overall the wig looks so nice
Wiggins Hair: Such a wonderful job!
Wiggins Hair: This wig is so so bomb on you!
It's Me Toya: That wig is gorg on you!
Yeye Breezy: Love the intro
Tierra Harrell: Hey. Is it the HD lace?
Talisa Liberty:
Adhari💞:
Caramel Crunches: Nice
Hypt Q: Hey, are you interested in reselling this wig?
Joetta James: Lace where
no lol: Anyone remember what show the intro song was from - it sounds like a old childhood show but I don’t remember what show exactly !
Anice kiss: Are you interested in collaborating?
Deana Gabriel: how tall are you?
Allove Hair: If you are interested in our brand ambassador, please?