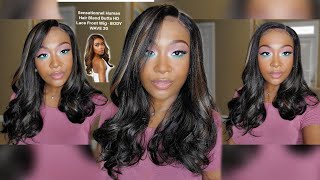
How To Apply, Install & Style Pre-Plucked Lace Frontal Wig! | Wig Encounters
- Posted on 30 December, 2017
- Full Lace Wig
- By Anonymous
Hey loves! Here's an easy way to apply, install & style your lace frontal wig! Here's how to make your lace frontal look natural and lay your edges!
All you need is:
Got 2 Be Glued Gel: http://amzn.to/2CdP8uy
Wig Grip: http://amzn.to/2CfaJmk
Blow Dryer
H A I R S P E C S
https://www.wigencounters.com/full-lac...
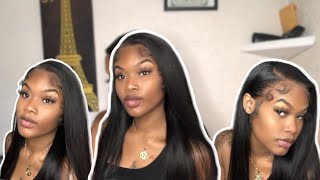
18 Inch Body Wave Indian Remy
My cap size is: Petite 21.5"
Cap 3 construction - Glueless Lace Cap
Lace Color- Medium Brown
-----------------------------------------
✗ Amazon Store to find my skincare must haves:
https://www.amazon.com/shop/essiemiche...
-----------------------------------------
✗ SUBSCRIBE TO MY CHANNEL ⇣
https://www.youtube.com/user/Essie479?...
-----------------------------------------
✗ FOLLOW ME
@ess_lovaa on IG/Twitter/Snapchat
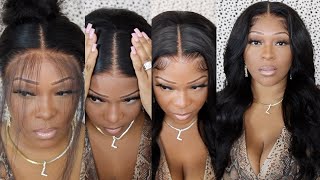
Hey guys so, as promised we're doing another hair review, well, hair type of series thing where I show you guys something we'll review something, and this is going to be how I apply and lay my lace wakes that I get straight out on the box and how I cut and curl and style and do all that jazz. So this hair is from wig encounters and we have hard to get started. Let'S go so now. If you're not big on making your own lace frontal wigs, then this is definitely a good option for you, like I said I received my from wig encounter, so it came pre-made slightly pre plucked and it comes with adjustable straps in the back. So it's easy for you to adjust it and I have a small head size i order 21.5. So I also had to use my velvet wig grip to keep the wig on, but this is how the hair looks straight out of the packaging. What I received from them was the 18 inch body wing, a three part wig, and I got the I think the denting is one hundred and thirty percent, and I love it right now, I'm just like playing around with it to see like what side I should Put it on the booth at side, because I look kind of crazy. The wig, though it's very, very thick at the top, as you guys can see. So I kind of act like cluck later on I'd like to collect some of the top, like my dome, but it was a lot of hair just right there um, so I'm just playing around with it trying to see where I want the part, but I think I finally found where I want the part yeah. I think so. Yes, this is the bluest lace cap and I got the color release. Color of medium brown. Make sure you try to get a lace color, that's like your skin color, so you have to do less things to it later on, as you can see it kind of like blends in already and I'm just playing around with it I'm setting myself up. So I couldn't lose my got to be glued, so I'm I'm braiding, my hair, so it's out of the way so that it's easier for the application um got ta have two got to be. Do you know if you watch all the lace runs of videos? Everybody has it so I'm just putting it on, like my edges, my hairline, because I'm gon na be just laying down with and mind you like. I said this is not plucked, yet nothing is going on with it. Yet I still have things to do and just make sure that you, when you use a blow dryer, make sure you use it on cool, not hot. So now I'm just placing the wig where I placed the glue and I'm holding it down so that it gets tight. It'S tacked and stays because you want your glue to be tacky before you lay it down, lay the wig down, and so this is how it looks just straight from me laying it down. As you can see this side well, I still have to relay that because it came up so I'm just using the rattles we're coming to lay the rest of it down. As I go and like I said, just use the blow dryer around cool, so it sticks everything me down. It'S probably better to do sections because, as you can see, I have to leave to you to talk to so it's better to do like you know the side at the top and then the other side. Just so everything stays down and doesn't live um. As you can see this side, it's like a hot mess. I look like laying the eggs on this side, so I'm kind of like counterintuitive by plucking, while it's on my head, I should have plucked before, but I just wanted to show you guys how it looks straight out of the packaging, so I will be going in And plucking slightly, while it's still on my head and I'm just using the blow-dryer to just keep it down, it looks so crazy right now, with the lace color the glue, the full hairline but y'all know me: I'm not gon na hook this up like alright. So just you know blow dry, I'm cool to make sure everything is tacked and stays, and now I am laughing so I'm lightly plucking, because you know I don't want to pull the whole entire wig off my head, so go in and lightly pluck. If it's already on your head, if it's on a mannequin head, you can pluck, as you please I'm just lightly plucking just for this video and, as you can see, I'm making some changes. This is a side that no one you really see anyway, so it doesn't even have to be like anyone, so just keep going in and just plucking clucking as you go, making it like sporadic now it's time to cut so I'm just cutting I'm trying to lightly Layer, the hair, so when I do curl it it gives it more volume. Layering, your hair is the key tip to getting the lunch Jewess, curls and bouncy curls, because they're not all the same length, your hair isn't all the same length, so it just makes it like stacked like layers pretty much clearly alright. So now it's time to flatten and I'm so upset, because I lost my business pro in Barbados, so I'm using this random as B's of Hyster hair flat iron, I like to curl my hair with a flat iron. I don't know why, but I'm also gon na show you guys in a second a little trick that I do to meet the bang part more bouncy when I get over there, so just keep curling. So this is a bang part too. So in a second, I'm gon na change how I curl the hair so that I can have more of a bouncy part, so you're, just gon na keep curling outwards right now, just taking different sections and keep curling outwards until you get to like the front of Your head, so that's a nice car. I like how that looks, but because I layered it it looks really pretty right there like that. So now I'm going to the front on my head, so the key tip right here, ladies, is to curl inwards into your face. So you're gon na be curling inward, not outward so that when you, you use the comb later on, it's just like a base. I don't know how to explain, but yet just flip it backwards and let it cool back. So I normally take like two pieces in the front and I curl it inward just toward my face so that when I use the comb later on, I can get bouncy or curls. I just found out this trick, and actually my my other wig looks better like that see: okay, yeah just take the comb, and if I had my B was fabulous Pro, these curls would look so much more popping. It'S so much more popping. I wish I could have shown you with that by iron, but I lost it as you can see, I accidentally made a hole in the lace right there. While I was clucking, I don't it didn't need that much clucking and I don't know why I did that extra plucking, but this is the final results, guys I'm going to cover up that hole with my eye shadow. You know I love using this brown eye shadow. It helps so much so you don't have to dye your lace. This is like a perfect option, for you know: girls that don't want to make a lace front ole and don't know how to dye the lace. This wig and this look is sort of you honey. Yes, because I look good and it didn't take too long, it came already kind of looking like this. I don't have to adjust much and it's just simple I'll, just put it on and go so. I hope you guys liked this video, please remember to subscribe. Remember at the end of this hair series, I'm doing giveaway on some of these wigs so make sure you have your post notifications on click, the belt click, everything and I'll see you guys in the next video bye guys, people have
Comments
hugznkisses: Love it
Ms A.E: WHAT LACE!!!! PERFECTION
hugznkisses: I'm surprise you didn't use the got 2b freeze hairspray
Jacqui Thomas: Yay finally
Melissa Rosario: nice
Jacqui Thomas: First comment too