Sleek & Silky Straight Wig Install✨| Side Part & Blunt Ends✨| Rpghair✨
- Posted on 23 July, 2022
- Full Lace Wig
- By Anonymous
The Skin Melted HD lace wig is from https://www.rpghair.com/
►► : https://www.rpghair.com/invisible-hd-l...
QUINSHA10 $10 $100
-------------------------- --------------------------
Invisible HD Lace Upgrade Clean Hairline 13x6 Lace Frontal Wig Silky Straight Hair [LFW96]
Length: 20 inches
Density:180%
13*6 Deep Parting space
★ Skin Melted HD Lace
★ Upgraded Clean Hairline
★ Whole Front Bleached
More Affordable 13x6 HD Lace Frontal Wigs: https://www.rpghair.com/6-parting-lace...
------------ ------------
Youtube Channel: https://www.youtube.com/c/RPGHair
Instagram: https://www.instagram.com/rpghairwig/ @rpghairwig
Facebook: https://www.facebook.com/rpghair/
Welcome to My Channel
Be sure to SUBSCRIBE & TURN ON YOUR ALERTS
HAIR CHANNEL @iambeautifulhustlertv
——————————————————
MY PERSONAL YOUTUBE CHANNEL : @Life with ShaeTV
https://www.youtube.com/channel/UCB9xX...
——————————————————
Follow My Socials:
PERSONAL
@iambeautifulhustler
BUSINESS
Instagram:_Beautifulhustler
@thebhslay
@girlsniteoutapparel
Twitter:_Beautifulhustl
YouTube :IAmBeautifulHustlerTV
✨For Sponsorships ,Reviews,& Questions
Email:[email protected]
786-571-1313
To Purchase Hair & Products Www.ibhslays.com
Allow 3-14 Business Days For All Orders
#miamihairstylist,#miamihair,
#browardhair,#browardhairstylist, #Atlanta #atlantahair,#atlantahairstylist #reels, #explore #trending #tiktok #viral #miamimakeup #miamimua #miaminails
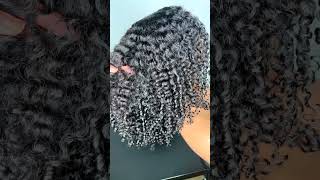
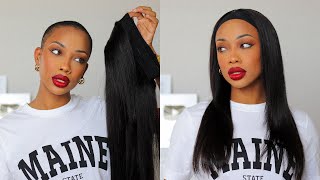
Hey beauties and welcome back to, i am beautiful tv. Today we are back with a new video and this will be the slay of the day. Now today's hair is provided by rpg hair and they sent me over this silky straight 20 inch wig and i always love their wigs guys because they are the perfect beginner friendly wigs. They come pre-plugged to the tee. It comes with the knots already bleached, and it also is just like out the box and ready to install. I absolutely love their wigs and the quality is always great, and this is their 13 by 6 silky straight hd lace. Wig, okay, like i said nasa bleach hairline is pre-plucked. All you have to do is take it out and install it. So i would be doing a nice little cute side. Part blunt ends curled ears and some quick little baby hairs um for today, and i will be using a new face on my channel. It'S actually one of my friends from a while back okay, actually it's my ex-girlfriend, but that's none of y'all business, but nevertheless, so today i'll be using my boo to do this look for today. So this is what the wig looks like straight out: the wig onto her head, like i mentioned before the perfect beginner friendly, wig, okay and she has enough foreheads. I can keep a lot of that pre-pluckiness. You know attached to the wig, because y'all know how these hair lines be cutting off everything they beat on pre-plugged, but her hairline was perfect uh for this wig and she got a little small head, so it fit her just perfectly and nice and snug. So, for starters, i just went ahead and cut off the extra flaps on the sides, and now i'm going to go in with three layers of my lace, mine, adhesive and begin to apply those layers and once that last layer is clear, i will go ahead and Tack down the wig, so after adding all of my layers and to turn clear we're going to get a little up close and personal, so you guys can really see how dope this wig hairline is. So i went ahead and placed the wig right where i needed to place it and just pushing it in. You know with my fingertips and i'm going to have her hold each side as i place it, and once i do that, i'm going to go in with the blow dryer on the heat setting and just blow dry that lace in comb it in some more and Then, of course, we're going to secure that and tie that down with the melt belt, and while that meltdown is sitting, i decided to just kind of like straighten the hair off camera and she was like hey begin to recourse. I was like oh yeah. Let me just show y'all quickly, i'm just pressing the hair out using my babyliss pro uh, my babyliss prima 3000 iron just grabbing pieces, because this is a silky straight wig. But you know it do be a little kinks in it from the whole shipment process. So i'm just going in and just pressing out the wig and then once i'm done with that, i will come back on and you know remove that milk belt and begin to cut off the extra lace and the wig is definitely giving scalp period purse. So now i'm going to go ahead and take my scissors slit, the wig down the middle, and i did not keep all of the pre-pluckiness, even though i could have because she had a lot of forehead space for it. But i still wanted to you know just not overdo it. I mean, even though i love them most of my clients, with bigger foreheads, be like uh, make it as low as possible, but i was like you know what it was down. You know further enough and i still had a lot of pre-pluckiness on there, so i was satisfied with that, but nevertheless, i'm just going in with a fresh eyebrow razor and just razoring up the extra lace and i'm gon na go back in and um tap down. Those little edges to secure them all the way and i'm just gon na do both. You know both sides we're using the same technique and then we'll get into the styling portion and, of course, is giving the girl scout period very natural, like a fresh relaxer at the scalp baby. That'S how we like that and that's on period, but nevertheless, even though this wig did kind of come with a middle part, i decided to take advantage of this 13x6 parting space. So i kind of did us like a little side, part or whatever, because i did want to do like nice side parts. You know two baby hairs on each side. Nice blunt ends and nice and bumped on the ends. So that's the kind of look i wanted to do today, instead of just a simple part down the middle. So i'm you know, i'm creating my side, part using my wax sticks, hot comb in that area out nice and flat, and then once we uh smooth everything down piece by piece. I will apply this section for the baby hairs spray that hairline and tie it down. Do so i'm just cleaning up that part a little bit more and now i'm going to go ahead and pull down a section for my baby hairs. So i'm just going to pull that out plan it out the way same thing for the sideburns and, of course, i'm doing the same thing on the other side as well. Like i mentioned, and then we're going to add a little more foundation to that lace. Just to make sure we are super melted, even though she's already scalped we're just going, you know, make sure um and then we're going to spray that hairline with that eating, holding spray and tie it down again with that melt belt and yeah. Once we come back, we're going to do some baby hairs blend the ends and give it a nice little bump, because it apart and we'll be done. Do so now that that holding spray has dried completely and it's time to remove it. Y'All know be giving straight scalp action period purr and we're going to go ahead and style. The baby hairs, i'm going to show you one side of the baby hairs off camera, i mean on camera and i did the other side off camera um. Just simply because i had a lot of videos that i recorded today for youtube content, so i need to make sure i have space. If you know you know if you're youtuber, you understand, but um. Nevertheless, um i'm going to show you guys in detail how i did this baby hairs over here, pretty simple baby hair, it's a regular swoop. Rather look you know regular little curl side burns, nothing dramatic or extra fancy today. So it's pretty simple, so i just cut the baby hair down and i use my small little curler curl the baby hairs and then using my baby hair gel um. I use the baby hair gel to swoop the baby hair. So pretty simple, like i mentioned, pretty self-explanatory, pretty basic! This is what the baby hair looked like on this side and we went ahead and did the other side off camera: okay, swooped it into soup soup. So now, what we're gon na do now is conceal up this part um, i'm spreading a little washing and a little holding spray on top, because, even though the wig is silky straight, you still want to give it a little something to give that extra finish and Polish look so i use some of my nature. What is it called nature? Something ocean? I can't think of the name right now you guys but um right now. I just add a little bit of that and um taking a little holding spray just sleek in every little thing you know little fly, aways behave, fly your ways on a nice sleek style and then i'm gon na go in and just uh blunt. The ends real nice and even and then go in with the curler, with a flat iron and just bump those ends, and i will also conceal that part up to make it more defined. And once i bump those ends and define that part, we will be done. So stay tuned for the finishing look, oh, don't forget. If you're new subscribe subscribe, subscribe like it's time to get the underrated goat to be out there like, we need to push the channel push the brand okay so show some love, leave a comment thumbs up and don't forget to subscribe, because i'm back being consistent and I'M back dropping new bangers period, and this is the finishing look very simple, clean sleek. I hope you guys enjoyed this video we're going to give y'all a 360 view. Yes, nice, blunt cut, nice and even clean part. Baby hairs neat yes get into it. We had to do this video at regular speed, so y'all can get into the sleigh for real, because, yes, it's giving she looks so pretty. Okay, no y'all cannot talk to my girlfriend but see y'all on the next video. Don'T forget to use all the descriptions and coupon codes down below

Comments
SlayedBy Jordan: Definitely laid
ItsNeicy: You always come through with the best slay
Sam Willis: Shae you never miss you hea me!! RPG Hair always on point I must say.
Zi's Corner: You didn’t even need the melt belt, this wig was
Valerie Naylor: Amazing
Venom Barbie: Nice Soon come for a slay
Remona Hyman: I would really love to see you do a reinstatement
Sammy Da Goat: Second Comment Stunning Wig
Beawtiie Iz Undefined: #YesssMaam♀️♀️ #Beawtiie❤️