Chocolate Side Part Closure Wig Install | Alipearl Hair
- Posted on 25 July, 2022
- Full Lace Wig
- By Anonymous
Social Accounts:
IG: jeriannajenae__
https://www.instagram.com/jeriannajena...
Twitter: JeriannaJeNae
https://twitter.com/JeriannaJeNae
Email: [email protected]
Shop Now➤https://bit.ly/3xDvUte
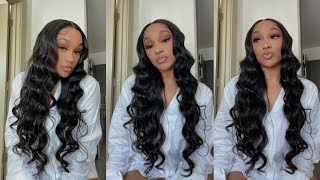
Hair Info: 22 inch straight chocolate brown 5*5 lace closure wig 180% density
❤#AlipearlHair Official Store:➤https://bit.ly/3xDH7dj
1.Join FB Group, Win FREE HAIR➤https://bit.ly/3ME4l7r
2.Lace Front Wigs for Sale!➤https://bit.ly/3HdVFUk
3.Invisible HD Swiss Lace Wigs:➤https://bit.ly/3MFreHE
#alipearlhairwig #alipearlchocolatewig #alipearlbodywavehair
Instagram @alipearl_hair: https://bit.ly/34I3Oyd
Youtube @Ali Pearl Hair: http://bit.ly/2H0Gmmc
Facebook @Ali Pearl Hair: https://bit.ly/3aKwxX3
WhatsApp: +86 15890076489 E-mail: [email protected]
Hey guys welcome back to my channel, as you guys can see, we're jumping right into this video. Today'S video is sponsored by ali pearl hair. They sent me over this bomb unit. I don't know the details off the top of my head as i'm recording, but all the specs and everything will be in the description box below they did send me a 4x4 closure wig, that's the most details. I know right now and right now, what i'm just doing is getting my wig ready so that i can bleach the knots. I don't think you guys have ever seen me do this process on my channel, because i don't usually bleach my knots. I pretty much just put foundation on the closure or frontal and just keep it pushing, but this time i wanted to try something a little bit different. So i'm trying to do something that the girls be doing on youtube. As you guys can see. I got my 40 developer and i got some bleach so here we are um and yeah. I'M gon na just show y'all the process. I'M not gon na talk too much about the bleaching part, because i don't know too much about it and i don't even want to talk to y'all and act like i really know what i'm doing so. Y'All can just watch and see what i'm doing if y'all want to give me tips on how to do it better. Please feel free to leave those comments in the description box or not the description box. Please feel free to leave those comments down in the comment section. Um help me out give me some tips y'all, so i can get better okay, so i will share with you guys what i learned from some of the girls on youtube and that is how they mix their bleach and developer together. So they made sure that they kept a thick creamy consistency while mixing it so that the um product doesn't leak through and seep through the lace to get onto the hair. So that's pretty much what i'm doing, i'm just copying it and doing what i've seen and once i got a nice consistency, i went ahead and started applying it to the lace. Now you saw me before then i made sure that i sprayed my god to be glue free spray on top of it and that's supposed to help it from leaking through as well. So once i did that, then i knew i was ready to go ahead and apply the product to the lace. So that's what i'm doing there once i finished doing that i let it sit for about 20. It was supposed to be 20, but i think i actually let it sit for maybe 25 to 30 minutes which you'll see later on in the video. I think it was way too long, but hey here we are so after you. Let it sit. Then i'm gon na come back and wash out all of the product out of the hair, as you can see, i'm just using a regular tresemme shampoo, which i should have gotten a purple. I think it's purple clarifying shampoo. I think that's what y'all call it girl. I don't know um, but that purple shampoo, that a lot of people use on youtube. I should have gotten that because i do feel like that it would have made a huge difference at first. I was thinking that it wouldn't because i always hear people say like. Oh, you use this to kind of tame the brassiness in the hair or the lace. I didn't think they would make a huge difference, but i kind of feel like next time. I need to actually use that to see if i can tell a difference so yeah right here, i'm just using regular tresemme shampoo, so you'll see that it definitely did seep through and leak to the hair because i'd, let one left it on too long. Two then use that purple shampoo like i should have, but overall i don't feel like it looks terrible all right y'all. So this is probably like a week to a week and a half later um. I was trying to find the time to actually film this. So i went ahead and bleached the knots pretty early, because i thought i was going to film this a lot earlier, but i didn't get around to it. So here we are so like i mentioned in the clips before i feel like i've bleached the knots or over bleached the knots, because it's kind of bleeding through on the hair, but i don't know i feel like it's not bad, so i should be able. I should be fine right. What i went ahead and did was put me a elastic band in because a lot of times when i have closure wigs, i like to have a band because i feel like it is more secured that way and i'm kind of torn, because i i literally been Wanting a side part so bad, i usually don't or i haven't done a side part with a closure wig. So i'm really about to just wing this so y'all about to see a lot of trial and error. Hopefully, it's not a lot of error, so hopefully we just go ahead and get this done. So i already pretty much um put down my phone. I can't get it. I already secured my bald cap. I didn't do the best, but we've got to make this do what it do. Okay, i'm trying to decide whether or not i'm gon na do voiceovers or if i'ma, just go ahead and talk through this whole thing. I kind of want to talk to y'all because i haven't been in this type of setup in a long time, so i might, i might incorporate both. I might just be back and forth voiceover talking to y'all it's just depending on how i'm feeling let's go ahead and get into it, so i'm gon na take my nars foundation, the one i use all the time if y'all need this, this shade this actual foundation Line then i'll have all that linked in the description box, but i'm gon na just take a little bit on the back of my hand, and i'm gon na do that. So i can cover this ball cap. All right got the wig. So now i'm about to put foundation on the closure part. I should have put this on my wig here, but all right got the foundation on there. Matchy matchy, like i said, i'm doing a side part. So hopefully this. Hopefully this lays down right. Okay. This is a little weird to me because i never do side parts with closures, so i don't know i'm trying to get this to lay right and um. I need to be right because i want a side part like bad, like real bad. We bout to try to make this do a little something i love this little hint of chocolate brown like i thought you saw these so cute, see what i'm talking about right here like you, can still see the cap through here. So i think i'm gon na have to end up cutting this part off, because obviously i didn't switch the wig. So it's not like it's showing a little bit more so, but we're going to get it together, we're going to get it together. Okay, so right now, i'm about to just play around with it and try to get the parting good or, like the spacing good, see. If i need to shift it a little bit more um before i actually like get it in place because trying to decide where i actually want to lay this so so, like i said in the earlier clip right here, i'm just getting my part in place to See where i actually want it, because i like a real deep part, so i played around with it for a little while to make sure i got in the right spot. But as i'm looking at it now editing, i can see that the hair, or at least the lace is very orange, so i definitely should have used that purple shampoo, but oh well, i'll make sure. I have it next time because i will moving forward be bleaching. My knots, so this is the first time me doing it so next time i'll know to do it the right way. So here i'm just plucking my lace, which actually i didn't really have to pluck that much because i will say the benefit of me over bleaching. It definitely made it look a little more scalp-like, so i didn't have to pluck as much out of the part. So that was a good thing, but yeah i'm pretty much just playing with that. I'Ve gotten the part in the place that i wanted. So now i'm just taking my wand to kind of flatten it out. So now i'm taking a little bit of alcohol to rub off the excess product from you know. Putting my wig cap on and you know putting makeup over the wig cap and then i'm going to take my bold hold active glue and i'm gon na put three layers of that. I think i mentioned in a video before that. I hadn't really liked the bow hold or the other glues that i was using because i was buying it from the beauty supply and i didn't think it was like the real deal and honestly now. I take that whole statement back because i just noticed that i'm laying it wrong, like you could probably tell me like - or you could probably see in my old clips or my old videos that i used to like pack on the glue and i didn't do layer After layer i would look, i would just do one layer and then i would always have an issue with the lace, not drying all the way down or drying in some spots and not others. So now i learned a trick to take my time. Actually do three layers do three thin layers and like just build up on the product after putting the three layers on now it's time for me to actually lay down the lace and get it in the right spot. So once i got it in a good spot, then i just took the back of my rat tail comb to kind of just smooth it down and smooth it into place, and then i have this elastic headband that i'm going to use to pretty much lay it Down in place for a little while - and i think i put it on - i had it on for maybe 10 minutes, and i couldn't do anything longer than that, because it was very, very tight. So i was in and out with it. So after letting the lace sit for a minute now, i'm able to take off the elastic band and y'all you're going to see my face in this clip. But i was relieved to take this off because when i say it was so tight like super tight. But you can see that the lace is laying down now it's super flat. So that's what we wanted so now, i'm gon na take my eyebrow tweak, not tweezers, but eyebrow razor and i'm gon na go ahead and cut away that extra lace in the front and that's just what i always use to kind of get that ragged edge on The end, so it's not like a super straight line when i cut the lace so after detangling the hair a bit now, i'm just going to take a few pieces out so that i can get ready to cut my baby hairs. So i did go back in and pluck the baby hairs a bit because i didn't want them to be super thick and i just wanted to look a little more sparse in some areas. So i took my tweezers plucked it out some more and then i took my razor so that i could start to cut the baby hairs and frame them to the. I guess frame them to my face so yeah. So now that i have my baby hairs cut now, i'm just taking my wax stick just to smooth out the top a little more and get it even more flat. So i'm using that and then i went back in with my wands also now i'm taking a little bit of mousse and i'm just starting to swoop my baby hairs and get them to actually lay down. So after laying the baby hairs. Now i'm just going to take a little foundation and blend the lace into my skin and then, after that, i'm just going to start to cut the hair and frame it to my face so that i can get that barbie. Look that i'm going for! So i just pretty much made it a straight cut on both sides and then i did take my scissors and kind of thin out the ends a little bit. So it doesn't look so thick on the ends and then, after that, i'm just going back in and straightening the hair a little bit more and we're pretty much done here y'all. I also forgot to mention that i did use my la girl, pro concealer and my part, and i just pretty much use that to kind of make my part stand out a little more, but now that i'm looking back at the video, i didn't really need it, Because, as you guys know, i did over bleach the lace. So now the lace is already pretty bright and it didn't need the extra concealer. But the fact that i already did it. I just went ahead and included it in the video but yeah y'all. So we're pretty much done now y'all. I thought this turned out so good. I'M really surprised because, like i said in the beginning, i never bleached my knots. So i'm really surprised that, like how this turned out um, i love how natural it looks like at first. I was kind of a little worried about the fact that, like i over bleached it and it kind of started to bleed into the hair, because i had it on like, i left it sitting for too long now. I'M kind of glad that i did leave it because now it looks more realistic and more scalp, like i thought you look so good. I do wish, though, like i would be able to do like some baby hairs and stuff on the side. But i guess because, like it's a dark brown, i probably could get away with just leaving my sideburns out and kind of like slicking them down kind of like how i did it here and it won't be as noticeable so i'll probably end up doing that. But by the time i come back from doing my makeup and stuff. All of that will be in place everything that i've pointed out that i'm like um, i could fix, will be back intact. Okay, so i'm gon na get off camera go! Do my makeup. Come back probably have on like a cute little top or something just i could do this outro, but i just wanted y'all to see it in the moment of me loving it, because i literally love how this turned out the hair is decent too. I do wish that it was like a little bit brighter just to give me a little bit of color, but i mean it's cool cool little chocolate wig but yeah like i said i'll, be right back i'm about to go! Do my makeup! I'M gon na go! Lay my sideburns, i'm gon na go um curl this hair under a little bit more and i will be right back all right y'all. So this is the final look. I love this style. I'Ve been wanting to do a style like this for a minute, but i needed to get me. Oh, i thought i needed to get me a frontal, but i said let me just go ahead and finish and try to figure something out with a closure wig. So that's what i did also like i mentioned earlier. I said that i was going to try to um slick down, like my sideburns, to kind of give me some baby hair effects, but i didn't do that. I actually took some of the hair from the closure. Well, not the closure, but from the side of the wig, and i just used that took a piece combed it down and then cut it as if it was like a frontal and then i just did me a little baby hair. It'S not cooperating how i would really want it to but it'll do for the video, but i feel like from this angle. It looks like it could be a frontal, but i finessed it. It'S a closure y'all. It'S a closure shout out to ali pearl for sponsoring this video and sending me over this unit. All the specs for this hair will be in the description box below. So if you guys want to pick it up yourselves you're more than welcome yeah y'all, tell me, which i think i thought this is so cute is giving barbie like. I feel like that's why i went ahead and put on this pink dress, because i was like yeah it's giving barbie vibe. So that's what i wanted to do today. Oh yeah y'all. I don't really have much to say about this unit um, it's kind of hard for me to give a full-on review about hair that i've only had in for probably like hours two hours so um. I can't say much about the quality i guess so far. So good i'll probably give an update or something maybe a video, if not a video, then i'll, probably just update my description box or something just letting you guys know how the hair is holding up, but as of now the hair looks really nice. I hope that you guys enjoyed this video. Please make sure that you guys like comment and subscribe to my channel so that i can post more videos, i'm at eight point something thousand subscribers. I'M trying to get to 10 so help you grow out. Help me get up to 10k, okay, because i really want to do something big. So in order for me to do that, y'all got ta help me get to 10k, so yeah um with that being said, please like comment and subscribe to my channel and um. That'S all i got y'all i've been saying for the past five minutes, but that's all i got for real. So i'm about to just end this video, okay,


Comments
Ali Pearl Hair: Pretty! Thank you so much for your sharing!
Shayla Neal: You did that