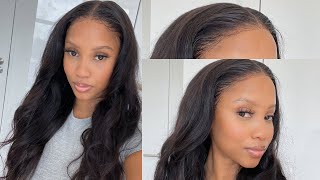
Best Frontal Wig Install From Home! Beginner Friendly | Realistic Hd Lace Wig Ft. Ula Hair
- Posted on 05 February, 2022
- HD Lace Wig
- By Anonymous
Hey y'all! This wig was so realistic! ULA has some of the BEST HD lace
Hope you guys enjoy this video products are listed below! Be sure to comment like & SUBSCRIBE! Follow me on IG @_KikiAdams
Five Products that'll ensure a clean and flawless install.
1. https://erickajproducts.com/collection...
2. https://erickajproducts.com/collection...
3.https://erickajproducts.com/collection...
4. https://www.imaslayyobae.com/collectio...
5.https://www.amazon.com/Head-TIGI-Hairs...
☆☆☆☆☆☆☆☆☆☆☆☆☆#ULAHAIR☆☆☆☆☆☆☆☆☆☆☆☆☆☆
♥$10 Coupon code: KK10
♥Product information : 22Inch 13x4 Undetectable HD Lace Frontal Wig Deep Curly
♥Video wig link: https://bit.ly/31nBBKT
♥Highly Recommend Hair:
No Lace No Glue Cheap Headband Wigs: https://bit.ly/3sgvunV
Special Offer Buy One Get Two Bobs: http://bit.ly/3cpP4an
Hot Trend Highlights Color Frontal Wigs: https://bit.ly/35RZlK9
Wholesale Big Promotion Hair Deals: https://bit.ly/2IZzO9i
♥Check all items on Ulahair Store: https://www.ulahair.com/
♥Follow ulahair for giveaway:
Instagram https://www.instagram.com/ulahair/
Facebook https://www.facebook.com/ulahumanhair/...
Youtube https://www.youtube.com/@ulahair
Tiktok https://www.tiktok.com/@ulahair
♥Contact for wholesale:
Email: [email protected]
Whatsapp: +8618924029739
Hey guys welcome to my channel. My name is kiki, so today we're working with a unit from eula hair. It'S a curly wig. I did record me styling the wig on the wig cap, but child the footage is gone. I think i accidentally deleted it when i sat down to film the install and i'm so sorry, but to do this style, it's really easy and it's a lot of videos on youtube um, starting off with curly hair. I did press the hair out with a hot comb just so that it was easier for me to comb through and park the hair, but yeah yeah you guys get into this hairline. I tried to pluck it to look as natural as possible and i think i did a pretty good job. Okay, damn all right girl! You look crazy! Look a cat, ass, okay anyway, so what i like to do, um. The first thing i like to do with my installs is i like to pull the wig down over the cap to make sure that i don't have too much cap on my head. I don't want the cap over lapping, where i'm going to lay my wig, so i like to do that and i like to kind of see you know how it's going to lay what it's going to look like, make sure that everything is positioned right before i Install the hair, another thing i do is, i always pin my hair back and i always um twist up the hair that i have left out for my edges. Just so everything is nice and neat and out of the way, i slide the way back and make sure that there's no hair trapped underneath the lace and make sure that all hair is out of the way. Then i'm gon na go into my erica j. Hold me down um skin protectant spray and i'm gon na spray that, on my forehead i did clean my forehead before spraying that spray i'm going to cut off whatever extra cap. I don't need with my razor or with my scissor. You can glue the edges of your cap down if you want, if you want your install to last longer, you can also use glue to um install your bald cap. I didn't do that for this video only because i didn't need my install to last that long. That'S something more so if you want a more professional like install meaning the longevity, if you want your your install to last, maybe two or three weeks, then you would go ahead and glue your cap down and make sure you um use glue to seal the edges In we need that this time around okay, so again i'm going in, i did pin uh, i pinned the baby hairs back, so i can, you know, see clearly and i'm going to take this green eyeliner pencil. Typically, if i'm doing my hair, i would use my eyebrow pencil, but for the purpose of the video i just went in with this green one and i'm going to outline where i'm going to um put my glue so anything outside of the line. I don't want. The glue to go - and this part comes with trial and error. A lot of people don't say this in their videos, but doing this is customary to your head and where you like your wig to lay so it's trial and error and you'll have to see how, in how far you want your wig down or depending on how Much forehead space you have, i don't have that much forehead space. My forehead is not small, but it's not big um on the sides i like to bring my wig down a little bit lower, but not too low. Obviously i don't want the wig on my eyebrows. I go in with my erica j glue and i'm just going to start by applying some dots onto my head and some glue onto the cap and i'm using a very small amount, as you can see, and i'm just going to evenly spread it out once that Glue starts to dry, clear, i'm gon na go in with a paper towel. I recommend using a q-tip. I usually use a q-tip, it's easier to go and erase your line, because clearly we don't want those lines on our skin. So on my natural hairline, my baby hairs actually like start pretty close to my eyebrow, the finer ones. I sometimes leave outside of the cap, because the cap will pull those hairs out because they're so fine. So the glue me putting glue on top of it like they seem to be fine, like i've, never really had an issue, but i noticed when i installed my wigs and i put the cap on top of my baby hairs, the fine ones, the the baby baby Ones try to be gone, they always grow back. So it's no beef but they'd be gone so most times i just try to leave them out and i'll just like blend them into whatever baby hairs, i'm doing on the wig. So usually, i do about two to three layers of glue for my wigs um. That gets the job done and your install should last at least a week like a full seven days. It should last um everybody's different, but usually, if i do three layers like, i can really push it to like a week and a half two weeks um. If you want more of a hold like when i'm going on vacation, i typically will do six to seven layers of glue if i'm going somewhere like really really hot, but for the most part you just need three layers um, when you're doing hd lace. I feel like you can do more layers of glue without it getting too gunky, but you do want to make sure that your layers are really thin. You don't want thick layers of glue. You will not have a clean, install okay, so for the middle portion, i'm going to bring the glue down just a little bit lower and i'm only going to do one layer of that and i'm going to blow dry that on cool setting. Until it's clear, i did spray the lace with the um, with this lace tint before my install, i do not put um makeup on my front tools or on my closures anymore. This lace, tent is a game changer and it will be linked down below so before. I begin to install my wig, i cut slits. In my frontal, it just makes things easier for me because i like to install in sections so i'll start off with the left or right work, my way to the middle and then go and do the other side. So i'm just going to pull my wig down to where my glue is and once it's in the space that i want it to be. I like to take a comb and just push it into my skin. Sometimes i'll use my fingers, but i really do prefer just like using a comb or something. This wig was a little bit too big for me, so i'm just making sure that it's on my head correctly, i don't want any bubbles or any gapes or spaces, or anything like that. So now i'm just trying to make sure because the middle section hasn't been glued down all the way, i'm just trying to make sure that it's in the middle, it's low-key, not in the middle gel, but that's okay. It'S like slightly off-kilter, but that's okay, we're not going to stress it! So now i'm just going in to get this last tab glued down and i'm just going in with a thin layer of glue and again i'm only going to do one layer of this glue and the middle section, because i don't want to cut too much lace Off in the middle, i don't keep a lot of lace on um. It depends. Sometimes you need to keep a lot of lace on depending on the way, but when it's a really great quality, um lace, you don't have to keep a lot of lace on y'all. So i don't keep a lot of lace on i'm literally adding what i need to add, but you'll see once i cut it off that i'm not i'm not leaving too much lace on. So you want that to dry, clear, obviously, and then i'm gon na pull it down tauntly and press it into my skin, and i can tell that there's a piece: that's still not glued down, so you can always tell like you'll, see it sticking up or you'll Still be able to see the lace in that area, that means that it's not glued down, so i'm gon na go in that area and add a little bit of glue and we're gon na do the same thing: let it dry and press the entire skin. I don't know why i said: press the entire skin chad, like we ain't both doing my hair, i'm going to let it dry and then i'm going to press it into my skin. I'M gon na do this in every section that needs some more glue. The sideburn area on this install is not the neatest and sometimes it'd, be like that, especially if you're hairy like me and have a lot of sideburns like my sideburns, go all the way down the side of my face. I did not shave them all the way off of this video so like that patch. That'S right! There'S still like hair in that patch, where i'm trying to glue the wig and that's why it won't look as clean as it would if it was no hair. There number one the glue, doesn't dry clear, all the way when it's like directly on top of hair, but that's okay, i'm gon na show you guys how you can still finesse and make it look good. Okay, if i can do it, you can do it too, and things like this are regular, especially if you're doing your hair at home. So yeah, i just didn't, want to shave all my sideburns off this time around. Like i don't know so, yeah i'm just same thing: cool setting, i'm just blow drying it until it's as clear as possible, as you can see like it's not going to dry. All the way clear, but i'm just waiting for it to get like super tacky and then i'll, just press it into my skin and don't use your finger like me. It'S not good to use your finger, especially if you have hair like underneath, where you're trying to lay your wig, like that's, not the best thing to do, but we got to finesse okay. So now i'm just going to honestly because the wig was a little bit too big for my head. I didn't necessarily have the quote: unquote cut around my ear, i'm just cutting the lace off like off the sides um. This is a size, medium wig. I typically get a size small, it's not like super big, but for some reason the small fits my head better than the mediums. There'S always extra room in the mediums for me that i just don't need i'm like. Is it in the middle? It'S a little crooked. What'S happening, but it's okay, i was like i'm not even about to stress like i don't care, so i take my elastic bands and i just tie this around y'all know the drill with the elastic bands. Alright. So with the elastic band, you want to make sure that you have the band on the actual part of the lace, that's glued down. It shouldn't be too far down. You know what i mean like it shouldn't just be, hitting the edge of where you had it glued the whole part where you had it glued from cap to skin. That'S where your band should be, then i'm going to take my blow dryer and i'm going to alternate between high and cool heat and i'll do that for about 5 to 10 minutes, i'm going to leave the bands on my head for about. I probably left it on for like 30 minutes, typically i'll leave it on for like 30 40 minutes um or until my ear starts, to hurt um to get like that real good girl. You need about 30 40 minutes. Okay, so while the band is sitting, that's when i like to typically go in and finish the styling of my hair, um yeah, so, like i mentioned before, the wig is too big, so my braids are just like hanging out in the back, so i'm just gon Na do the old, good old, like roll and tuck under the wig, but honestly in cases like this, my braids always slip out the back um. You can double up your cap if you don't like the braids hanging out the back of your wig. Look at that double chin: it's okay, y'all, i'm gon na i'm gon na be slim, so it's okay, but anyway girl. I look like the bread. I look like the bread, like i, i feel like i'm in a 90s video but yeah um, even though i did like the crisscross on the wig head, i and i just i just had to like. I just can't do styles on my head, like i have to do it on the wig head and then i put my wig on even like when it comes to like straightening the hair. I prefer to straighten the hair on a wig cap, but anyway i'm just combing the hair out sectioning it sectioning in i'm, going to section the hair out so yeah, i'm just combing the hair out and then i'm going to section it. I knew that i wanted to do an updo. I just didn't know like exactly how i wanted my ponytail. I didn't know if i wanted two ponytails. If i wanted the bun a ponytail in the back or if i wanted like a high pony a high bun, i know i was gon na. Do a ponytail, a high bun. So that's what i'm just trying to figure out like the fun part with wigs is that you can really just like play with them. At least like i like to the last few months, i've been trying like different styles, so yeah, i'm gon na. Take my hot comb and i'm just gon na press out the hair outside of um, what section out, just so that it can be nice and flat and that it doesn't get in the way when i'm trying to do my ponytail, because not for nothing y'all. I can't do a ponytail to save my life like, so this is me trying to see like what two buns would look like, but i'm just like um. I don't think i want to do that for this look, because so the look i had in my mind, like i wanted to do like a euphoria like if i went to euphoria high, like how i would wear my hair and how i would do my makeup. So yeah i was filling the one like all the hair into one bun, so i'm going to go in with the bed head hard head spray and i'm just going to spray that on the hair and comb it up. Just so that everything looks nice, sleek and neat and there's no flyaways in my way this is kind of like my mock ponytail like i want to see how it would look if i did it more so towards the back. It was cute, but i decided that i would prefer for the um the bun to be more of a high bun. So that's what i'm gon na do. I'M just gon na pull the hair up into a high bun um yeah, the first, the first two buns that i did is not the final bun. It'S just like for me to see what it's given and for me to just have the hair out. The way me, oh, that girl, you look dumb girl, you look stupid but nah so yeah like i said, i'm just gon na put the hair up and see what it's giving i'm i'm. In that moment i was like kiki. What are you doing, but i was like you know what you got to see it through my boy, so i wet the hair up, then the ponytail and i wet the rest of the hair. As you can see, the hair in the frontal is more of a tighter curl and it's um a little bit shorter. So this style is gon na. Do what i need to do. Okay, it's giving jerry curl! It'S definitely giving jerry curl like yeah, it's getting 80s but anyway, i'm just going to do a bun like how i used to do my bun in high school, like y'all. Remember that bun that we used to do yeah, i'm just going to gather the hair kind of like it's like a donut bun, so like a messy donut bun is what i'm doing, but without the sock i never used to use a sock in my hair. All right so, while the hair is drying, i'm just gon na go ahead and um work on my hairline. The first thing i'm going to do is get rid of that green pencil that there's still some on the lace, because i have put some on the lace before i started the video. So i'm just going to use some alcohol to clean that off and i use 70 alcohol and not 90. I just feel like 90 is too harsh to be using on my hair, my hairline and all of that um yeah girl. That'S probably why i still have my edges no tino shade, but anyway, i'm gon na start to cut the lace off now and i'm using a razor and, as i cut the lace off, if i feel like i want to pull some lace up. I do that and then i just use the 70 alcohol to clean off the residue. Do not use a paper. Towel use a rag which you'll see in the next scene. I grabbed a rag because using a cloth is way better than using a paper towel. Sometimes the paper towel will get stuck on your head and it'll. Make a mess will be on your legs and who has time for that? This is me realizing this installment to be lit, but yeah, i'm just taking my razor and i'm just doing a ragged jagged cut. I like to pull the lace away from me and so like since i'm pulling it and cutting it. It'S kind of like a tearing and ripping effect, that's happening, so it won't be like a straight line. It'Ll be very like messy. You know kind of like frayed. You want that frayed effect me and if you're doing your install - and you see like that ashiness after you cut your lace off, do not fret um, it could easily be eradicated with what i'm doing just alcohol and i'm also removing like extra glue um. Sometimes that happens just off of like the cutting like it makes your skin ashy. I don't know, that's that's that's what i think i don't know what it is, but um yeah, i'm just removing some extra glue. That'S on my baby hairs but, like i said i never had an issue with like if i needed to like comb glue like laying glue on top of my hair, never caused hair loss. For me, it could be because i'm doing my own hair and i'm really gentle and i really care - i don't know, but as you can see them little itty bitty baby hairs are still there and i mean they're super fine like that's like the tippy top of My hairline, so i'm just going back in this, is like your detail. Work like you want to make sure like the edges are glued down, because this is going to make your install look flawless like this is going to make ensure that you have a professional looking install and you did it right in your house. Okay, so i'm just going in and making sure you see, i'm gently like tugging up and when i see the lace lift up. That'S how i know i need to go ahead and glue that down, because if you don't glue that down you're gon na see that lace, the lace will not be melted. Therefore it will not be invisible and we can't have that. Can we now then get me underway foreign, i'm just going to use the edges to kind of pull and tuck down? We already talked about the ear tabs, so we the not the air top the sideburn area, so we don't got to talk about it anymore. I'M going to take the same bed head spray from earlier, and i'm just going to saturate that area. It'S going to help to kind of just like melt it and just make it look better in that area. You could also use this spray across your whole. Hairline. Very lightly, if you wanted to and it'll um it won't leave a cast, it won't leave like a super shine or none of that, like i don't know if you still using got to be says, i'm judging you, because why, like that's another reason why i started To use do my focus on doing my own hair, because i just don't like the products that a lot of hair stylists use like. I am not a got to be girl like she is not my girl, so yeah. If you wanted to use this spray like got to be with no glue, you absolutely could, and you can also use it along with whatever glue of your choice and it is chef's kiss. Okay, kiki will not steal you wrong, because i don't play when it comes to my hair. Okay, so i typically cut my lace off in sections, so i'm going to do the exact same thing i did on the other side and once all the lace is cut off. I tie my elastic band on again and i leave it sitting on for about 20 minutes 30 minutes. It really all depends how much time you have, but i like to tie it down again just for that additional snatch chat. If you have experiments with doing your hair at home, you've seen this before. Okay, it's okay, don't fret! I'M just gon na! Take my rag and my alcohol and we're gon na clean that up and be gon na get it together. Do not let that freak you out or discourage you when you're doing your hair, okay, i'm just playing with the bun, seeing what it's getting, i'm trying to see the vision. You feel me because i i can see the vision, but i can't really see the vision. It'S hard when you're in your house, clothes and no makeup, sometimes to see what you're trying to get when you're, not really giving you feel me so we're just gon na do some swoops some basic swoops on the side, nothing too serious, because you can't this is The type of hairstyle, where, like you're, not really gon na, see the baby hairs anyway, so it doesn't really matter so. Once i have my edges laid down, i'm gon na go ahead and wand curl the hair. I love to wand, curl, wavy or curly hair. It holds the curl so much better than straight hair, like the texture, is just big and voluminous like uh chef's kiss. So i know you're not supposed to assume, but i'm gon na assume that y'all need to see me one curling, my head, like chad. We know how to run girl. What i will say is i was picking up smaller and bigger sections throughout me, one curling hair, just so that i could have more of a voluminous and less um uniform. Look like i want the hair to be like kind of messy looking for my edges, i'm going in with the erica j liquid melt. I don't even know if this is for edges. This is literally like my second or third time using this product like i, so i can't say if i like it or not for my edges, but it's just like what i've been using. I think you can also like install your wig with it. Maybe i'll try that one day soon we'll see but yeah um yeah for some reason like when i do my hair, like i work from one side to the other. So now it's time to do these edges on this side and again, i'm not even doing anything crazy, i'm literally just doing some simple swoops this side of my hair off camera um, and i cut layers on that side of my hair too. If you're wondering why that side looks bigger, it's because i decided at the last minute that i wanted to put layers in it. So i was just going in and like re-curling the ends and then i went and um put some layers in off camera cleaning up around the forehead again. This is something that i do a lot when i'm on my install just because, like i just want everything to look nice and clean, i don't want any extra glue, or none of that now i'm going back in this is my favorite thing to do. At the end of my install add some of that tint spray on top of your lace, baby bob baby bye, ladies gon na be ada. You gon na eat that lace up baby, but yeah. That'S a must. It'S a must. No makeup no powder, no foundation of that mess spray, some lace tint. On top of your install baby, bye, so yeah. This is what it's given, oh and y'all. I only had time to do. One of my eyebrows, like i um, i grew my own brows. I i didn't have time to do the other brow, because i had to take my mom to the hospital i didn't even get to like really fix the other side of my hair, because i had to go. I was rushing so that i can close the video out, but like yeah. This is just me like fake, doing final touches and i did go in and make my bun neater. It'S the same. Donut bun, i just made it neater, pulled some hairs out and juan curled some pieces yeah. This is the finished look. This is the finished look like i said. I was only you for a euphoria, um inspired makeup. Look to go with this hair. It'S on my tic toc, but yeah. Let'S get into this! Please love you guys so much and i will see you in the next video bye. You
Comments
tina mokango: The installation is so flawless!
Mr.Nightingale: Loving it! Thank you for this
ashley correa: You getting better and better with your installs and Style. Keep it up ❤️
Planet Earth: could we get a skincare routine?
Tameka Bryan: Very nice!! I can't believe it's a wig!
Share Bear Clan: Girl you are so good!
Tety Mua: ❤️
Valquiria Martins: Flawless
ItsCookie DaDiva: Yahhh I’m early tf