Ombre Hair & Purple Wig | Watercolor Method | Beauty Forever Hair | 613 Blonde To Hot Pink | Taejha
- Posted on 12 May, 2020
- HD Lace Wig
- By Anonymous
What’s Poppin!! Welcome to my channel!!
______________________________________________________
LIKE AND SUBSCRIBE!!
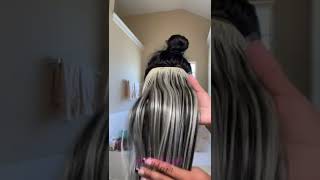
Hey ya'll in todays video I walk you through the process of how I got this pretty vibrate Fuchsia and Purple Ombre hair. I also show you some of the common mistakes made when using watercolor to dye hair and also how to fix the mistake as if it never happened. I use Beauty Forever hair in 613 Blonde 22in Frontal Wig. I also use Adore Hair dye to achieve the color in the video.
Drop a comment and let me know what other colors you'd like to see from me! I am wanting to create all different color hair and even have a rainbow of hair wigs.
Love you!
NEW VIDEOS EVERY WEEK!
***Click the notification Bell so you don’t miss any uploads!***
SUBSCRIBE IF YOU’RE NEW! https://www.youtube.com/channel/UCCb5Z...
———FOLLOW ME———
INSTAGRAM: @taejhaa
instagram.com/taejhaa
Contact for Business Purposes only: [email protected]
____________________________________________________
Hi I’m Taejha, thank you for watching my video, please be sure to check out my collection on videos where you’ll find my beauty tips and just get to know me and have a real conversation with each other. Whether you’re looking for a new product review, tutorial, beauty tip, haul, or maybe just a place to escape, I’m your girl! I hope you enjoy watching! redken loreal morena iluminada arctic fox toner
FTC DISCLAIMER: This video is NOT Sponsored and there are no affiliate links. All music belongs to their respected owner. NO COPYRIGHT, FAIR USE ACT. Vlogging and reporting
FAQ:
-Race: Black (French Creole)
-Camera: Sony a6000/ iPhone XS
-Editing: Final Cut Pro
What'S poppin issue girls, asia and welcome back to my channel, if you guys want to see how i got this pretty pretty b yuusha purple fish, ombre, hair, color stay tuned and subscribe. If you you know want to, you want to see more videos from me more videos like this. You know and hit that like button down below and comment what you think and let's get right on into the video. So here's the hair fresh out of the box literally fresh out the box and do anything to it. The lace already came, pre plugs, which is nice, didn't, have to do much plucking at all to it to get it looking natural on my head and my scalp, how i like it to personally be, and then it came with all of these four clips three and Then one in the back, but i took those off - take the shimmering light, because i want to tone the hair lighters so that the color will come out more vibrant. So i just put some water in there and mix that together and you can use cold water. Hot water, whatever you want, it's literally up to you and dip the hair right on in i dip. The whole thing in you know didn't trip about it, just let it be, and then i didn't care to keep it in too long. I just like you know, did a very quick, wash and rinse, and we're done just two easy dips boom bam tone. Now we're gon na take this soft lavender and the Fiesta fuchsia from the adore mix, those two together and for this process that actually did use hot water because I felt like it would be better to use. Color came out so pretty just mixed together and when you mix the color definitely make sure you get all of those little chunks and pieces out of it. Because if you don't, then you're gon na have streaks and chunks on your hair. And that's not what we're here for at all. So let's dip the hair in the water - and this is the mistake I did because I got kind of scared that the lace was gon na end up tenting. So I like didn't, really feel like I dip the middle good enough and when you do this, you definitely want to make sure you are dipping it and brushing through and getting in the middle. Because if you don't you'll end up having patches in your hair, which I ended up having you guys, will see how I try to fix that, but this was a very annoying process since I initially didn't dip it. In correctly, I guess at first it ended up coming out a little patchy in some places, so make sure you guys get in between all the pieces of the hair. Don'T be scared, you know, protect your lace with some got silly glue or some vaseline, which I did do. I was just really anxious and scared that the lace was still going to tint hot pink, and that's not what I wanted at all. So you can see here, like there's still pieces in the middle, that I didn't that didn't get dipped and dyed all the way which at first I thought. Oh, that's cute, like it's gon na, be these like blonde highlights, but no girl, no baby girl. That was not blond highlights. It was patches in my hair, but I did dip it through a few times. You know, as you can see, but you can still see that they're still like blonde in there, and I should have made sure that all of that was saturated completely but learn from my mistakes. You guys learn from my mistakes as I have, because I would definitely be dipping it all the way through the first time, but it came out really pretty and the color change very very fast. You guys see how the ends are a little bit more purple. That'S because I kept the toner and a little bit longer at the end, so that the color would even absorb even more on the tips which I wanted. I just want to show you guys how it came out and it was pretty damn cool. So now I'm gon na take the purple rage from a door because I want it like. I said the ends to be more saturated and darker in color. So I just dipped the ends and they're over and over, and then I also took pieces of the front which you're about to see and dip those in a little bit more just to give some highlight dimension going on and then now that it's getting dry and I'M actually blow-drying it. You can see where I was saying that there was patches in the hair, and that was starting to really bother me. I was like oh shoot, there's patches, that's not fun and yes, yes, there was Shetty. There was quite a bit of shedding, which was kind of annoying too wasn't expecting there to be so much, but with it being a blonde wig, it's kind of expected that there's gon na be more shedding than there would be with a natural color. So this is where I went and tried to fix some of the patches I kind of like just put the color straight on to the wig itself, without even dipping it so that I can have more control over where I was adding the color, and this did Work but I didn't end up putting the color down like evenly in some places. So then it still ended up patchy in other places, so this wig ended up being a hot mess going through this process. Sometimes you guys could just see how I ended up. Fixing the color and making sure it wasn't going to look all patchy when I wear it so now we're gon na put the wig on, and you saw it first like there's this white line around my head. I did that because I wanted to make sure I wasn't putting too much glue around the perimeter of my head. I have a hard time with determining where exactly the lace should fall and how much glue even needs to be applied onto my forehead. So I put that white line kind of to give me a guidance and help me know where my perimeter should be, and I am sorry for this angle - you guys I did actually film this time-lapse for Instagram. So that's why the angle kind of sucked right there. So now we're going to curl the hair, curl, the hair and how I ended up fixing some of the patches too, because with this color, the heat ended up just changing the color of the hair and make it even more vibrant. So before you guys actually saw me curl it, I did take a flat iron through the hair and just flat iron. It kind of fix some of the patches and then went through and curled it even more. Alright, you guys. So this is the finish like that. You see my my real hair color just a little bit. Let me do like a full 360, so you can see, see everything so yeah. I feel like it came out just a little patchy in some places and then honestly, once I put heat to the hair, it was just so interesting. I knew this was going to happen, so I wasn't a hundred percent mad about the patches because I felt like I can fix it with the heat, because, once I put heat on the hair, it kind of changed the hair, color anyways and end up dying. Even more so I felt like the color wasn't even as like, fuchsia and bright as this, and then I feel like the ends had a little bit more purple. Going on. This me ended up hello. The heat ended up dying, the wig more, which I didn't mind at all drying in mind, check the roots here, they're kind of like more like pink, and then they go fuchsia and in purple so the other day I really like how it came out. It was really cute. This is like a wig I feel like. I would wear for a real serious occasion where I want to stand out and be someone for everybody to see like my birthday or something you know, oh and if you care my jewelry is from mulana the collection, if you guys like what you see make sure You comment down below and if you want to see some other colors for me, it's another type of hair, styles and stuff. Let me know too and tell me what colors I should do, because I want the whole rainbow in my collection. So tell me what you guys think down below in the comment issue girl, Taoiseach, thank you so much for being here.


Comments
Krissy 1981: Beautiful , I watched alot of videos today and this was one of the best!
kelly taylor: So cute love it
LaToria Thomas: great job girl!!!
Fame By The Flame: OOOHHH girl! love it!!!
Wraith: How did you protect the knots from the dye?
Geraldine Paul: You really did good I like it
Yuky Mix 1: 9# love the pink hair ur so pretty
LaToria Thomas: you are sooo great and nice!!!!!!!!!!!
Taylor McKnight: Bomb ❤️
Leigh Vaughnn: love the hair color doll
THINGZ wit CARDI: F*****g cute❤❤
Spoiled Cancer🦀(Chi): What colors did you use
Samani Smith: yessss it’s the Aaliyah for me
Geraldine Paul: The next color is green and blue you should do
Nikki Corbett: Cute.
Monica parker: What where the colors