The Ultimate Hd Lace Melt | Start To Finish Frontal Install For Beginners | Alipearl Hair
- Posted on 30 August, 2022
- HD Lace Wig
- By Anonymous
Like, comment & subscribe!
Instagram & TikTok | zoenahabwe
______________________________________________
Instagram: alipearl_hair
TikTok : alipearlhair_official
Shop Now➤https://bit.ly/3QZu9NE
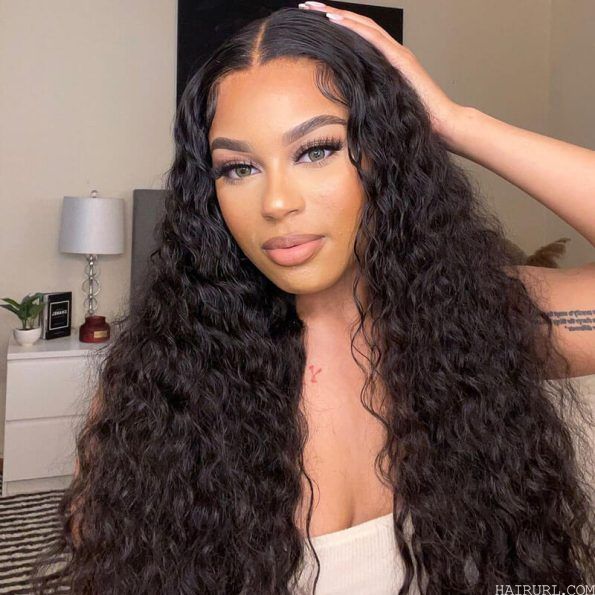
Hair Info: 24 inch body wave 13*4 HD lace frontal wig 180% density
❤#AlipearlHair Official Store:➤https://bit.ly/3dxVhFa
Up To 50% Off, Lace Frontal Wigs!➤https://bit.ly/3QVMRG3
In FB Group, EXCLUSIVE DISCOUNT! ➤https://bit.ly/3O1I8ku
1. 24h Flash Sale!
2. Free Hair and Cash Back!
3. Unlimited Coupons!
#alipearlhairwig #alipearlbodywavehair #alipearlhdlacewig
Instagram @alipearl_hair: https://bit.ly/34I3Oyd
Youtube @Ali Pearl Hair: http://bit.ly/2H0Gmmc
WhatsApp: +86 15890076489 E-mail: [email protected]
Hi guys it's zoe and welcome back to my channel, i hope you're all doing amazing. Today, i'm going to show you guys how i installed this unreal alipal wig from start to finish. If you want to see how i create these bombshell, curls with fluffy baby hairs - and you know just a full in-depth review on this hair - make sure you keep watching. Are you ready so jumping right into the unboxing? This is the packaging it came in ally. Paul has always done amazing with their wigs i've. You know if you've watched my channel for a while. You know that i've already done some reviews on their hair, but i decided i want to just stick to the classics and get a by 420 4 inch. Black wig um: this is their hd lace unit and trust me. The lace was hding, it was crazy, but we'll get into that later. So inside the packaging we got a little edge. Brush got some lashes and a little band melt edge. Thingy, which you'll see me, use to settle my baby hairs and set the front on the lace a little bit getting into the wig. I'Ve got a 180 density and this is a body wave unit as well um, as i mentioned before. This is hd lace, guys. Firstly, i have a few comments with this hair. Firstly, why is it so thick? Look at the thickness. This is not 180 density. Do you know how mad this is normally 180? It'S like it's more of a natural-ish thinness, but this is full. It was giving 200 density look at that, and then this is the lace color again this lace doesn't look 13x4. It looks way wider than that and really intrigued. I should have measured it because it's just it was unbelievable. You really get your money's worth with this wig. The body wave texture was unreal and guys the color as well. Look at the color difference. This is it next to another wig, it looks jet black. I wanted to actually dye this wig jet black um, but once i took it out of the packaging, it was like the blackest black. It could be so that just made me even happier, i did decide to end up bleaching the knots um. These are the knots before i bleach them. I just use my jerome russell bleach as always, if you want to see an in-depth video on how i do that, i do actually um have a couple on my channel, so i'll link them below. But i left the bleach on for about 45 minutes and this is how they ended up as but guys you can see the color of this wig a little better here. It'S just complete blackness and i love it. I feel like jet black hair. You can never go wrong with it, so shout out to alipo, because they really did their thing with this wig. This is what the wig looked like after i plucked it and just used my hot comb and styled it a little bit at the front. I spent about 20 minutes plucking it it wasn't too difficult, um. I did kind of have to really get in there and make sure that i got that gradient line um, but it wasn't difficult to do at all. Moving on to the actual install here's just me showing the wig again on the mannequin head, i use my bed head hair, stick with my hot comb to just slick it down, and then i just straighten the rest of the wig moving on to tinting the lace. I just grabbed my bonus weight and see up not concealer foundation in the shade spice drum um, and i just grabbed about a pump and a half of that and a dense, kabuki brush and blended that into the lace. Now one thing guys just because it says it's hd lace. I did get a comment on this on one of my other videos. Just because the lace says it's hd doesn't mean you don't have to tint it. The hdness is the thinnest of the lace and it will melt better into your skin if you're dark skinned like me, you will still need to tint it and bleach the knots. This just goes with any hair that you get so do not be alarmed. The quality is still crazy. I clipped the hair backwards and grabbed my scissors and just started cutting around the hairline to help make gluing down a bit easier for me. For some reason, the alipal wigs never really fit my head like properly on one side. So, as you can see on this side, it fit a bit awkward, but we made it work at the end of it. I cut a few tabs into the wig with my scissors and then i grabbed my lace glue today, i'm using as usual the better the melt lace glue. This is the best glue ever and it really just keeps my wigs on for days weeks, no matter where i'm going, no matter how high it is, this glue lasts. I put about two layers on for this install. I think two three layers um, but you can go up to five depending on how strong you want the hole to be once i place my layers of glue down, i just put the lace back over the top and use my fine-tooth comb to just really brush Away any white bits that might be left over due to the glue residue and then i'm going to repeat the same to the sides of the head. Once i get all that glue down, i'm now gon na grab my eyebrow razor. I really need to get a new one, because this one is so gross from all the glue that is at the bottom of it, but yeah still works, i'm just cutting off all the excess lace and, as you can see, the lace is already melting in. This is what makes hd lace hd guys like just look at that. I barely had to do anything to it and honestly, i could just leave it like this at this point, but i just wanted to go the extra mile and make this wig the best. It could possibly be so. This is the inspo for my baby hairs. I wanted to go for a really fluffy curly natural, looking baby hair, so i found this go on tik tok. That did it perfectly like this is what i want my baby hairs to look like every single day and the way i tried to achieve the look is i just separated off my sideburns first and then i grabbed a section about that big, as you can see, Um from either side of my head once i do this, i'm just grabbing my eyebrow razor again and i'm cutting the baby hairs in a diagonal line. I prefer using doing this over using scissors, because scissors gives too much of a harsh line and it looks like you've cut the baby hairs. If that makes sense, you want it to be a natural wisp, so eyebrow raises creates that effect. I'M now grabbing my hair straighteners and just curling the baby hairs inwards and, to be honest, this is my basic baby hair routine, but i just wanted to recreate the shape of the picture. I just showed you to keep the baby hairs settled down. I'M grabbing my got to be hairspray and i'm grabbing it on that edge brush that came in the packaging with the wig and i'm now just going to start sweeping the baby hairs. It'S kind of hard to explain what i'm doing, but you just kind of want to freestyle it really and truly just follow the curl that you created and just use your hands to hold down the baby hairs um. I also go in with my band after to really help settle them down because they will, you know, want to pop up and like do their own thing, just because we are using hairspray, not like a mousse but yeah. I'M just gon na do this for both sides of my head, and this is the look that you should have as you can see. They'Re super super wispy and really soft looking, and that is the look i wanted now. I'M going to clip my hair up and i'm going to grab my melt band, the alley pearl melt band and i'm just going to tightly wrap that around my head for about 10-15 minutes. Just while i curl and style the rest of my hair. Now i wanted to go for a victoria's secret, blow-dry bombshell. Look! So i'm going to start by layering my hair, guys, i'm not a professional hairstylist, so the cutting that i'm doing for these layers doesn't actually make sense. But essentially, what i'm doing is i'm grabbing sections at the front of my hair and just dragging the scissors in a diagonal line and just cutting away to be honest, you just you do just want to make sure you keep your scissors moving and you don't just Hack at the hair, because this will create harsh blunt cuts and lines, which is what we don't want. But if you do end up messing up, do not fear the hair curlers are here, and this will just hide any of this. Any of the mistakes that you've created, um and really just make everything, look soft and cohesive. This is about a one and a half inch barrel. I think - and i curl each section and then grab a little crocodile clip and clip each section in place. This is going to help hold the curl for much much longer, because you're, allowing them to fully cool down instead of you, know letting them drop straight away. So i'm going to do this for my whole head and just make sure that i spray each section with hairspray in between once i do this i'm going to take out the crocodile clips take off my melt band, and this is what you should have and now I'M just going to shake my head and really fluff out these curls, i'm just literally using my fingers to style the curls, how i want them to look, but this is essentially the final look guys the hair is so soft. I wish you could feel it through. The screen and guys i promise you i'm not just saying this like this hair is beautiful. I'Ve had so many compliments on it. I'Ve been wearing it for about a week a week and a half now, and i am feeling myself it's the jet blackness. It'S the fullness. How is it this full at 180 density, the lace everything about this wig is 10 out of 10, like alipo really did that, and this is honestly, my favorite black wig. I'Ve ever like ever had the pleasure of wearing so you'll, be seeing a lot more of me in this wig, but yeah guys. I hope you enjoyed this video make sure you give me a like comment and subscribe. Make sure you look at the description. I'Ve linked all the hair down below and yeah. I will see you in my next video guys, bye,


Comments
Ali Pearl Hair: Sooo pretty!!! Thanks for trying our hair
Claire online: This hair is bomb just ordered! A good tip is to use your bronzer or contour shade on the lace instead of your foundation, it blends in more
Dee Luther: Great Video as always Stunning thumbnail Beyond Pretty you are Ur Makeup always on Point Happy Bless Week Too Be safe always
J Jenny: U are so prettySlayed
ivyiam: Fave
Vladimir: ♥️ ❤️ Alles sehr schön. Aber zuerst zusammen die Nummern 10 und 1. Eine Cucuzz.Online Brünette und eine andere Blondine. Es wäre unfairu, wenn ich 4 wählen würde
Петр Петров: ❤Only for fans over 18 year⤵️ Alles sehr schön. Aber zuerst zusammen die Nummern 10 und 1. Eine empr.ONLINE Brünette und eine andere Blondine. Es wäre unfair, wennq ich 4 wählen würde