Detailed Af: The Only Video Beginners Need | No Baby Hair Hd Lace Melt | Lovelybryana X Bestlacewigs
- Posted on 21 June, 2022
- HD Lace Wig
- By Anonymous
Twitter/IG/Snap: @LovelyBryana
Description info:
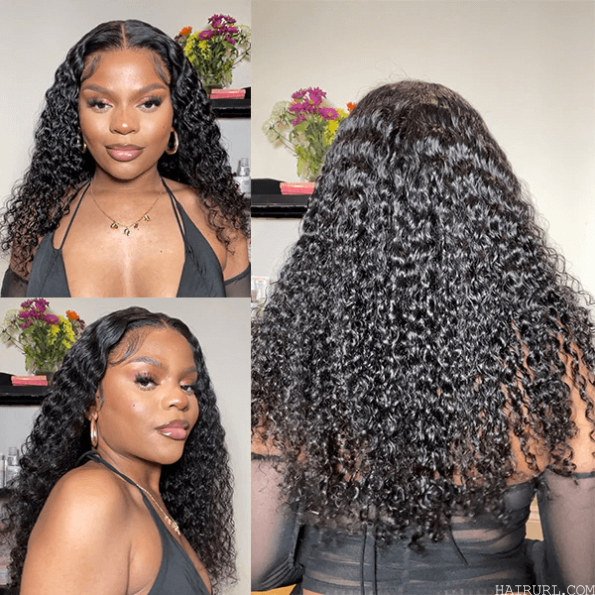
This 13x6 HD lace wig is from www.bestlacewigs.com
✿The link of the same wig in the video https://bit.ly/3HM45m4
✿Use my coupon Bryana20 to get $20 off (Code available for all HD lace Wigs)
------------------------SUMMER SALE--------------------
Coupon : SUMMER
$20 off for orders over $199
$30 off for orders over $299
$40 off for orders over $399
✿Wig Details In this Video:
Wig Name-HD09
Hair Color- Natural Color
Wig Length- 20in
Wig Density- 180%
√ HD Lace+Swiss Lace
√ New Clean Hairline
√ Whole Front Bleached
√ 13x6 Parting Lace Front Wig Cap
More HD Lace 13x6 Lace frontal Wigs: https://www.bestlacewigs.com/c/Best-13...
Keep Up with Bestlacewigs:
Instagram: http://www.instagram.com/bestlacewigs
YouTube Channel: https://www.youtube.com/user/bestlacew...
Products I Use:
Ericka J Hold Me Down Glue
EBIN lace Holding Spray - https://amzn.to/3AAZv52
Clear Got 2b Glue (Black tube) - https://amzn.to/2Q8viXA
Lotta Body Foam Wrap_ https://amzn.to/2TZloX3
Pattern Beauty - Jojoba Oil - https://amzn.to/3FstBtZ
BabyBliss Pro Titanium Flatiron - https://go.magik.ly/ml/ltc8/
Perfect Line Grid Eraser (my match: TAN)
https://perfectlineswiss.com/?wpam_id=...
Purple Comb: https://www.pitreessentials.com/
Esha Fusion collagen Glue - https://amzn.to/2Qo58Pa
Esha glue Remover - https://amzn.to/2CWmQGp
Esha Primer/ Skin Protector - https://amzn.to/31s2oXj
Bold Hold Active lace Glue - https://thehairdiagram.com/products/bo...
Got2B Insta Hold holding spray - https://amzn.to/2WregWy
ORS Olive Oil Mousse - https://amzn.to/2ZCGIqu
Soft Silicone Medical Tape (Houseables Brand) - https://amzn.to/2AoNohL
Bed Head Hard Hold Spray - https://amzn.to/2U9ED1q
Bed Head Mini - https://go.magik.ly/ml/uypb/
Silicone Strip (ScarAway): https://go.magik.ly/ml/q9y2/
Lace wig grip : https://amzn.to/304dylZ
Sally Hansen Leg Spray Medium Glow - https://go.magik.ly/ml/kizp/
Wig Grip - https://amzn.to/2W8mOjh
Wig Stand - https://amzn.to/2W8mFfJ
Wig Head - https://amzn.to/2TbZMGg
Scissors/ Shears - https://amzn.to/2RT00F9
Tweezers - https://amzn.to/2CCfW54
Lotta Body Foam Wrap_ https://amzn.to/2TZloX3
Creme of Nature Foam - https://amzn.to/35AtDik
Got 2B Glue Freeze Spray - https://amzn.to/2BiTm1G
Clear Got 2b Glue (Black tube) - https://amzn.to/2Q8viXA
Yellow Tube Got 2B Glue - https://amzn.to/2ZEShhA
Conair Infiniti Pro BlowDryer - https://amzn.to/2DxWd8z
Conair Infiniti Pro Curler 1 Inch https://amzn.to/35dg2Nj
Pressing Comb - https://amzn.to/2HPKEMd
BabyBliss Pro Titanium Flatiron - https://go.magik.ly/ml/ltc8/
LovelyB's Edge Control - AmazonPrime https://amzn.to/2QaGZNr or www.LovelyBs.com (Also Amazon Canada)
Sephora Foundation Powder - Golden Almond - https://go.magik.ly/ml/kizh/
BH Cosmetics Foundation Powder - 240
~~~~~~~~~~~~~~~~~~~~~~~~~~~~~~
Helpful Videos:
Hide the Grids on Lace Wig
Baby Hairs Like a Pro
https://www.youtube.com/watch?v=EN35oL...
Bleaching Knots
https://www.youtube.com/watch?v=tccwTD...
Bleaching Knots vs Foundation
https://www.youtube.com/watch?v=2ORjQ3...
Plucking a Natural Hairline
https://www.youtube.com/watch?v=mYr2tx...
Melting Lace No Baby Hair
https://www.youtube.com/watch?v=3sQOpN...
Melting Lace With Baby Hair
https://www.youtube.com/watch?v=xr2x7Q...
~~~~~~~~~~~~~~~~~~~~~~~~~~~~~~~
FTC disclosure: This post or video contains affiliate links, which means I may receive a commission for purchases made through my links
Hi guys welcome back to my channel so jumping straight into this video. Like always, today, i have a new unit for you guys, and this unit is from best lace, wigs and let me just start off by telling you from the beginning that this lace is living up to the name. Okay, like it looks so freaking good. So this is fresh out of the box. I'Ve done nothing to this unit. You guys can see it is plucked. So freaking good, i'm really hyping this unit up y'all but like it is plugged so good. The knots are bleached perfectly. This is what the inside construction looks like and then look how this lace just melts against my skin and that's not even with any type of adhesive. So just imagine that but yeah. So this unit is a different kind of unit, so it has hd lace in the front and then swiss lace in the back. If you guys seen that little line of demarcation, that is to make the unit more affordable, because hd lace units seem to be really really expensive um. But that makes it way more affordable to put the hd lace just in the front and then have the swiss lace in the back. So this is affordable for you guys, but i'm starting off i'm going to make this video as beginner friendly as possible, starting off with my hair in these two braids and then i'm going in with this um scalp protector. So i haven't used this one in a really long time. I honestly do not recommend using this one, but i couldn't find my spray one but yeah i'm just going to go ahead and put this scalp protector all over my hairline just to protect it one because i don't have my hair braided and if your hair is Braided up it's a little more protected in my opinion and two i'm doing the ball cap method today, and i haven't done that in forever. If you guys have been following me, you know i've been anti ball cap because it kept ripping out my edges, not necessarily my edges, but like my baby hairs, it kept pulling them out, no matter what um, so i'm trying it again, which is why i use The scalp protector this time, but again i don't really recommend this one for wigs, it's good for quick weaves, but not for wigs um, so yeah, i'm going in with this stocking cap. This is the sheer one. This is the most sheer one that i can find. I couldn't find like the super, clear ones that everyone's been using um, but it doesn't matter it works perfectly fine. So when you do the ball cap, you want to slip by your ears first, because you want that to be like fleshed against your skin. If that makes sense, that's the part that people have so many problems with is the ear tabs like soon as you cut it? It usually just rolls right back up and now your hair is exposed, and it's like you might still take that off. But if you just do a little tiny slit like just enough to pop your ear out, not not too much to where it runs and not too little to where your ear feels like it's in pain just enough to pop your ear out, it'll keep it like Pushed against your skin and then once we get it like laid down, it won't move and then, with the stocking caps, i like to put my knot in the back and kind of tuck it in my braids. I know a lot of people put it at the top, but i feel like that creates like a hump in the wig so yeah. I tie it in the back and then i'm going in with this ebin spray, and i'm literally going to use this to trace out my natural hairline shape, because when i wear my wigs i know i like them to look as natural as possible. To me, like i like them to fit my face, so i just shape out my hairline with this, and i want to make sure that i really get enough on the ear tabs part and then to really secure the ear tabs. I go in with a little bit of the got to be glue and i don't put it everywhere, because this takes forever to dry. I literally just cup it around my ear. You want to go back a little bit to keep it from rolling when you cut it just like this and then on the actual sideburn area. I just put enough just right there to keep this part from rolling because y'all know this is the issue all the time and then i go in with my blow. Dryer make sure everything is dry and then i really focus on the ear part to make sure that part is 100 dry. So once it's dry to touch like, especially by the ear tabs like once, you touch it and it doesn't feel sticky or wet or cold, or anything like that. You want to begin cutting off the extra. So i like to start in the middle and when you spray it, of course you want to spray a little bit too much at first, because you don't want it directly on your hairline at first um or at all. Honestly, you want to leave just a tiny bit of space or that's what i like to do so i peel it back some and then i begin cutting it doesn't hurt it's not ripping my hair off, because there's no hair right there, that's just forehead. So i pull it back a little bit and then i begin to cut away the extra and getting it close to my hairline, but not right on my hairline, if that makes sense like as close as possible, with leaving a little bit of skin. So once you cut away the extra you want to go ahead and put your wig on and just make sure that everything is covered like make sure the wig cap is going to be completely covered by the hair when you put it on - and this looks pretty Good, you can see the little white outline, but don't worry we'll fix that in a second. But there are some pieces that look like they're going to stick out, so i just go ahead and peel it back a bit and then i remove those extra pieces. So after you do that, you try the wig on one more time, just to be safe, make sure everything is covered and it's pretty covered, except for this tiny part on the right. So i'm going to take it off one more time and i'm just going to peel that back a tiny bit just so we can be safe and then i'm going to finish off the wig cap. So, to get rid of the little white outline that you've seen under the lace i like to take a little bit of the got to be glue, the clear one on the end of a rat tail comb, and you want to have your blow dryer on. While you're doing this, because if you just put the wet gel on the wig cap or anything wet on the wig cap, it's going to start rolling back. So you want to blow dry and push it down at the same time just to melt the ends, because those are just like the part of the cap. That'S not melted down. You want to melt those in down and melt those ends down sorry and blow dry. It at the same time so that the cap does not move so now that the ends are melted down. You still kind of see a little bit of the white line, but i feel like that's the um protectant that i use, because it turns white when you peel it back so to get rid of that. We want to go on with a little bit of foundation. So i went in with foundation powder first, just because i can like do that really fast and then for the edges part. I went in with a little bit of my liquid foundation just to get rid of that whiteness and make it look more close to my skin tone. If that makes sense now i can go ahead and put the unit on and we can see what it looks like before we glue it down and you can see the little white outline from the wig cap before or if not the wig cap the stocking cap Before you cannot see it at all - and this is what we want now to make my parting look as real as possible. Y'All know i've been using this perfect line. I don't even know how long it's been now, maybe six or eight months, but this hides the grids on the lace. It also hides the knots if the knots aren't bleached good, but this is bleach really good, um, so yeah i like to put it in my parting area and y'all. It really makes it look like scalp, so i use the shade 10 i'll go ahead and leave a link for you guys down below um, but yeah just put it on the parting area or you could put it on the whole lace whatever you want. But i don't like wasting it, so i just put it where i want the part to be um and then you push it in place, add a little bit of oil on it, and then oil also removes it if it gets on the hair. And then you have a scalp and finally for cutting the lace. If y'all don't need any of this, i hope y'all fast forwarded it, but i'm trying to make this as beginner friendly as possible. So the ear tabs i like to remove the parts of the lace that have nothing on them. First, i do this all the time, because if you cut the wig while it's on your head, then that just gets in the way like it serves literally no purpose. So i remove those side pieces first then i go ahead and put the wig on and get it positioned. Where i want it to stop. Is this unit actually fit my head pretty good for the most part um? I am going to remove a little bit of the hair and the lace, but only on one side for this, because when i put the part in the middle, the other side looked fine like it fit my ear perfectly. This part is just sitting on my ear. A tiny bit, so i am going to remove that extra hair just so that my ear can be free. So i like to start at the top of my ear and then do like a diagonal line going down to where my sideburn area would be pin that hair up out of the way and then only cut the hair in the lace. That'S sitting on the ear. So once i cut this out, my ears should pop out just fine and now for cutting the actual lace. So i like to do kind of um, not a tugging method, because i'm not really putting the lace, but i'm using my scissors to kind of cut forward. I'M not doing a smooth like straight line cut, i'm kind of jagging the scissors down, if that's a word and if that makes sense, um so yeah i like to get as close to the wig hairline as possible and then for the top i removed some of The hair, because i, like my natural forehead to be out um if i would have left that it would have took away too much of my forehead. If that makes sense - and i feel like it - changes your face a bit, and i don't like that with my wigs, i like them to look like they're, my hair, so i remove any of the extra hair that i don't need, like all of that was just Sitting on my floor, you can see my wig cap or my stocking cap is still not exposed and literally that's the part that i won't cover is just the stocking cap, because i have it positioned perfectly um, so yeah i just remove any of the extra hair And all the extra lace - and it looks freaking perfect now, i'm going in with the erica j homie down glue. This has been my go-to for months um and then one of the pluses of wearing the actual wig cap is that you can put the glue as far back as you want, without like worrying about your hair underneath. So that's a plus that i've been missing out on, of course, with the wig caps, but yeah you can put it back as far as you want. So i just like to use the end of a rattle comb, because you want the layer to be as smooth as possible that way it dries all at the same time, and everything is clear: if it's not a smooth layer, then it will dry like in sections And it sometimes would be white for a long time in certain spots and i like to do two layers. So you let the first layer turn clear and then you go in one more time and do the same exact thing, making sure it's a nice smooth layer. I'M smoothing out any parts that look too white because those will take the longest to dry and then i go in with my blow dryer make sure everything is completely clear, um and then i can set my unit in place. So i do it section by section. I do middle and then side side just so i can make sure my wig is positioned right and the wig doesn't wrinkle or the lace doesn't wrinkle or anything like that. And then you want to lightly set the wig in place at first, because you want to make sure that your sides and everything will be in the right position and then once you have it in place, then you can go ahead and press it in because if You press it in right away and then the sides are off and you try to pull it up now. The glue is sticky and it's just a mess. Okay, so you want to lightly place it first and then once you have it in the right position, then you can go in and press it down. I like to use my comb to kind of scrape it back and then i blow dry it for a few seconds for the side areas you want to do the exact same thing, uh two layers i like to go in like a check mark area so that The sideburns are completely like laid down and not just the front of it, because then the back will start lifted and doing weird stuff, so two layers make sure they're completely dry and nice and smooth the only difference about the size. Is you don't have to lightly? Put it down the first try, because the middle is kind of the anchor already the wig is where it needs to be. You can go straight in and just like lay that in place comb it back and dry. It me, you tell me me, um your eyes. Tell me that you don't want to leave just yet no my eyes without you. I know you feel the same. So now the lace is pretty much melted, but i like to take my finger and apply a little bit of pressure on the hairline area to see if any lace is lifted and not melted down, and i like to remove it because obviously i already put the Glue where i wanted the wig to lay so all of this is just extra. I can cut it off, but if you don't want to do that, you can take a little bit of whatever adhesive you're using put a little bit on the end of a rat tail comb and just slide it under the lace. Let it dry a bit and then press it down um, but yeah. I just put a little bit of pressure and then i just remove everything. That'S not glued down already come hit me with your touch so to really get that melted. Look i like to take a little bit of the ors holding spray. Well, first, i pull out a little bit of the siberian areas because i don't want those like crunchy going back they're going to be forward, so i pull those out and take a little bit of the ors holding spray spray, the entire hairline and rub it in So there's not like big droplets everywhere and then i like to tie it down for maybe five to ten minutes. So after the five to ten minutes, i can go ahead and cut away the wrap strip and you guys can see those little white patches. That'S because it was a lot of holding spray right there, so the wrap strip kind of stuck to it. So when i pulled it off, it pulled the lace a little bit and left it white. So you just want to take a little bit of more holding spray. I like to put it on my finger and just tap it into those white areas and it'll completely melt away. So you guys know i'm going for no baby hair. Look today so for the sideburns areas, i'm just going to pluck those a tiny bit just to get them a little bit more thin and natural looking and then i'm going to cut them and then use a little bit of mousse to swoop them. I can't fake it when i'm with you, my legs go weak. Can'T you hear it. I think my heart just and look how good this freaking hairline looks. You guys like it looks like it is growing out of my scalp okay. So now for styling, if you guys are done with the video, you can go ahead and exit out. Now, i'm just going to style my middle part, so i want it to be super flat. Super sleek, so i'm going in with a little bit of this wax. Stick and then i'm going to use my pressing comb to really press it in place. I'M also going to add a little bit of my foundation powder to my parting area, although this looks really really good. My makeup tends to be like a little bit darker, so i'm going to put a little bit of foundation on that hairline area and then i'm also going to use a little bit of um black and brown eyeshadow mixed together, just to clean up the hairline and Make it a little bit more sharp? I know i'm yours baby, so here's what the back in density of the unit looks like and this is it y'all look at the hairline. Okay, like it looks so freaking good. This unit also looks super black like it doesn't. Look the typical 1b. It almost looks jet black to me and this hairline and this lace just look freaking bomb and then, if you're like me and super undecisive you're going to change your part. So i decided that i wanted to do a side part which doesn't make any sense, because i did not put my perfect line in the side area. But i want to show you guys what the lace looks like without the perfect line just in case, and this lace actually looks really really good, especially with the ball cap method underneath but yeah. I just switched up my parting area, i'm going to slick it back with some mousse and some wax and get it in place going to go in with a little bit of foundation powder in the parting area. Because again i don't have my perfect line there, so it doesn't look bad. It just doesn't pop out as much as the perfect line, if that makes sense um, but it looks perfectly fine to me - and that is pretty much it for this video you guys. I will have everything down below in the description box, along with coupon codes and direct links, and everything like that. I hope you guys enjoyed this video. I love you guys and i will see you in my next one so come give me.


Comments
raeyni1: There is something so therapeutic about watching you slay/lay your units. I’ve never put that much effort into mine due to impatience but your tutorials makes me want to try Thank you for giving us very detailed and clear videos
Melissa Scholfield: You did a beautiful job. Also thank you for showing how great a unit can look without all those baby hairs that just end up looking like thin glued bangs. Absolutely Beautiful
Summertime Jay: Damn, you really give me hope to install these wigs myself. My issue is customizing the wig to my head. I either cut too much lace off or over pluck the hairline. This wig might be the option for me.
verrell hanley-moncree: What a great tutorial! And I love the side part look.
DWOOD: This is perfect! I’m just getting into wigs so I really needed this. Gorgeous!
Jennifer Cruz: I just love the way your wigs turn out. I mean they just be looking so natural, and that’s a plus for me. On top of that your makeup be POPPING! Heyyy Bry, and little Theodore! Thank you so much Bryana for the very detailed tutorial!❤️
Rhonda Seward: Perfect!❤️I do bodybuilding shows. I wear straight hair for that. I am going to try this.It looks Amazing Bry!
Donna Wallace: Thank you. Just purchased. You make it look flawless. Have a blessed day.
booojee4: Thank God no baby hair .. I love it ..
Myrna J: Yesss I love a beginner friendly. ❤️
marceline: Just got the wow african wig you reviewed for my prom! thanks for your videos ❤️
Trinimami1: You’re like the only person on YouTube I’ve been faithfully watching for years because you don’t fail me lol ❤️
Leah Anthony: Wow looks so natural amazing
Travista Jefferson: Best tutorial I have EVER watched! Thank you
Vanessa Harvey: Loving it
CookieDoughmonsterTravels: Hey Bry! Awesome slay!!!…as usual. So, I wanna try this wig but i do glueless. How do you think this wig’s construction would work as a glueless unit?
Creators Child: Awemazing! Thank you!
sokiexo: Hi. I am looking to buy my first wig due to alopecia. I am sick of hiding so I decided to look on youtube for advice. Love your videos. My question is: is this install meant for long term use like for a week?
Rebecca Agron: It’s giving …. Life . I love it !
Brittney Seauxsa: Slayed per usual! But omg, shot every time she says “If that makes sense.”
Jorge Celio: Perfect
taustin206: so layed! Great video! What wax stick do you recommend? I find the mouse isn't doing the trick for the fly aways.
icxrxdddbtw: Awesome job!!! Does she hold curls well?
C J Morris: About how long will the bonding glue last for this install?
hey: Can you show us how to secure the back of the wig? I made a wig with two frontals, but I still don’t know how to secure the back front till that well. It will be helpful. Thanks.
Tammy white: You did that!!!
Debra Morton: Amazing
Gugu Simelane: My queen I love it
Manifested: So Bomb!
Bella Fain: Craaazy
Curesa Arnold: Is the bonding glue sweat proof?
Human Hair Wigs Top Quality : nice hair
C B: If you could compare this unit to the hair vivi fake scalp wig , which one is better?
Syreeta 22: What song list is this??