Frontal Wig Install Tutorial (My First Time) Ft Aliexpress Beautiful Princess Hair
- Posted on 04 April, 2021
- HD Lace Wig
- By Anonymous
Zee’s social media
Couples channel: https://youtu.be/Ta3d2qT0snE
Me & My Best friend channel: https://youtu.be/jFQbJQdtvaQ
SC:thvtgurlzee
IG: iamjerzee/idcimzee
IG Spam: yallhoesbemaddd
Dubsmash: idcimzee
Tiktok: Zeepostedthat
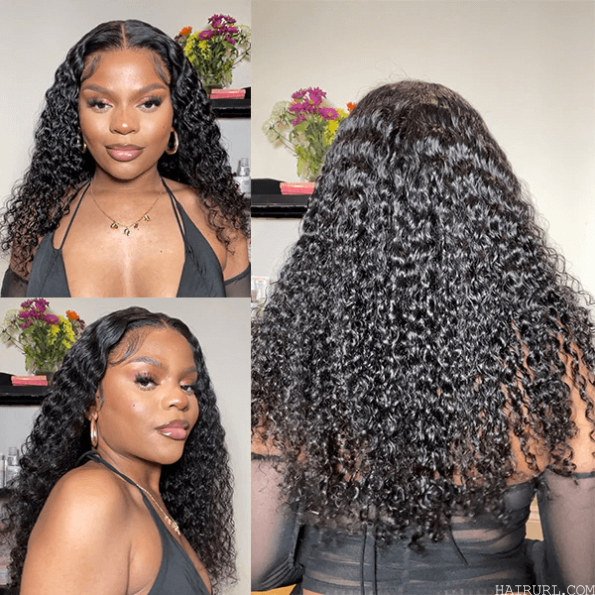
Hair link: US $64.21 44% Off | HD Transparent Lace Front Human Hair Wigs PrePlucked 13x6 180% Brazilian Body Wave Lace Frontal Wig With Baby Hair Remy Princess
https://a.aliexpress.com/_mMpwscT
THIS VIDEO IS NOT SPONSORED !!
Stream “2 faced remix “ on all streaming platforms
What'S up my z, babies, if you are new to my channel, go ahead and click that subscribe button. If you want to become one of my z, babies don't forget to like and leave a comment down below. But if you want to see how i installed this once a week, continue watching and watch me slay. So the first thing you're going to do is glue back your edges and your baby hairs. So this way they're out of the way and they're protected this way. When you put on the glue and stuff it doesn't take away your edges, yo. What'S up it's your girl, coila ray i'm rocking with dj taj, my favorite dj, you know from jersey, baby hold up hold up. Can you play that again? Yes, my forehead is big. Don'T do me in a comment. Cause watch me. Do this wig y'all talking now but watch when i lay this way. Okay! So now you're going to take your wig cap and you're going to put it on your head and you're going to see me i'm going to pull it all the way down, because you really want to stretch it out. So it's really you want to get it. I stretched out because it's going to make the cap thinner, which makes your cat more bald, which is what you want, so your wig leaves real flat. Seamless, that's how you get the lace to look real scalp-like, okay. So now i'm just going to cut out the ear tabs, and this is just so. The wig cap plays flat as possible. Now i'm going to take my got to be free spray and i'm just going to spray it along my hairline, and this is what's going to help your cap stay down and stick so you want to spray it a little ahead of your headline because you don't Want to put it right on there. So when you cut your cap, it's not right on your hairline, which could pull out your edges, so i'm going to spray one layer blow dry, it and spray another for a total of two layers of freeze spray is uh. Now i'm taking my scissors and i'm cutting off the cap, so you guys see me looking down i'm looking down at the mirror, so i'm trying to get my wig cap to be as close as possible to my hairline without being on my hairline, because if you Put it on your hairline, that means you're going to put the glue from the frontal in your hairline, which is going to cause your baby hairs and your edges to fall out. So i'm just trying to take the scissors and get them as close to my hairline. As possible, but not on my hairline this way, when i lay down the front tube, you don't see the wig cap, but my edges are still protected and it still gives scalp okay. So i sped the video up and the video is gon na be sped up from now on, but just know that it did take time for me to lay down this wig cap, because i planned on plan on wearing this wig cap for more than one install. So i wanted to make sure my wig cap was really down stable in the place where i wanted it, because i knew that i was going to wear this wig cap for more than one install, but even if you're only wearing this for one install, you still Want your wig cap in the place that you want it, because once you put the frontal down, you cannot move the wig cap. So just make sure it's where you want it. It matches your headline and your edges are still protected under that weak head is, is so. This is probably the most important part of the install you want to make sure you're cleaning your headline along your headline with alcohol before you put any glue down, because if you don't once you put the frontal down the front two in the glue will irritate your Skin and that will cause you to break out and, like your frontal to itch and then you're gon na, have to take your frontal off waist whenever you should have to and again i glue my wig cap down, because i planned on wearing this wig cap. For more than one install now, i'm going to take this powder foundation. This is not my specific foundation because i do not wear makeup, but i got this at the beauty supply store. So i'm just going to put this all over my wig cap, and this gives your lace a more of a scalp look when you put it on rather than if you didn't put it on it, wouldn't give that melted. Scalp like look. It would just look like um, you would be able to see the difference between the wig cap and your lace if you didn't put the foundation after you put your foundation on, you want to take another alcohol, swab and just clean off the excess foundation that you Might have along your headline: okay y'all, so this is the week. So this video is not sponsored, but i still will put the link down below of where i got this hair from, and i believe the name of this hair is beautiful, princess hair. Something like that. I will put the link down below, but again this video is not sponsored so y'all tell princess here to sponsor your girl, because i killed this install okay, so right here, what i was doing was just seeing if i can see the difference between my wig cap And the lace, because when you lay your wig down you're, going to put the wig a little before your own wig cap, so i noticed that it didn't blend very well. So i knew i need to add more foundation to my wig cap, which is what i did so i just took a brush this time, which helped way better than the little pad that i was using last time. So i went ahead and added some more foundation. So this way the lace to the blended way better with the wig cap. While i finish printing this foundation on this wig cap, i thought i'll tell you guys that i did record a video of me customizing this wig. I did bleach the knots i bleached the hair, i dyed the hair and i plucked it and i did customize it to this side part. So if you guys want to see the video of me customizing this wig before i put it on my head drop a comment down below and i will drop that video as well as you guys can see. I'M just trying to make sure the wig is laying where i want it to lay for this specific, install y'all. I really was focused on the ear tabs, because i wanted my wig to be chilling on my head y'all, not sitting chilling. You want your leg to be chilling, because when you're chilling, you're comfortable, you feel me like you chilling, so i wanted my ear tabs to really be chilling, like, especially with where we're living now like over 19.. So i really want to be able to put my mask on without having to like fight with my wig to get my mask on. If you know, then you know, because i've got my wig down from a couple different styles and y'all. I was not able to put my mask on properly because the ear tabs was not cut out right. So since i'm doing it myself y'all, i really was focused on these ear tabs, because i really want to be able to put my mask on without having to move my wig or fight with my wig to get my last one so y'all, even though this video Is not sponsored, i can't say this hair is very soft y'all. I bleach this hair. I'Ve straightened it. I'Ve popcorned it and it's still giving y'all. So this is actually body wave here, a body wave wig um, but i do have it straightened and, as you can see yes, y'all like even when it's straight and it's given body. So here we have my best friend and she's gon na cut off the lace. In the back and also adjust the straps on my wig, so this way it fits snug on my head because before as you're gon na see the lace was more loose, but now that she's tightening the straps in the back it's gon na fit my head. Um. More properly - and i really can see where the wig is gon na be laying so here i wanted her to cut off the ear tabs for me, because i was scared that i was going to cut too much lace and i did not want that to happen. So yeah, i trusted her to cut my legs for me, y'all and guess what she cut my ear. Yes, she cut my ear, y'all and y'all gon na see. I was only bleeding a little bit y'all, it didn't really hurt. I think it. She only cut me because the scissors were so sharp but yeah. I was bleeding a little bit but y'all the show must go on so you're just going to repeat the same step on the, so i'm just going to cut my lace into sections this way. When i go to glue it down, i glue it down in sections and that just helps your wig lay way better and way flatter so y'all as y'all can tell from the title. This is my first frontal install that i'm doing on myself. So when it came to the glue and stuff, i didn't really have like a specific way that i put down the glue. I tried a few different methods, this one i did the cap skin cap skin and then i spreaded it and then i dried it. A little bit with the blow dryer, so i did do that three times, but on the other sections you guys are going to see me put the glue down, but i made sure i put three layers. I made sure i spread each layer out and then i blow dry each in between each layer. So i blow dried until the glue wasn't clear, but it was still a little bit of white, but it was kind of turning clear because that's how you knew that it was tacky and that the glue is about to be dry but not dry. Out of the way, because you don't want the glue to dry all the way before you can put down your lace because then your glue is already dry before you even put down your lace, which defeats the whole point of you gluing down the lace. So basically, you just want to make sure you blow dry until the glue is still a little bit of white but clear this way, it's tacky and once you put down the section, as you can see, you can comb it and blow dry it this way. The lace is melting into your skin. I know okay, so i don't have one of those frontal bands, so y'all, i'm just gon na. Take my silk scarf and wrap it around my head. This way um. This helps your lace melt better to your skin, so you're just going to leave this on for a little bit, and while i have this on, i usually style my hair or, like you know finish doing whatever i need to do um. I usually do this on. For a few minutes, though, you don't have to leave it on for a long time. You just want it to sit long enough for your lace to really melt into your skin. Now i'm just taking my liquid foundation and i'm just going to use this to enhance my part to make it look more natural, so i'm not even gon na lie to you guys. It was five minutes went by and i took my scarf off. So it wasn't very long but, as you guys can see, it's bam melting. It looks way better than it did before i put um the scarf on so yeah. It looks more melted. So now what i'm gon na do is cut that lace off now, i'm going in with my scissors and i'm just going to cut the lace a little further back and then i'm actually going to go in with my razor to cut the rest of the lace Off so i prefer to use the razor over the scissors, because, with the razor it just gives a more natural look, a more like jagged edge. So the lace is melted better into your skin and looks more natural because nobody has a straight headline um. If you was to cut with the scissors, all you have to do is cut in a zigzag line, but with the um razor it's just much easier and you don't have to worry about going in a zigzag motion because it's already cutting in the natural form. So after i cut off that extra lace, i noticed that the lace lifted a little bit, so i just took the comb and just put it back down and it really was melted into my skin y'all. I'M telling y'all, as you guys, can see i'm just going to cut off the rest of the extra lace um. Let me be the one to tell you guys: it's okay, if you cut off some of the hair off the lace, because i felt like i was trying to like make sure i kept all the hair. But honestly, when you cut the hair a little bit with the lace, it helps it melt better into your skin, so don't be afraid to cut a little bit of the hair off if need be, because that will actually help your lace smell way better into your Skin, yes, y'all, i'm cleaning my head with another alcohol pad because i had extra glue and i really didn't want to break out so i'll, just clean up the extra glue okay. So now we get into the baby hairs and when i tell y'all it took me an hour to do these baby hairs. It took me an hour so if you're thinking about giving up do not give up, but as you can see right now, i'm just going to be parting off the hair that i want to be my baby hairs. So again, i normally don't part my hair on this side, so i'm really trying to see like you know what i want my baby hairs to look like, because it's way different when you're used to doing your edges the other way so yeah. First, i'm just going to part the hair and see which hairs that i want to leave out as my baby ears ears and i'm going to curl my baby ears with a small flat iron. Because when you do this, it helps your edges shape into the form that you want them to be because you're going to sweep it anyway. So it really helps your baby. Hairs lay and stay where you want them to be, and sleep very easily, so you're just going to take some um mousse with your edge brush and sweep your edges. However, you want me, i was only doing one sleep on this side, so yeah that's right. So we finally made it to the side guys and i'm gon na just repeat the same steps that i did for the other side, this side. I did pluck a little bit more and yeah, i'm going to put the baby hairs and repeat the same process that i did on the other side and yeah. The edges took me the longest y'all. It probably took me yeah. The edges probably took me longer than the whole install because with baby hairs, you really have to make sure the hairs look right, because if it doesn't look right, it just messes the whole wig up like the baby hairs is really what helps sell. The wig and y'all i'm big on baby hairs, so i really wanted mines to be perfect. So that's why i really took me so long, but yeah you're, just going to repeat the same steps that you did on the other side make a [ __ ]! That'S right is is so after i finally got my edges how i wanted them. I went in with some um gossipy freeze spray, because i was using a lot of mousse because i kept messing up y'all. I told you it took me a while to get my baby hairs to how i wanted them. So i was messing up a lot, so i did use a lot of mousse which did cause the lace to lift a little bit. So i went ahead and sprayed down some freeze spray and blow dried it with the blow dryer to help it really stick back down and be melted into my screen. Again, just a little reminder: y'all, i did style this wig before i even put it on my head. That'S why it looks real flat, real nice, because i styled it before i put it on my head, because i knew once i had it in my head. I wasn't to put the hot comb as close to my scalp, as i would so that's why i styled that um hair, while i already had it on mannequin's head with this being my first week y'all, i was like paranoid about everything like i did not want To mess up so i was debating on whether or not i was actually going to cut my hair into layers like this, and i did decide to cut it, but i didn't cut it too much. So if i did, when i waited as middle part, i you wouldn't be able to tell that i did cut it into layers ben. I already styled the wig and stuff guys. I didn't really have to do much, but just straighten this little sweet part, because it wasn't really swooped. I just had it straight um. I do suggest that if this is your first time installing the wig to um do all the styling and plucking and whatnot, while it's already on the mannequin's head, because it will help you get a flatter, install um. But, like i told you guys, i did do a video on that. So if you guys want to see the video of how i you know, got it flat, the um whole process of it, you guys could just comment down below and i will put that video as well, but right now, i'm just making any final changes to the Wig that might need to be made and yeah you're about to see the end result, because, after all of this, your girl was slayed and laid a winner. Now my pocket's is this is cause. I ain't come to play.


Comments
Tvedt Groves: I’m here from AliExpress and we def need that customization for the wig
Shanelle Webb: I found this channel from your AliExpress review of the hair
Lolatography: First time??? You did this like a pro
Heis Prettycool: I’m here from your AliExpress review you did such a good job!!!
Plum: One word!! Bombbb now patiently waiting on the wig customization video
Steph Jones: I would like to see how you customized the wig !!!! I’m here cause the Ali express review
Perla: Como haces el blanqueamiento?
Gloria Aleegresse Nangoa: Came from AliExpress ! ❤️
Henny Zaina: How long did this hair last you ?
Cass Alizae: We need to know what you used to colour this hair
D'Erica Robinson: How was the hair since you dyed it ?
Perla: Cada vez que te quitas y pones la peluca tienes que cambiar gorrito o con el mismo lo haces?
amaya monaé: what color did you use to color your hair ?
Ashlee Johnson: Found your channel via AliExpress too
Tamya Everett: When you dyed the hair did it shed
Katelyn Scott: what’s the length ?
Zee & Niyaa Army: Niyaa here , Bestie you did that period ate and left no crumbs
dymond: still recommend hair ?