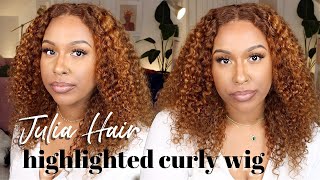
Full Fall Vibes~Lace Magic!!!Highlight Lace Front Water Wave Wig Install~ Ft.Nadula Hair
- Posted on 03 October, 2022
- HD Lace Wig
- By Anonymous
Hello, Love. Welcome to our channel, I hope you guys enjoyed it! Everything will be linked below! Thank you for your love of Nadula Hair, we will provide the best quality hair to all customers.
The link to the original video:https://www.youtube.com/watch?v=puM7tn...
●▬▬▬▬▬▬▬▬▬ ◆ #NadulaHair ◆▬▬▬▬▬▬▬▬●
❤All the hair can be paid in 4 installments
❤Use the Special Code to get EXTRA $10 OFF: nadulaytb
———————————————————————————
Direct link in the video: https://bit.ly/3xdgqLT
Hair Info:24 inches 13*4 Lace Highlight Water Wave Wig 150% density
https://www.nadula.com/ ➤ Top-sale wigs: https://bit.ly/3xXNtE4
Stunning fall color hair wigs:https://bit.ly/3DYhMhP
Invisible 13*4/13*6/5*5 HD Lace Wigs: https://bit.ly/3So47Fa
New protective U/V part hair wigs:https://bit.ly/3URmGmD
New Arrival Fashionable Wigs: https://bit.ly/3rhbi6g
Top-selling bundles with closure& frontal: https://bit.ly/3Cj25jZ
Nadula Customer Service Email: [email protected]
Aliexpress Nadula Hair Website: http://bit.ly/3bW23QD
Aliexpress Nadula Hot Sale Wig: http://bit.ly/3068Mlt
Amazon Nadula Hair: https://amzn.to/2rqyP57
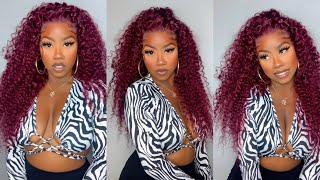
#nadulahair #lacefrontwig #curlyhair
Follow #nadulahair for a giveaway:
☛Youtube: https://www.youtube.com/c/NadulaHair
☛Instagram: https://www.instagram.com/nadulahair/
☛Join Nadula Facebook Group to Get Free Gift:https://www.facebook.com/groups/nadula...
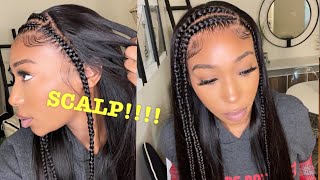
What'S up, ladies welcome back to my channel, it's your girl, hypnotic lady and the company I will be working with today is medulla hair jumping right in they sent me some new nice little goodies. I got this cute little nadula elastic band. Of course, your wig cap and then, of course, a goodies bag with some extra goodies. I got another adjustable um. Oh sorry, elastic band, of course, a cute little silk Bonnet and then some cute little mink 3D lashes. This is the unit. This is their 24 inch. 13X4 lace, frontal highlighted water wave wig, it did come in 150 density um. It did come with two three Combs, an adjustable elastic band and then, of course, your handy dandy adjustable straps in the back. Now this lace is HD um. I did go ahead and plug and bleach knots off camera. Those of you who've been following me already know how I get down now, jumping right in I'm, showing you guys what the hairline is. Looking like straight out, the box um. Well, sorry, straight on my head and ain't straight out, the box, you know and now I'm just cutting off the excess lace with my cuticle Scissors, because it was a little too far deep down. You know I can see and but cutting out my little ear tabs on both sides, I'm just using my cuticle scissors and cutting away from my face going directly where my ear crease is going or the shape of my ear. You don't want to cut too much because then it would be looking crazy. Once that's done, I'm going to repeat the same steps on the other side until we get the full frontal. Looking how I need it to look for you know our hairlines once that's done. I am going to take my cuticle scissors down the middle and split that lace up and then I'm going to be using an eyebrow razor to cut off the excess lace here you guys see. I already did my little split in the middle and I'm just cutting off my excess lace like so once I get that done, I'm going to repeat the same steps on the other side and then we're going to go in with our adhesive and get ready to Lay this lace down, I know next, I'm going to take my Ruby, kisses cream foundation powder in the shade honey beige and we're just going to pop that into the perimeter of the lace um. Even though this is HD legs, it was looking a little bit clear or grayish on my skin, and that is a big No-No. We want it to look like scalp. Now I'm going to take my Erica J adhesive, I did off-camera went and Drew me like a little line, so I could see where to stop putting my adhesive since I don't have a ball cap on. I just wanted to make sure I didn't put my adhesive down too far on my forehead, because then that'll be a huge mess trying to clean up once you know everything's already dry. I do do three layers of adhesive and I wait until it dries completely clear. As you guys can see, it does not take long for it to dry at all once that is done, um I go in for my second layer and then I'm just using my blow dryer in between and like I said I do three thin layers drawing into Each section is clear and then we are going to get ready to lay that lace down all right. Um, take your time, don't rush. If you choose to use adhesive um, it can be hard if you make it hard, but you know it's really really easy. If you just take your time, have patience and you know follow instructions. You know here I am on my third layer and I'm just blending everything in and then we're going to hit it with a blow dryer, and I am using my loaf my blow dryer on a low medium heat. You don't want it super super high to where you're gon na burn yourself and I don't use cold because I want it to dry. You know as quick as possible. Now, once that's done, I'm just going to pull the lace down like so and gently give it a firm press where I have put my adhesive and then I'm just going to repeat the same steps on my sides that I did in the middle once I get Through with the left side, I'm going to repeat the same steps off on the right until the whole perimeter of the lace is laid down and adhere, once all of that is done, we're going to get into styling, wrap this lace up and wrap this video up Foreign, ladies once that is done, I'm gon na go in with my ebb and wonder: leg spray and I'm just going to do a nice little thin layer on top this just seals. The deal for me melts the lace down into the skin, gives you that scalp look, and this is a mandatory step. Okay, once we get that done, um just doing the whole perimeter, like I said, I'm just dabbing everything in with my finger, not too much um. Once that's done, I'm going to cover everything with my elastic band. This is what the lace is looking like, it's already given scalp and I haven't even wrapped it up yet so now I'm going to take my medulla um elastic bands and we're just going to wrap that up and now I'm going to get into defining the curl Pattern, styling it and giving it more. Oh, so you know a look, I am going to go in with my Conair hot comb and I have it set on 425, just because this was some water wave hair and had a little Kink to it. I just updated the boots a little bit, so I am just defining my hairline and pushing everything back making it look all nice and neat. Of course, this. Of course, this is going to be a no baby hair. Look. Those of you who subscribe to me know that I have tried to dedicate myself to not doing no baby hairs lately, okay and so far it's working so here I am just to finding my hairline, making it all nice and neat Flawless. Looking like scalp, you already know once we get done with that, I'm going to go in with a paddle brush and, of course, just a spray bottle with water, and we are going to Define this curl pattern, I'm going to wet the hair, but not drench it. You don't want it, you know soaking wet, but if it's dripping on you a little bit or anything like that, that's fine! That'S perfect! Not too much not too little. Once I get done with that side, I'm going to repeat the same steps on the right side and then we're going to pop this lace off, and then that will be the finished look pictures all right once that is done. This is what the lace is. Looking like definitely very much scalp, okay, I ate this one up and I was obsessed with this look, especially when we not having no baby hairs like I just didn't know how to act. Look at it up close and personal okay, and then we doing a no part flip over method style like I was just feeling this hairline and these no baby hairs. Okay, so up close to personal, no Glitter, you already see how we coming, and you can't tell me that's not my hair. You can't tell me that's not coming right out of my scalp, like the caption says. Okay, tell me that ain't, my hair, here's a cute little 360.. I had to show you guys the back of the wig, of course, like I said this is 150 density water wave texture. This is the natural texture, no products in this hair at all, and it is, I would say, about 40 to 50 dry. I just let it air dry um after wetting it with my spray bottle, and this is what it was looking like. I didn't put no product in it, no curl cream, no mousse, no, nothing - and this is what the hair is looking like. Naturally, it's not giving you know big poofy, deep, wave, hair, it's water wave hair, but it's not limp noodle, looking hair either, which I really appreciate. Love, love, love, love, love, love this. This is what was looking like from the front.
Comments
Heaven Morgan: Love these videos and Units