Best Water Wave Hd Lace Wig Install + Viral Claw Clip Hairstyle | Perfect Fall Hair | Yolissa Hair
- Posted on 13 October, 2022
- HD Lace Wig
- By Anonymous
Welcome To My Channel ❤️
Don’t Forget To Like, Comment, and Subscribe!
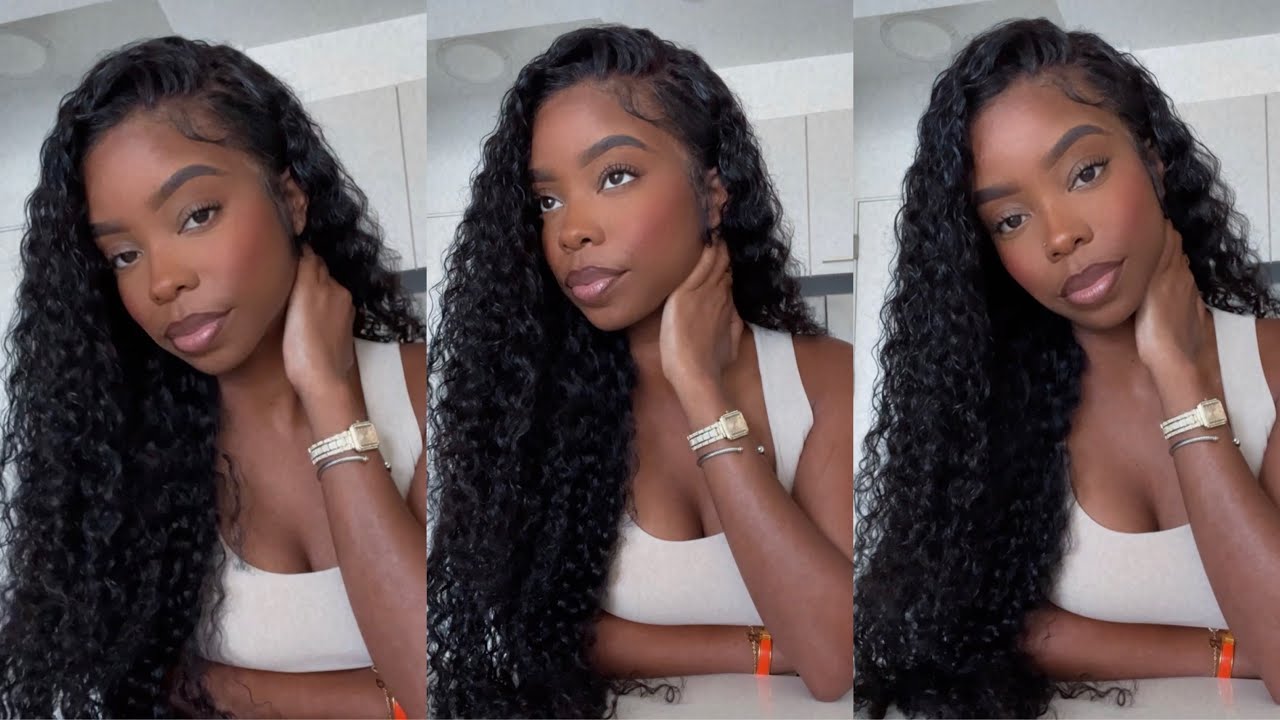
This is the best water wave wig ever! Yolissa hair did they thing yet again and i decided to put the hair in a cute claw clip hairstyle!
●▬▬▬▬▬▬▬▬▬♛Yolissa Hair♛▬▬▬▬▬▬▬▬●
*BUY ONE GET ONE FREE* Shop Now➤https://bit.ly/3QkypqQ
Hair Info:#yolissawaterwave 13x4 HD Lace Frontal Wig 24inches 180% density
❤ #yolissahair Official Website:➤https://bit.ly/3Q56iwd
Yolissa Hair New Comer? Look Here!
Get ❗️$100 Coupon Package❗️Join in Yolissa group:➤https://bit.ly/3momOuu
Classic Wavy Curls #yolissabodywave :➤https://bit.ly/3QG6T7B
Follow Yolissa Hair On Social Media
Instagram: https://www.instagram.com/yolissa_hair...
Facebook: https://www.facebook.com/yolissa_hair/...
✔Wholesale Contact +86 15803834514
Jesus loves you ❤️
“For this is how God loved the world: He gave his one and only Son, so that everyone who believes in him will not perish but have eternal life.”
John 3:16 NLT
S O C I A L M E D I A S
Snapchat: @Keandrawilson
Instagram: https://www.instagram.com/keandrawilso...
Business Instagram: https://www.instagram.com/kskrochets/
S H O P
Want a crochet pieces made by me?
Shop Kskrochets! https://ks-krochets.com/
Instagram: https://www.instagram.com/kskrochets/
Shop My Poshmark: https://poshmark.com/closet/keandraw
Shop My Amazon Storefront: https://www.amazon.com/shop/keandrawil...
Contact me for business inquiries only:
if you ever wanna send me something......
PO Box 651
Oak Creek, WI 53154
United States
Name for the mail: Keandra Wilson
F A Q
Camera and filming equipment (y'all stay asking for this elite camera quality lol):
Camera: https://amzn.to/3oHE2mi
Lighting: https://amzn.to/3ffXDao
Editing Software: Fcpx
Disclaimer: There may be affiliate links in this description. If you choose to make a purchase through the links I provide I can receive a small commission which takes nothing additional from you!
And now it says get into this look. You need this wig. What'S up y'all, my name is Kendra welcome and welcome back to my channel in today's video, I'm bringing you another Hair video. This video is sponsored by your Lisa hair, shout out to them later not come to play with this water wave unit. Okay, I did put it in a really cute viral hairstyle, the little claw clip half up half down hairstyle. I think that's what it's called and y'all just get into it. I really don't have too many words if you are interested in how I got this look just stay tuned. This hair is so bomb loved everything about working with his hair, the laces HD, it's thick. It'S so pretty so full yolisa did that thing. Stay tuned, y'all, all right, y'all, let's jump straight into this video like I said this, video sponsored by yolisa hair shout out to them. They have all these cute goodies in the bag along with the unit. Of course, just showing you everything that came in there also fixing my ball cap, because I don't know what happened girl like it. Just it was sliding back. It was just giving me a hard time, but it's fine. The install came out cute. Nonetheless, I'm showing y'all that I'm using boho and that my ball cap is looking back, but it's okay, like I said, I'm gon na be working in sections with this unit y'all. I did three layers of glue, I think, for each section and I'm doing three of them just to make this install like a little easier on me depending on the wig and the hairline. Sometimes I have to do this, especially because my hairline is low on the sides, so this just helped me out with the um and start process. I did kind of over bleach the knots on this unit, but it's okay, because you can always fix that. But that's why y'all kind of see that it's looking how it's looking, because I over bleached it a little bit, but these knots were so small on this wig. This lace was lacing. It was HD lace, so bomb um, like I said in the beginning this week is 24 inches y'all and you would think it was a 30. okay, I'm only like five, I'm like five eight y'all, and you would think this wig was longer than 24 inches love. The length on this unit and did I tell y'all the density - is 200. I will have all the information in the description box for y'all and, if I'm not mistaken, they might have some type of deal going on right now like buy one get one free. I could be wrong, but click the link in the description box. This video is a little long overdue, so shout out to your Lisa here once again this week, it's everything and then some but yeah. This is just me showing y'all um how I'm laying in the unit, like I said in three different sections, I did three. It may have been two two to three layers of glue, don't mind my ratchet uh blow dryer. We using it till it breaks okay, but yeah, I'm just going in on the other side now laying the unit laying the unit, I don't really be showing y'all how I do my ball caps, because sometimes they turn out good and sometimes they don't. So I just like to kind of get straight to the nitty gritty but yeah. I think this wig is definitely bomb for fall and winter to be honest, any type of curly unit. That'S really thick like this one is perfect for like colder Seasons. I love me some long, hair, curly, hair straight hair, I bust down middle part, even though I didn't do that in this video. I started with a middle part. Y'All gon na see the process and shout out to them for including this bomb elastic band, because it just makes everything so convenient when they include the extra goodies in the bag that you're going to actually need to slow your unit. So I went ahead and pinned it up. Let it melt a little bit Bella, please if y'all hear little licking noises that is Bella all in my face right now, but I went ahead and just cut some more extra lace off the um ear tabs and I think I didn't tell y'all, but this is A 13x6 and y'all gon na see because departing was was so on point. A really deep part went all the way to the back as it should, and now I'm just cutting the lace off y'all and it's looking ashy now, but just trust the process, just trust. The process y'all know I will not steer you all wrong. My installs, they don't be too perfect, but I'm queen of getting the end result to look bomb. You know the steps along the way might not be perfect but best believe by the end of the install. It'S gon na get melted. It'S gon na give laid it's gon na get flat. It'S gon na get everything, so I just went in with that. Um, even lace, spray on the lace - and I put the band back on so that it can melt a little bit. We did about like two different melting sesh sessions, because I really wanted to make sure that this wig was giving the girls what it needed to give. So this is the hair y'all look out for like stop and it's crazy, because I barely like I styled this hair, but I didn't even put any product in it, because I really like the natural just the naturalness that it was given. So I decided not even to put on moose no nothing. I wanted it to stay big and you could still see like the curl pattern, which is a water wave. So if you are interested in this unit, like I said, I will have all the information down below, but now I'm just using some makeup to just um add a little bit more of a color to that lace so that it's not so white. Looking um. That is the beauty of HD lace, it fits all skin types and you can kind of customize it to your liking, of course, because it comes like this clear type of lace. So now I'm going in with some Spritz Pump It Up. Spritz, Yes Y'all! That is what I'll be using to melt, really really just take them out to the next level like as y'all can see. It went from ashy white to like growing out of my scalp, real, quick and now I'm going in with the styling process, because y'all that's over with super simple. The installation process was just so easy, so simple! So now I'm parting um, my hair and I'm using my wax stick so that I can lay that at the top. You want that to look really sleek and really flat. So I'm using my hot comb and my care care wax stick to help me. Do that. Yeah this hairstyle was so cute. I saw it all over Tick Tock by the way, follow me on Tick Tock, because I'm very much active on there, unlike how I've been on here, which I'm gon na get back consistent, y'all y'all see a different background. Like I didn't moved and all type of stuff, but that's besides the point, I'm just using my hot comb to melt this unit and, like I said I did see this um hairstyle like trending all over Tick Tock, and I wanted to try it on my wig To see like what it would give and I fell in love with the hairstyle y'all, this was so cute, like I literally had nowhere to go like the night that I was doing this video, but it's fine. I took Instagram pictures follow me on there too, but y'all just see me perfecting apart. This hairstyle is really really easy. Like I said, I'm not gon na go in with like no product on the actual unit, I'm using like a lace, um spray because, like I said I over bleach, my knots and now y'all just see me mapping out the baby hair, so I'm gon na take Them out and I'm gon na do the same thing on the other side, and I'm gon na be plucking them and y'all could just kind of see me trying to get the shape of how I want them before I start to. Pluck I like to pluck them just to make them look more natural. So that's what I'm doing I'm going in with my tweezers I'm gon na do the same on both sides. So after I'm finished plucking them, I'm gon na be cutting them, and I just did the two front ones. First and then I'm gon na do The Sideburns. That'S all the edges I want you can do whatever you want. However, you want edges are just very much versatile, there's so many different ways you can do them and have them. So I'm just doing them on the side now and I'm gon na do the same process, just mapping them out, tweezing them and then cutting them, and then the rest is pretty much history, we're gon na curl them and all that good stuff. But of course, it's always good to see the process of something I feel like I'll kind of learn better when I'm watching something be done versus, explain so now, y'all see me curling them with my little skinny flat iron here, I'm just curling them downward. I see people curl them up or I don't know it really don't matter I like to do mines downward. I guess it matters depending on what look you're going for, but I don't know this is how I do it and then y'all it just changes. What I use, sometimes I use mood - sometimes I use gel just - depends on what I'm going for. I decided to use a little bit of got to be glue, gel and focus it on the base of the um baby hairs. They usually always start out longer than what they're going to be in the end. I usually go in and cut them. Y'All are probably not going to see that, but this is just a little bit of the process. Just me mapping them out how I want them to look me playing with them. Um, that's the one thing about edges, baby hair, whatever you want to call them it. Sometimes they just take time until you just you know, play with them and get the look see. Now they look completely different, so I definitely went in and cut them so now y'all see me actually doing the hairstyle, I'm skipping straight into that didn't put any extra product in his hair. Like I said, I just washed it bleached the knots all that good stuff and now we're going right into styling. So I'm just basically parting out some hair on the sides. As y'all see, I kind of went from the part and went down as y'all see to where my ears are and because I put the um hot comb and like the care, kale white, stick of my hair. It kind of already looks flat and shiny. So I didn't add any extra product you can, if you want to like, if you want to add gel or something but like I said I just chose not to after I hot comb, my hair, everything was looking pretty sleek, so sometimes less is more for me. So I'm going in and I'm literally tying those in a ponytail and at the very back of my head like on my neck and I'm letting the rest of the hair down, I'm kind of fluffing it out and I'm gon na act like I'm doing. Half up half down now, so I'm just taking a little bit of the hair from the top as y'all see and kind of mapping it out. Now I'm actually going in with my comb and I'm just combing all the hairs down, like I said I didn't add any extra product for this literally just the quickest easiest, cutest hairstyle ever so now, I'm twisting the hair and I'm using a little claw clip that I had a little white one and now I'm going ahead and fluffing the hair out y'all. That'S literally it to this hairstyle I kind of had to play with a little bit to get it to my liking, but yes, Q to freaking slow mo. Like look at this hair y'all no extra product so cute, big and fluffy, I think this hairstyle looks best with bigger hair, in my opinion, so I didn't want it to get. You know watered down or just any other product. I wanted to stay like fluffy kind of effortless, look and that's exactly what I got y'all, I'm just showing y'all. That is how it looks and it doesn't have to be perfect y'all. This was a quick hairstyle and the hair kind of covers the size anyway. So yeah, as long as the front is looking good you're good. But thank you so much for watching this. Video shout out to um yolisa hair once again and I will see y'all in the next one foreign
Comments
S. Sssss: Soooo pretty!!!!
Breanna Platt-mccreath: