How To: Black To Honey Blonde Hair Color | The Hare Life Official
- Posted on 06 February, 2020
- HD Lace Wig
- By Anonymous
⇣⇣⇣⇣⇣
#beautybasics #honeyblonde #bleachingblackhairblonde
_______________________
Connect With Me ⇣
Instagram ⇢ @theharelife / @theharelifeofficial
Twitter ⇢@theharelife
Facebook ⇢ The Hare Life
W a t c h M o r e ⇣
- How to : Double Tracks on Sewing Machine
https://www.youtube.com/watch?v=_n9Wpo...
-SLEEK High Ponytail On Natural Hair (NO Bobby Pins,NO Sewing,NO Glue)
https://www.youtube.com/watch?v=YaHjhx...
-From Dark Red to Bright Red | Color Fix
https://www.youtube.com/watch?v=Y0RfXO...
P r o d u c t s U s e d ⇣
- The Hare Life Official 18" Virgin Chinese HD Lace 5x5 Closure
- Wella Charm Bleach https://go.magik.ly/ml/u1tk/
-30,40, 20,10 Developer https://go.magik.ly/ml/u1ti/
-Wella Color Charm Gel Color (9GN Sand Blonde & 10GV Honey Blonde) https://go.magik.ly/ml/u1th/
-Ion Brillance Dark Intense Blonde (6NN) https://go.magik.ly/ml/u1tf/
-Ion Color Solutions (purple shampoo) https://go.magik.ly/ml/u1td/
-Got2b Freeze Spray
BUSINESS INQUIRES ONLY ⇣
FTC | Some Links provided are affiliate links. which mean if you make a purchase through the link I will receive a small commission. Thank you for your support : )
**** I DON'T OWN ANY RIGHTS TO THE MUSIC IN THIS VIDEO****
Hi Cap Migos Type beat https://www.youtube.com/watch?v=S4AEld...
THANKS FOR WATCHING XOXO-SHAYNE
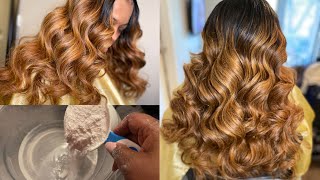
What'S up y'all welcome back to my channel if you're new to my channel, hey girl, hey, make sure to subscribe button and turn on the notification bill and if you are not already makes you go, follow me on Instagram and Twitter, at the hair life and the Hair life official, so, as you guys can see from the title, I will be showing you how I got this bang in Milan color with the customized roots. This was a wig for my client yeah. I hope you guys enjoy this. Let me know if you want to see more wigs, that I do for my clients and I would definitely get that poppin VR, so we don't get right into it. Ok, so the closure is for my hair company. It is my 5 by 5 HD lace and my client provided her own bundles, so I'm going to be bleaching the hair with Wella bleach and some 40 volume developer. You already know the drill, if you have watched my videos before so I'm just applying that bleach. All over the bundles and ideality sit on this side for a minute, so we can start to process before I flicked it over y'all know I love good dimension. I don't like flat hair colors so yeah. That is what I did and you guys are gon na. Just see me apply the bleach generously. You want to make sure that you get every single strand, so you don't have any patches and if you would like to send your bundles in or anything or a purchase mundos for me, you guys know you can contact me on instagram at the hairlike official or You can email me at the hair life official at gmail.com or leave all the information down below y'all know I make BOM wigs under custom color. All of that says. So if you need me to get you together, you know what, if I mean so, I'm only going to be bleaching one bundle and then the closure. That is how my client wanted it, as you guys could see in the beginning, like the bottom of the wig was still the natural color. That is how she wanted. She just wanted to top blonde, so I'm bleaching her top bundle and I'm gon na be bleaching. My HD lace, it was an 18 inch HD. Ladies body wave closure. Do y'all see like do. Y'All see disclosure first of all, with lace, turning release and y'all see the quality. This is my Chinese virgin hair. You guys, I am so excited to show you guys. I'Ve showed you guys my Indonesian here before, but yes, this is my Chinese virgin hair and I cannot wait to show you guys. So the only look out for that video, but you guys are gon na see how fast the bleach is like the quality is amazing. Okay, so I'm just gon na take my Wella bleach, wait some for the volume developer and I'm gon na apply that all over my closure and initially my client did not want roots. But after like I bleached it like, I was you guys would see like the process. I did to bleach the closure cuz, I'm gon na put it up on my canvas head just to get in there better. But after doing that, I was just like you know what I don't really like. I didn't think that it would look good with no roots, especially since the bottom was that natural color. So I let her know like you know. This is what I feel is best cuz. You know we want you to slay, so she agreed and yeah right here. You guys will see me like doing the process without I didn't want to get the bleach on the nuts, because I still did need to bleach a nice, but I didn't once you just have bleach just sitting on the nuts like that, while the hair process, so With that being said, I did go back and do custom roots, but, like I said initially, if had I known that we were gon na, do roots you're gon na just take some bleach with 20 volume developer and sit there on the roots, and it wouldn't be, As dark, it would give you like lift to a nice brown shade. So that is what I did. I let the hair process for about 45 to 50 minutes and then my closure. I let it process for 30 minutes y'all and they got that break like y'all. See that that was after 30 minutes, I'm telling y'all my hair is lit. Like I said, if you need to purchase, I got you. You know where to find me. Okay, so after the hair process, I did wash it out with the iron solution. The color solution. Shampoo, it's a purple shampoo. I prefer it over summer lights. That'S just my preference and yeah y'all can see that good dimension, so I did let it air dry and we're gon na go over with some weller color charm. This is their like gel color, and I like this, a lot better than toner, so I'm using ng 9ng Sam blonde and 10g v honey blonde, and I did do like half and half of each color. I honestly prefer using a color over a toner. I feel like it's more accurate, that's just my opinion, so yeah. If you guys wan na, follow this, you know you can do that. So I'm doing half and half with um would I use thirty-one developer. I think I use 30 volume developer. It was like a clear, yeah, clear developer. It'S the same thing as cream is just clear and more liquidy, so yeah I'm just going to go ahead and apply this all over. Like do, y'all see how light that closure is from 30 minutes. Like I'm, listen. I'M sorry that I keep talking about it, but it's just it makes me happy like it's mom, so I'm just gon na apply that all over the closure and all over the bundle and I'm gon na let that process. I believe I let it sit for about 30, like 35 minutes, let it sit and then I did wash it out again and then we are going to go into doing the roots. I did go ahead and bleach the knots while the color was processing so yeah. It was definitely around like 35 minutes that I let it process and you guys are gon na see me rinse - that bleach off and yeah I'm gon na go ahead and take the iron color solution shampoo, again and tone the knots you know. I really love this shampoo. I will make sure I'll link it down below and here it is so you guys can see it if you want to go purchase it. You know exactly what it looks like so yeah. I let that sit on the knots for about 15-20 minutes. That'S about it. I don't leave it on there any longer than that and yeah. This is what the knots look like, like listen, I'm telling y'all that looks like scalp. Tell me that that does not look like Scout. I just was not feeling the no root. Look. It just was not hidden for me. So yeah we're gon na go ahead and do the roots. I did go ahead and like freeze my knives with the guard to be free spray, I sprayed it all over the knots very generously and I think my blow-dryer and our blue a dryer so that the color will not stain. Didn'T arts like that is the worst. When you stay in a knife after you already bleached it no ma'am, so I'm gon na be taking the iron brilliance, dark, intense blind six and in for the root color, and this is honestly like the perfect root color. If you do need to go back and do roots instead of you know just leaving the roots as is or anything like that, so I did take some bleach and sometimes volume developer, because I want it like that front piece. A little bit lighter and yeah. You kind of can tell in the video at the end you guys will see you can kind of see it, but not really so yeah. I kind of could have skipped out on this step, so I did do that and I fold it up folded it up. The foil silica process, while I was applying the root color, so I'm gon na mix up, I did a little bit of mixture and both sides. One side are mixed with 20, the other side I did with 10. Now I did that to basically even out all of the roots, because you guys can see some of the closure has darker roots than others. So on the parts that were dark on the roots, I use the mixture with a 20 volume, so it can lift a little bit and then the parts that didn't have any root color on it at all. I use the mixture with the 10 volume so that piece on the front, you guys see like I kind of put it on there and I am gon na blend it in so there's no line of demarcation because that's not cute, so I just went through and Parted with my rat tail comb apply the mixture, whichever mixture was needed for that section, and I did that all over and I let it process for about 20 minutes. That'S it because the longer you let it process the darker, it will get, and I didn't want it too dark. So I did it for like 20 minutes. This is what the color looks like after processing for about 20 minutes and yeah. Like I said it came out perfect, so this is what the color the roots like you guys. I love this color. I definitely want to do this again like all over and I leave like the bottom dark. I want to do this blonde all over. I think that it'd be really really pretty and maybe ask some little lights in I'm. Just gon na show you guys this scalp itch. Okay, still scoping on them did not stay in the knots. So, yes, if you guys were wondering that is how you do it and look at that laces. Look at that! Hd lace! Yes, ma'am! Alright, listen! I love it. So this is what it looks like. After being air dried, I did motivate some Nairobi and then boom. I curled it. I didn't want to make this video too long, so I didn't show how her do, but I did long curly if you guys want to see just let me know I want curled it, and then I took a wide tooth comb and just to comb the curls Out, as you got some see right here and yeah, I did add a few layers like a few face, firming layers and the front so yeah. If you guys want to see how I make my wigs click the eye in the corner, I do have a class online class coming up more in depth in detail of how I make my wigs on the sewing machine. So follow me at the hair, like official, for all the good info, so this is a final look. I hope you guys enjoyed this video. Let me know down below how y'all feel about this color and I'll see you in my next one bye,

Comments
Terri Holloway: You Are Very Passionate About Your Craft & It Shows Sooooo Amazing
GOD Gotcha Gurl: GURL you are BANGIN with these wigs! Gorgeous!
June Medford: Do you add light blonde higights to wigs if they are sent to you?
keshia martin: Boss moves Sweetie!!! I see YOU!!!! :)