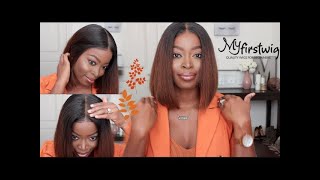
From Black To Honey Blonde Ombre! Perfect Fall Hair Color &Heatless Wavy Hair! Luhair Fake Scalp
- Posted on 10 October, 2019
- HD Lace Wig
- By Anonymous
Luhair Fake Scalp Wig
Use coupon "Ojai" for 10% off.
Direct link to the unit:
https://www.luhair.com/nikki-glueless-...
Nikki - Glueless Invisible Fake Scalp Brazilian Lace Front Wig LBS06
Wig Name: Nikki
Hair Length: 20 inches
Hair Density: 150%
Hair Texture: Body Wave
Hair Color: Natural Color
Cap Size: M
Cap Construction:13x6 Lace Front Wig
Luhair website: www.luhair.com
Stay Connected With Luhair
~Instagram:@luhairwig
~Facebook: https://facebook.com/luhairwig/
Hey loves! ♥ Become a Beige-ian by SUBSCRIBING here ▼
https://www.youtube.com/user/Mahoghany...
NEW VIDEOS POSTED EVERY WEEK!
TURN ON POST NOTIFICATIONS
**I do not own the rights to any of the background music being played in this video. The background music is for entertainment purposes only. Here's the music playlist, check out the amazing Artists below ▼
1.) DVNNYBEATS - Balenciaga - https://thmatc.co/?l=DAA5437E
2.) Ryan Little - flew da coupe. - https://thmatc.co/?l=37E30CB
3.) Ninjoi. - Relax - https://thmatc.co/?l=C28BFF2E
4.) Ryan Little - Take It Easy - https://thmatc.co/?l=5B804D53
5.) GoodNight the Satellite - Supernova - https://thmatc.co/?l=DD3D6C04
Thanks for Watching!
Contact me: ▼
https://beigemedia.wixsite.com/beigeoj...
L E T S B E F R I E N D S: ▼
INSTAGRAM: BEIGE OJAI
TWITTER: BEIGE OJAI
FACEBOOK: BEIGE OJAI
SNAPCHAT: BEIGE OJAI
BEIGE OJAI
P.O. BOX 520
LANHAM, MARYLAND 20703
#FallHairColor#HoneyBlondeOmbre#MeltThatLace##fakescalpwig#mostnaturallookingwig#meltthatlacesis#laceinstall#tipsandsecretslacemelt#HDlace#mostnaturalwigever
Hey guys welcome back to my channel. My name is beige. If you are new here, welcome, don't forget to give this video a huge thumbs up and subscribe down below. If you have now already, today's video will be a tutorial on this wig that was sent to me from Liu hair I'll, have all of their information, promo codes and direct links down below in the description box. So don't forget to check down below for more information. So today, we'll be working with a thirteen by six lace: frontal wig in the texture body wave. I did get this wig in 20 inches and it does come with a fake scalp. This weight comes with three combs, an adjustable strap and a detachable elastic band. Okay, so I'm gon na start off by bleaching this hair first, I'm gon na grab an empty mixing bowl. I'M going to pour my 20 volume cream developer into the mixing bowl and then I'm going to add a few scoops of that BW powder Lightner bleach into the cream developer, and then I'm going to begin to stir it using my whisk and then I'm going to Apply it to the wig, so I let the bleach process for about 25 minutes and here are the results from bleaching the hair. I think that this color is so beautiful. I was thinking about putting a rinse on top of it. Maybe Diane get like a burgundy color, but I was so in love with the color that the bleach lifted the hair. To that I didn't even want to alter the hair color in any way, so I'm just gon na leave it as it is. It kind of gives me highlights and lowlights within the wig, because the hair did lift in different sections to different levels. So I love love, love the effect of that and I did end up doing an ombre. So the roots are dark and it is like a golden golden blondish color. Okay, so the hairline did come pre plucked, but, as you can see, does have like a curve where the hairline is and my own natural hairline doesn't have that curve. So I would have to either add baby hairs where the two curves are, or I would have to part it and then cut it for a more circular shape. But before we get to that part, I do want to plug some knots from the hairline because I do feel like it could look a little bit more natural, so I'm gon na do my zigzag method to plug the hairline. If you want a full tutorial, I do have that posted already I'll. Have that link somewhere on the screen or down below in the description box, but we're going to basically pluck some more hairs from the hairline. But we're now going to pluck too much because this wig does come with a fake scalp and if you pluck too much, then you're gon na be able to see that fake scalp. So I'm just going to pluck and then spray some water and brush it. Just to check my work and we're going to do that to the entire frontal portion of this way. Okay, so now I'm starting to see that fake scalp show through the hairs, which means that I did I'm on the verge of plucking too much so we're just gon na stop right there and we're going to continue with the rest. Okay. So, as you can see, the fake scalp doesn't come all the way to the edge of the wig, and we need that to be the same complexion and we need it to match flawlessly with my skin color. So I'm gon na have to go ahead and tent. The lace and the fake scalp to be one uniformed color and one uniform color that's going to match my skin tone. So I'm just going to take this custom lace tent and I am going to just basically tip the lace in the fake Scout. Moving on to the hairline, I'm just going to custom cut this way to be my hairline Shape and I'm using a razor blade to do that, and some food plastic wrap after I do that we'll be ready for the next step. I do want to show you guys how the front so is looking. This is after I applied that lace tint to it. The fake scalp just takes this week to a whole nother level. The fake scalp makes it look so so so good and so so so natural. I am really obsessed with a fake style on this unit, so I've been wearing like a lot of wavy hairstyles and I do have a waiver but times where I'm in a rush or if I just don't feel like waving my hair with my curling iron. I have been just doing large braids and getting that wavy effect from the braids, so I'm gon na show you guys how I do that right now, it's the easiest hairstyle you will probably ever do and the results are so beautiful. Now the results do vary depending on how big the braids are and whether or not you're, using like a flexi rod with the braids or some type of rod at the ends similar to your own natural hair. You can get different types of results, so keep that in mind. I did do larger braids and then the back had smaller braids. So it was different braid patterns in this wig, but I'm just going to do four braids. The two at the top are gon na. Be more of a cornrow and the two in the back are just gon na be individual braids, so I'm basically just going to detangle the hair. I am spraying the hair with water, I'm also using mousse and I'm using this s curl product and that's basically just to allow the hair to have some type of product in it, so that it can form that pattern of the braid and just braid it. And then allow the braids to set like when I'm doing this hairstyle typically I'll. Do it like two hours before I have to be at a club or a party or an event, and by the time that I do my makeup and get to the actual event. In my car, I'll, usually like unloosen, the braids and they're, so beautiful, the hair is a little bit damp typically, but the pattern of that braid has stayed in the hair. So it's such an easy, quick hairstyle to do so. Anywho, I'm just going to do that and then I'll come right back for this particular wig. I did allow the braids to set overnight, and here are the results from and loosening the braids the next day. You want to make sure that you're not getting that much frizz because of obviously the more you separate the braids, so the bigger the hair will be so I'm just going to take my time and try to unravel it as neatly as possible, and then I'm gon Na spray, like some hair serum in the hair, just so that it can have like some shine and Sheen to it without being too greasy looking - and I was inspired by this hairstyle from the eighties - you know that flip over a method that they used to do Back then, with the wavy hair, I thought that was so so so so so cute and I was also inspired from the 80s to do like a bright neon, pink eye shadow, look which I was obsessed with. So the whole look came out to give me like rebel from the 80s type of look hashtag 1980s comment down below which decade was your favorite cuz? I'Ve done so many different looks from every decade, but I've never done one from the 80s. So this video was super exciting for me, so anywho. This is how the style looks. I am just going to put it on my head using got to be in the black tube as well as got to be in the yellow, free spray bottle, and then I'll show you guys. The final look, and here is the final look. Thank you so much for watching. If you have any questions, don't forget to leave them down below in the comment section check down below for more information about this company and for the direct link, and I can't wait to see you all in my next video bye, guys Bezos, I yeah that's. My is Bezos
Comments
Beige Ojai: **THE CUSTOMIZED WIG WORN IN THIS VIDEO IS FOR SALE, EMAIL IF INTERESTED: [email protected]
Nya .m: You always kill every look, so inspiring
Ra'Shone Lewis: You are so good at what you do. Thank you for being an example that we ALL can look up to!
Model C: Beautiful Beige you’re so talented
edwina crenshaw: Haha girl,the eighties was my haw day,class of 84. Beautiful, I love the color.
Betting On Becca: come through with the fall inspo
j6282: Wow you’re a gorgeous lady
Kimberly Kyles: Ok ❤️ waves o this unit an color for fall season you did Tht HELLO ( she’s ready) keep bringing tha GOOD GOOD. THX
minime diamond: always coming thur
Mysedi M: Thank you!! But that outfit is too bomb tho, what are the details?
Lana Latha: Nice look
NOSIMO: When are you having a giveaway on this wig?
nayah: Have you ever thought about being a model
Kimberly Kyles: Anytime
RissaRozay_: Beyonce vibes