Best Preplucked Hd Frontal Lace Waterwave Wig Install | Luvme Hair | Very *Detailed*
- Posted on 11 June, 2021
- HD Lace Wig
- By Anonymous
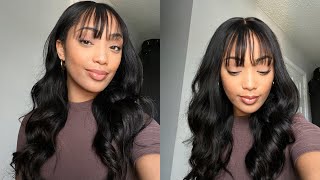
Hello LOVES todays wig was sent to me from LuvMe Hair to review and show & tell this is there 18 inches 4X4 Closure lace wig.
#LUVMEHAIR #LUVMEHAIRREVIEW
~~~~~~~~~~~~~~~~~~~~~~~~~~~~~~~~~~
C O N N E C T W I T H M E
Instagram: @ohhthatsmariam
twitter: @ohthatsmariam
email: [email protected]
~~~~~~~~~~~~~~~~~~~~~~~~~~~~~~~~~~
C O U P O N Code : MARIAM20
HAIR INFO:
Direct Link for the wig: https://bit.ly/2RwvhQ4
Length: 20 inches
Luvme Undetectable Lace Wigs: https://bit.ly/3ish5Cq
LuvmeHair Website: https://bit.ly/3x2DwCC
Instagram: http://www.instagram.com/luvmehair/
Facebook: http://www.facebook.com/luvmehair/
YouTube: http://bit.ly/2OCjZrr
Promo code: MARIAM20
Welcome back to another video, it's your girl maryam c and in today's video i'll, be showing y'all how i installed this lovely unit sent to me by love me hair, so to find out how i got this flawless, install just stay tuned and keep on watching. So in this video i'm going to be showing you guys how i tip my lace to match my complexion. I'M also going to be showing you guys how i melt down my laces to give it that scalp finish and, lastly, we're going to tap into these baby hairs. So let's get started so this unit was sent to me by love me hair and thank you guys. So much for sponsoring this video, i love collabing with them. This is just everything that comes in the box when you receive the package and probably stuff that i won't use, but it's very nice for the aesthetic. So they sent me over this beautiful water wave unit. In 20 inches - and this is an undetectable hd - 13x4 frontal, full lace, wig and y'all. If i do say so myself, this lace is super hd and very beginner friendly. They did all the hard work, so it already comes pre-plugged and installed ready. So i went ahead and bleached the knots behind the scenes and this wig does come with an elastic band and three comb attachments. So it's very secure now, as you can see here, they plug this lace for perfections. So the only thing that we have to do here is tint the lace with a shade that is the exact same color as you or darker. So i'm using my maybelline fit me powder in the shade 360 color mocha, and i find that powders are very lightweight compared to using creams or liquids which can be very runny. So what you see me doing here is just applying the powder all over the lace. Ear to ear, and just going in with my handy dandy, got to be spray to just set it all in so, as you can see, my holy grail product was running out, so let's make sure that we're keeping that got to be in stock. So now we're going to go ahead and just make a part on the wig and y'all. It'S always so hard for me to decide between a middle and a side like mine is usually middle, but sometimes i want to do a side like if you know you know but go ahead and leave a comment down below and which one is your go-to. So here i'm just using my hot comb to get my wig as flat as possible, and then i'm going to go in with this leave-in conditioner, nothing really special about it. It just smells really good to just get those waves flowing, so this part is optional, because you're most likely gon na, have to do it again at the end. But i chose to just go ahead and add mousse to define the waves and just set everything in place. This is what the wig looks like on and please remember, to adjust the clips in the elastic band to your head shape before putting it on, like i stated earlier, this lace lives up to the name and is very undetectable. So i just know this install is about to be flawless so first things: first, we're just going to get our hair out of our face and then we're going to cut off these ear tabs, and this part is pretty self-explanatory. So just follow and cut around your ears, but don't cut your ears please. So now we're going to take a makeup wipe to just clean up the area and if you don't have on any makeup, please make sure that you're cleaning the area in which you'll be applying the glue to get rid of any oil. I chose not to do the bald cap method because it just takes up too much time and to all my big forehead girls y'all. We really have the upper hand when it comes to these front tools, because you can just simply apply the frontal right onto your skin without damaging your edges. So i'm using my holy grail, bold hold and i love this lace glue. It has never steered me wrong and pretty much always gives me a flawless, install and also dries really fast. So when applying i'm literally going to follow the line of demarcation, where i clean up the makeup or just eyeball it, if you don't have on makeup, i put on about three to four layers, just depending on where i'm going and in between each layer. I let it dry clear: let it dry clear and do not touch or blow dry it, while it's drying so the moment that the last layer dries clear, we're going to lay that lace down. This is the most important part y'all, so pay attention. You want to take your time while laying it down and for my beginners if all else fails place the lace in front of the glue, rather than behind that way, you can add glue to the lifting parts instead of cleaning up the glue i'll show you guys Later on, what i'm talking about so the elastic band method is another important part. This is how we melt that lace and get that flawless. Scalp finish so we're just going to tie that elastic band as tight as you can without a headache and let it sit for 10 minutes and the longer you wait, the better the melt. So don't rush so girl. It'S been 10 minutes and since this lace is melted, so now it's time to cut that lace, i started off using my shears to cut it in the middle and then we're going to take our razor to cut each side. The razor gives it that jagged hairline, which helps the lace look even more undetectable, while using shears gives it that sharp and very unnatural look so make sure you're using a very sharp razor to cut your lace. So now we're going to apply glue to any parts of the lace that you see lifting like. I stated earlier and you're going to take your time and you're going to use a very light hand as a little goes a long way in this process. So, as you can see, some of my sides were lifting, so i'm just going to apply the glue right to that section and then take my rat tail comb to just press it down into my skin so on to the best part which really makes or breaks The look, in my opinion, the baby hairs, so for my baby hairs, i alternate between edge booster and got to be styling gel. These both give me a great hold and don't move as i go through the day when applying i use a little because it really does go a long way, and i also use my fingers with a rat tail comb to create a swooping motion. I pretty much just get really creative and just eyeball everything. My baby hairs, never look the exact same on each side, but i like that because it gives a more natural illusion. I really love this swoop thing that i've been seeing a lot of people do lately, because the dramatics like it's just giving everything it needs to give and i'm here for the dramatic baby hairs so yeah. I just went back in and just added that extra swoop going the opposite way, so we're just going to go in with that elastic band again and just melt everything all together, y'all, look how gorgeous this install came out and i just want to say i did That, if there's one thing i did do your girl did that. So this video is a wrap and we can honestly just end it right here, but we're not of course, so you should definitely stay tuned to see how i styled this hair and, of course, your girl couldn't decide on a part and switched up last minute to A side part, but i am very happy with that decision, because the middle just wasn't given what it was supposed to give. I don't know about you guys, but i was given more like tina turner, and that is not what i was going for. So i definitely switched over to his side and the side was just doing it for me. It was giving me that summer, beach, vibe so yeah, you guys should stay tuned and just keep on watching me style this hair, and that's it it's a wrap. We'Re all done this hair is definitely summer approved y'all. Let me know down below how you think i did and please don't forget to like comment and subscribe, so you can be notified every time. Your girl drops a new upload and also guys don't forget to use my code merriam20 for money off thanks. So much for watching loves until next time. You
Comments
Shae Games: Thank you! I’m ordering this wig and wanted to install it myself versus spending $100 for someone to do the exact same! You did that
Toya S.: This looks nice, you did a awesome job! Thanks for the tutorial!
Tracey Weh: This was soo flawless!
Tashika Sturkey: That looks so pretty
That’s so missy: Amazing ! Keep up the good work
Karen Fentress: Side part for me love the video
caribbeangem89: I just ordered the same wig but my curls are still a bit tight, how do I loosen up the curl pattern?
Dawn luvSAJ: Beautifully styled .. looks nice on you, but how do You bleach the knots ? ♀️♀️
Candy Lipz: The hair I purchased, looks nothing like this. Im not sure the hair they send to youtubers, is always what they send to the customer. But i can say out of four i purchased two are cute
Happy: I ordered mine but it's a slight different yours looks better.
Facts&Opinions: I didn’t get any of that stuff♀️