New Nuola Wigs Hd Lace Install - How To Get An Undetectable Hairline / Detailed Install
- Posted on 28 May, 2021
- HD Lace Wig
- By Anonymous
Hi everyone! Welcome back to my channel. The new Nuola Wigs HD lace frontal wigs are INSANE! If you missed my review for this one, make sure to watch it...
Mila Review - https://www.youtube.com/watch?v=27ht9e...
Wig details: "Lina" https://www.nuolawigs.com/product-page...
Length: 20"
Density: 180%
100% human hair, HD lace frontal
Products used:
- Bold Hold Lace Jelly
- Got2B Blasting Freeze Spray
- Rat Tail Comb
Thanks so much for watching! Please don't forget to subscribe xx
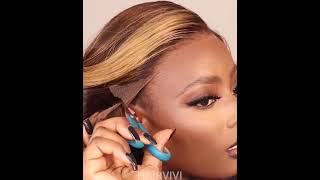
Hi everyone welcome back to my youtube channel. So in today's video i will be doing a nice wig application for you all. As you all know, i did get some new nuala wigs and i showed you their new hd lace, frontal wig. So today i will be showing you how to get such a seamless, seamless, install just from those wigs and the new laces amazing. If you want to see how i do that, make sure you keep watching. Ah, so, let's get straight into the video and first off, i'm going to introduce you to the amazing wig that i'm going to be popping on, isn't yet styled so she's looking a bit untamed. But this is one of my new units that i've just got from nuala. This unit is a custom, so it will be going on here website soon and we did do some shots when i went down in the water basically modeled in this wig as well. If you just screenshot me when i've got this on, you can just send her a message and ask for this wig. If you want in this wig, it will be going up on the website soon. So as soon as i know, the name of it then i'll pop that in the description for you, you know the mila wig, so the miele wig like how that's colored, but with as an amelia custom. So me emilia and amelia jammed together, basically brown color and it's got so much like ash, blondes and stuff running through. So when this is curled, oh, my god, the colors look insane. Today i am going to be installing the wig. So i did a recent review of nuala's new hd lace, frontal, wigs and i'm honestly so impressed. I feel like i just absolutely love them. This hd lace is just on another planet. I just need to show you this wig on and i'm gon na just pop. It on so, you can see what it looks like without gluing down, but i think for like the best sort of application, the most seamless application of it, then i definitely think gluing. It definitely helps. Obviously, it looks seamless without but personal preference gluing and installing it properly, and you literally you will not detect that lace and it's going to be so secure. Okay, so this is, without anything at all, you'll be able to see just how seamless it is remember. I said as well: this isn't like styled or anything, that's why it looks a little bit wild, but this is how seamless she is yeah. So this is the wig that we are going to be installing today and my ear holes and everything already cut um but yeah i like to use a mix of different products to install, and so i'm going to run through those products. First off i'm going to go in with the got to be blast and freeze spray, and i basically use this just to kind of get a bit of tackiness over the top of my head here and that really like locks in the the top bit. I bring it all over. You'Ll probably see me doing this all the time, but then i put the wig on while it's tacky, so we want to get it locked in straight away. Basically, i put quite a bit on as well so it's like just before it starts running and then dip my head straight in, and this is the part where you want to get it, where you're going to put it down. Basically, so get your ears comfy get your forehead right. What a thing at the minute for making my forehead really big, what it is, but i've just been really bad at, judging where i put it at the minute or while that's on it's literally just gon na lock in because it's nice and tight as well. I tightened the bands and everything so it's nice and secure, and it's literally just locking into that blast and free spray that we've just popped on, make sure my ears are comfy so that it's not sticking somewhere where it's not already like kind of comfy. What i like to do is i take down two little side. Parts like you only need a tiny amount right on the very end side, part right. The very bottom took the rest behind your ears. Then i'm just going to pop the rest of it back up into like a ponytail or a clip. Just so it's out of your face. I'Ve been loving at the minute is the boldhole lace jelly. This is basically like the got to be ultra glued like gel stuff, but it's not a shiny at all. That'S the one thing that puts me off with the got ta be. Is it's really really shiny, so you can just see shine on your forehead and stuff. Like that, but this really isn't it's so much much much better. It is for like a daily hold, and this is why i like it because majority of my wigs i never go days wearing them. I just like a daily hold, so this is your boil, so i like to apply using like a little tail comb. My tail combs are scruffy like they need a wash, but anyways you get the juice. I apply it to like the comb side right at the top. That'S quite a lot that i've got on there. Basically, gon na start with this top section here and just pop that all along that hair line well, underneath everywhere i've lifted you're gon na pop it down and then just place it over done that i kind of like comb the hairs through and back. This is basically going to control the hairs, get them the direction that i want. This is the time you're going to do baby hairs as well. If you want to it's kind of like using the excess that is on that brush to comb through as well. Just so we can get the direction of the hairs nice, so we can basically just get it get it exactly where we want it to be, and i really wanted to do this video, because the lace is obviously slightly different to nuala's previous ones and yeah. Just think hd list looks so good when it's sort of like installed like this. I'Ve done this on. One of my previous looks with, like the other blonde one that i got from them and it literally looked so seamless. I was like okay, i'm just gon na have to share this because it looks amazing like i was, i was blown ooh. I was blown away. It was literally the the best i've ever got a wig. I believe. Obviously, this will have a little bit of shine to it um, but when it dries down, it's definitely nowhere near as bad as what got to be is then, i'm literally going to take a nice good amount again. Do the exact same for the sides, but so i literally just lift it all up and then pop the glue everywhere that it's lifted? You don't want to try and go sort of past where the hairline finishes, if anything just go slightly before it, because you don't want kind of glue excess on your face. If you can help it, sometimes i do by mistake, but this is why we've got these side parts here so then you can kind of pull it down and push it down with those side parts they just help with controlling it. A little bit, i'm gon na need a little bit more because you can see there's like a little bit there, that hasn't quite been stuck yet. So what i do is i'm just going to take a little bit more glue and just pop it under that section, and that part is usually the part that i'll put like a baby hair on or something like that. That'S just my preference again popping that excess on top to comb through it all. So this section here kind of comes out a little bit. It'S kind of it's quite nice because it makes it look like an actual hairline, where it's not just fully rounded. Like this custom section to the hairline, which is really nice, sometimes it pulls up a little bit like this when you're doing it, but you've just got to keep being patient with it. Just keep trying to press it down combing the hairs through, i think, sometimes adding a baby hair on there does definitely help with this. I think this is probably the main reason why i do it um. It just gets the direction of the hair nice. It'S not going to pull that section up as much. You do want all of the hairs to kind of align when they get back here. So you see here, it looks a little bit messy. I'Ve got a few there, so you just keep combing until it's all. In line and kind of adding more product on top definitely helps with getting it seamless and getting those hairs. A bit more uniform and you've just got ta not be afraid to apply a little bit more product. If you need it and just keep going with it until you're, happy like until you're happy with the direction of the hairs and just with this, obviously the glue does dry down, but it doesn't dry down instantly like the freeze spray itself. So you've got a little bit more time to play around with it. Just obviously do it in sections. So that say, for example, if you put the whole glue on the whole way around then you're not gon na have time to like faff around with it and make sure it is perfect. So you want to do it in sections just like i have um just so then you've got more time to get everything, seamless, get everything perfect, um and yeah. Of course you can see, i've got them all uniform, all nice and let that dry now that top it's nearly dry, so that'll just show you how sort of quick or not quick, it does doesn't dry more on the end of that tail comb, you see, i Do use quite a lot as well. You want like a good dollop. Sometimes, if you kind of hold the front of this little section here, while you're combing, that back it'll obviously keep it forward so that it's not going to flick up as much and there we go. I feel like i've done that quite quickly. That side, it's just thinking there as well. As that i know a lot of people might think this has took some time. I could not take this long every morning to do, because i know it's obviously just a day hold um. You might need a little bit more time on a morning see if you're going to work just till you do get used to it and obviously i would say i'm quite quick at doing it now, just because i'm used to doing it. I know how the hairs fall, so it definitely is a game of sort of practice and things like that. But, alternatively, if you want to just do this on like special occasions where you want that seamless hold - and this is definitely how to do it and it's definitely personal preference, what you think um how you prefer to wear your wig, you might not prefer to wear It every single day and whereas some will sleep in it, they'll wear it every single day. Things like that. So if you wear the strong glue, you can always do the normal stick down and then just use this to get the rest of it seamless. So, like combing, the baby hairs back and getting your hairline really snatched, and then that will hold really well. You just might have to top up now and again. Basically, while this is drying as well, i just go around and make sure everything's tapped down. So, like there's this little section here, it starts to fray up a little bit. I don't know if you'll be able to see on the camera, but it's not as it's a little bit stubborn. Basically, so as it's drying, you just have to make sure you keep going in and pressing it down just so when it's really tacky, it's definitely going to stick down just have to keep an eye on it and keep doing that. But yeah i'm just going to keep an eye on on it, keep pressing it down as we're going and what i'm going to do is. I am going to just quickly style it off camera. So when i come back, you can see exactly sort of how i finish it all up and how i make sure the hairline and i'll basically show you the hairline, completed and there's one more step after this as well um once i have styled it so i'll, Be back in a second okay, so that is it now styled? I assumed she's out there, so you can see the wig properly in its full action. It will see all of those gorgeous colors. Now it's going to go onto the last step, basically um, of what i do to get it so so seamless, so it's obviously been drying down we're pretty much dry on there now as well. There'S slight sections like right on the edges that just want to curl up like they just don't want to play a game basically, so i take some more of my blast and freeze spray and spray it all across that hairline not a massively thick coat, but a Coat to cover it, you don't want it where it's going to be dripping down on your face, that's a little bit too much! Then i basically i'm going to take my tail comb again. Push that through. So we've got no thick bits on the hair and as that's drying, this dries a lot quicker by the way so you're, basically just gon na tap it through right on those edges as well, where potentially we've got a sticky up bit. You'Re, just gon na keep tapping away until it's fully down once that's fully dry. That'S you done! That is how easy it was to get it. Looking absolutely perfect, like i've said as well, don't be dishoned. If you can't do it really quick, it's definitely just a one that you're gon na have to practice on. Until you do get quicker and quicker the more you do it obviously the easier it does get as well. You can just see how seamless i've managed to get that, and i think some of my makeup is caught on the lace on certain sections, but other than that. Just look how seamless yeah, and that is literally what i do every single time to get it to look, really really seamless. It'S the best method. I'Ve found up to now remember as well, though, if you're wearing makeup to be careful because, like i've said i can't catch in certain places. I think mine has slightly if you do make that mistake. Baby hairs will cover that. So don't worry too much. Add a baby hair where potentially there's a line or something like that, and that will cover it, just fine for you, so it's just all about working with their baby hairs all the way forward. They can cover any parts on the hairline that you've potentially just messed up, but yeah. That is literally it that's how easy it is, i think, nawala's just next level when it comes to colors and things like that, like when i tried this on. I was like. Oh, my god, this is amazing. Amazing, yes, i'll link everything that i've used down below as soon as i get this wig name i'll pop that down below as well. For you all, if you want, you, can just send noah a picture of this one and she'll be able to help you out with this one. If you are wanting it any sooner than what i can tell you that it is but anyways everything will be down in the description box, all of the products that i have used if you do want to go and purchase any yeah thanks so much for watching. I hope you like, like the video, make sure you do, give it a thumbs up comment down below. Let me know what you think of this unit and also, please don't forget to subscribe to my channel. I would really appreciate if you hit that bell button as well. You won't miss any of my videos. I'Ll see you all next time, thanks so much for watching
Comments
Anne Meijs: Hey Danielle, I have been watching your video's for a while now and they've really helped me find out what I want in a wig. I love your in depth videos about wig application, but I would like to know how you handle taking the wig off when it's glued down and want to wear it the next day again. Because obviously you don't want to wash the wig every day, but also don't want layers and layers of old glue after a few days of wearing. Hope you can help me with this XXX
JS H: I just received my HD lace wig from Nuolawigs. I love it and thank you for making this video
Lady Luck: Hello beautiful Danielle, this wig looks great on you. Can you, please, make a video/tutorial how to do the eyebrows. Your eyebrows looks amazing, the best I have ever seen. I live in Las Vegas, USA,so I seen a lot of beautiful faces. Thanks a lot.
Karen Breathnach: Great video. Really helpful.., thank you lovely x
Haley Thames: Love!!! Thank you <3
Stop Jazz: can you make a video on how to wash the glue out? i think you've mentioned you don't wash the whole wig after each use. I cannot seem to master it and end up with gooey hair
Preeetttyy BlKqUEEN55: Would you recommend putting the wig tag inside of ur wig first or on the base of ur forehead?
Leslie Leslie: I’m a brunette, I might just get this exact wig.
Lauren Gallagher: What camera do you use? And editing software? I'm really interested in maybe starting my own channel talking about alopecia and makeup x
JezusChild: Beautiful you!
Shekh Heena: Yoy are so confident...i love u
JessiP: Can you write me what the exact name of this wig is? Can't find it on "Nuola Wig" ....
Brandy Amarillas: Is this the Lina wig? I just bought it.
Shekh Heena: What is the prise