Minimal Effort Easy To Install Glue-Less 4X4 Closure Water Wave Wig Ft Curlyme Hair
- Posted on 06 November, 2022
- HD Lace Wig
- By Anonymous
Hello my beautiful subscribers (and non subs) ☺️
Wig sales page - @CAwigss
Personal instagram- @holaa_caro
EMAIL- [email protected]
✔Pre-cut Lace Wig Link in the video:
https://curlyme.com/products/convenien...
☛CRAZY SALE Up to 65% OFF, Buy now pay later, 4 or 6 Interest-Free payments➤
https://curlyme.com/?utm_source=youtub...
☛Use my special Coupon: "Caroline" for all products extra 10% off !!!
Wig Name: Wear Go Glueless
Wig Cap Construction: 4x4 Clean 3D dome cap wig
Texture: Mongolian water wave
Length: 30 inch
Lace Type: Swiss HD Lace
Density: 180%
▬▬ Why Wear Go glueless wig ▬▬
✔ Pre-plucked Clean Hairline
✔ Pre-cut lace
✔ Real Invisible HD Lace
✔ 3D dome cap to fit different head sizes
✔ Piano Keys Elastic Band
✔ 5-min install wear and go
#gluelesswig #weargowig #curlymehair #wiginstall
Follow us on Instagram to win free hair: https://www.instagram.com/curlyme_com/...
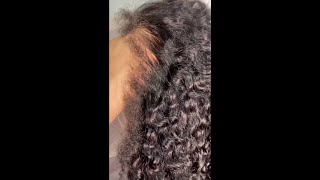
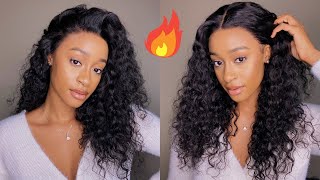
Hello, everyone welcome, or welcome back to my Channel, It's Your Girl, Caroline in today's video, I'm going to be installing this lovely unit and what makes it even more lovely it's a glueless. Yes, glueless wig, no product, nothing at all, just God and some gravity is holding it down. If you are interested in more details on this stay tuned and let's get into today's video all right, so the wig we're working with today is from curly knee hair company. They sent me their 30 inch water, wave closure, wig, 180 density. This wig comes with a pre-cut lace and pre-cut and a way for it to lay perfectly upon your skin and the lace melts in super easily. This wig also comes pre-plucked, so this hairline that you see in right there. That'S all good. I will say the knots are not bleached, so I went ahead and bleached the knots myself, but if you're a beginner and want to make this a very easy, simple install you don't have to bleach the knots do make sure you watch my how to install a Wig without bleaching your knots video on how to do that, but with that said, let's get into our install. So the first thing I am doing is tinting the lace for it to match my skin perfectly. I'M using my Maybelline Fit Me Foundation in the shade. Warm coconut and I'm just kind of brushing that into the lace, even though the lace is supposed to melt perfectly on your skin, I feel like you still might need a tint it honestly for it to really get that exact match effort to just look as seamless As possible just going ahead and putting on a wig cap just to help protect my braids from getting stuck in the clip, if you know I'm not a bald cap kind of girl, sometimes after wig cap, I just throw it on I'll. Just want to be cute. Today and put a wig cap on, but whenever I do wear a wig cap, I do like to make sure I'm pulling it all the way back. So it's not going to show under my wig. I just go ahead and adjust the elastic band inside the leg, and I just you know plop her on. I will note this. Wig doesn't have any Clips at all in it and I feel like for a glueless unit. It should have more Clips just to help you feel really secure, because look if I'm wearing this way, glueless a little cute elastic band is not going to cut it. I need more to make me feel very secure, but with that said, y'all see the lace like. I had not, I did not spray anything on it, it is laying the way it needs to lay I'm not gon na lie. I was a bit skeptic of how gluelessly it was going to lay on my head, but this doing a good job. It'S blending in and the pre-pucked hairline is not bad at all. So I feel like this is very good as a beginner to install but mind you, I did bleach knots, which I'm sure really helped give it that very scalped look. So next thing I did very simple: just went ahead and added some baby hairs to this. Look because I felt like it just needed some baby hairs for my baby hairs. You already know me, I like to keep this simple, but still a little dramatic, so going in a diagonal angle and just parting out enough hair. I did have to go ahead and tweeze the hair a little bit. I don't want it to be super thick and I'm just using my scissors to cut it down in a Diablo diagonal Jesus motion and with my super tiny mini flat iron from Amazon, giving it as tight as I can without burning my head curl, going in with Some mousse this is a Nairobi mousse it's in a different bottle, because I bought the really big one, so I'm just using an empty old mousse bottle for it to hold itself anyways. Now I was struggling a little bit when it came to sweeping this baby hairs, but that's just because, since the lace itself is not laid down as you're swooping, you might get some lifting and that's okay, you have to like really use your finger to hold the Lace down in areas to help you like swoop, but besides that it was very simple and easy, install a little bit too easy. Okay, once my baby hairs were done being swooped, I'm going in with my elastic band to hold down my lace because I'm about to brush down this hair and something needs to be holding this down as well as just to help. You know set the baby hairs in place and the elastic band also is going to help give that lace a more laid into your skin look without using any products here, I'm just brushing out the hair to kind of just brush out the original curl pattern that The wig comes with out of the box, and I like to do this because it just makes detangling and defining the curls a lot easier. So I just brush brush brush, so the hair gets nice and poofy as far as actually defining the curls, I'm literally just using water y'all. I know I said this all the time, but it's just water and I like to really just take my time in brushing the hair. Y'All know what I say: it's all about the technique when it comes to getting your curls to look really really pretty. When I say the technique, first, you got to make sure you're using lots of water like soaking, that hair up and then once you soak up the hair, you go in with your brush and really brush and scoop the curls till you see that ringlet form like Once the curls are clumping together, as you see right here, that's how I know that's the look I'm going for and of course, I like to go and scrunch the hair up to help the curls form even better, and once you get this Clump curl look leave It alone don't run your fingers through it, don't separate them. Let the hair dry like this, all by itself and later, when it's dry, you can, you know, go ahead and get the hair bigger. If you want to key is to leave it alone and not bring your hands through it, and I just go ahead and do this all over the head. Hair hasn't fully brushed through and defined and, like I was saying earlier, leave it in this state. Let it air dry it's going to come back to y'all once the hair is fully dried. The hair is fully dried. Take out this little nasty bear. I got a headache, wow and watch y'all. Look at this! What that's crazy! That'S crazy! That'S what we'd like to see, I think I would say to be honest. Is it definitely, I feel like I would add some clips to it, because it's it feels secure-ish, but not as secure as I would like it to feel like. If you wear this out in the summer just know you might go from a middle to a side. Part real, quick, real fast now, I'm just gon na um separate these curls and shape the hair. The way I want it and when you're separating curls, don't I don't like to like I like to be gentle as possible, not separate it all the way out to the end, because I still want the ends to be defined. Let me cut layers in this. Yes, they're too long, not again, okay, now to kind of just fix all the little hairs I've made fluffy by doing all that, I'm going in with some mousse to just re Vamp, the curls back, can't forget the hot comb to slow down. Oh, this could be hard man and the hair is a bit wet, so it was really hot. My bad - and here we are, with the finished, look by the bing bada boom. This was such a simple, straightforward, install like literally just out of the box. I mean I did bleach the knots, but y'all know what I mean they already plucked it for you. Lace is already cut as far as reviewing the quality of the hair. I'M gon na have that down pinned in the comment section, so I can have a couple of days, maybe weeks, depending to probably wear the hair, to give my actual thoughts on the hair quality. As far as the lace and all the little extra features, it has I'm here for 100, but this is really it guys. Thank you so much for watching. Thank you for making it to the end love. You appreciate you for that and if you enjoyed this video, give me a nice little thumbs up, even if you hated it still thumbs up because support your blog businesses. Dang bro, but, like always make sure you like comment and subscribe, and peace out Girl Scouts, good, bye,

Comments
CurlyMe Hair: Thank you so much for slaying our wear go pre-cut lace glueless wig!
Lola Pearl: Yesss I’ve been looking for a closure water wave thanks girl. Looking gorgeous like always ❤️
Simone Nicole: curly hair queen! it always comes out looking greatt
Nina Negedu: The install is bussing. Love glueless wigs❤
iAmTeshaMarie _: Yeah this lace is unclockable
bre thee chemist: i’ve been looking at this wig for over a week now. this might be a sign
Jess J.: At this rate I will have more wigs than anything after watching your videos because baby, I'm buying all
IG: BASICALLYBASICNAILS: It’s the consistency for me
Abby Márie: girl you ate that shit down wtf… my turn to learn middle parts be so hard for me like damn but ima do what you did period & keep them videos coming PURR
Honey: You should try a shein wig! I got one from shein that looks JUST like this curl pattern and all. The lace is good too the knots bleach fast though like under 10mins fast and it comes pre plucked just like the one here. I paid $130 for it 30 inches
Evelyn Cooper: Do you prefer the water wave or deep wave wig?
James: Sooo cute girl!
Tashanda Myers: