Sensationnel Butta Lace Unit 5 Unboxing| How To Do A Glueless Wig Install
- Posted on 08 May, 2021
- HD Lace Wig
- By Anonymous
HEY DOPE CREW ,
Thanks for watching. Don’t forget to LIKE , COMMENT, & SUBSCRIBE
Link to wig: https://www.samsbeauty.com/service/Sen...
Link to Caammm Video: https://youtu.be/7Hj4088bWN4
Let’s connect:
IG: _OhSoDope_
https://www.instagram.com/_ohsodope_/
Twitter:
https://mobile.twitter.com/_Ohsodope_
Snapchat: Tfreakyyyy
:
Age: 24
Camera: iPhone 11 Pro Max
Editing Software: iMovie
Location: Chicago
Intro By: Dora Kristin (Her Page is Linked below )
⤵️⤵️⤵️⤵️⤵️⤵️⤵️⤵️⤵️⤵️⤵️⤵️⤵️⤵️⤵️⤵️
https://www.facebook.com/ada.emmanuel....
About me..... ❤️
My name is Kyrah Crosswire! I am an aspiring social media influencer, model, and brand ambassador! I started here on YouTube because I love to create content! I love hair , makeup , fashion, and anything creative ! Subscribe and join me on my journey ❤️
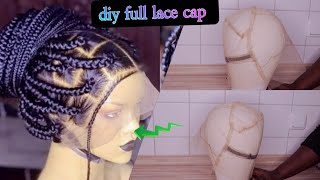
So what is up everybody? It'S also dope, i'm back for another video and in today's video i'm going to be showing you guys how i installed this butter lace unit 5 in the color 1b. Since i got this wig from sam's beauty um and it was 45 bucks, um i've seen a couple of videos of this on youtube and i wanted to go ahead and give it a try and i haven't done a wig video in a while for you guys. So i figured this would be the perfect way to jump back in the wig game. Since i have not done a video in a long time, don't worry y'all more wig. Videos are coming, i'm getting prepared and whatnot, so we are back in business. So without further ado, i'm going to just jump straight into the video remember if you're new here, please make sure you hit that like button, please make sure you hit that subscribe button and turn on your bell notifications. So you know every time i post and if you are a returning subscriber and a member of dope crew. Currently, then i thank you for coming back to join me. Make sure you bring all your friends with you, your aunties, your uncles, your mama's, your sisters, your cousins, your brothers, your daddies, come subscribe and be a part of the dope cruises. It'S i told y'all the few and the pro okay. So without further ado, i'm going to jump straight into this video. It'S going to be a voice over i'm going to walk you guys through how i apply my wigs and how this went for me, it was super easy to install. I love the way. This lace looks, i did some like messy baby hairs, um, so yeah. I hope you guys enjoyed this video. So this is the hd lace uh unit from sensational it's the butter lace unit. Five. I picked this up at sam's beauty. It was only 45 bucks. I got it in the color 1b, which is like a natural brown black ish type color. This is the construction of the wig. You don't have much parting space from front to back, but you do have a full hairline, pretty much uh from ear to ear and you have a few combs inside the wig as well. So here i have on my little wig cap and y'all. See me just playing around with the wig, showing you guys, the hairline and the lace actually looks pretty pretty good. So i'm excited about this. So let's just see how it goes. I'M going to take this fit me powder. I believe it's in the color 350 coconut and i'm going to just use a real, no ecotools brush to just go ahead and swipe that inside of that lace, just to make it a little darker to match my skin and as you can see, it looks even Better already, yes, i love it, so i'm going to dip that back in there and go ahead and completely cover the front of my wig cap just to make everything match and flow seamlessly from the lace to the cap. Now you just see me pulling the wig down well the wig cap down and i'm going to put the wig on just so. I can see how far i need to bring my wig cap down before i go ahead and secure it, and then i'm just going ahead and doing the ball cap method by cutting these little slits on the side of my ears. You guys know the drill and i'm taking that volume maniac by got to be blues and i'm just going ahead and spraying that once that's dry, i'm going to take my bold hold glue and put a thin layer, then thin thin, remember. Otherwise, it will not dry clear and it will not dry fast, i'm taking this little edge brush with the spatula on the end and i'm just going ahead and smoothing that out to make it easier for the drying process. Once i go ahead and hit this with the blow dryer again, i have a bunch of small dots but literally y'all, it's so thin that it dries so quickly. As you can see the cap, starting to turn back to its natural color, and then i went ahead again with another little spritz and went back over it with my conair blow dryer. Now you see me taking a pair of scissors to cut the middle of the cap and then i'm going to go down each side using this eyebrow razor. These are better to use because, they're more precise, you can get a better, realistic, looking cut when you're cutting your lace, especially so this part doesn't have to be perfect. I'M just taking these scissors to cut off most of what didn't glue down and then just to go back over it to fix that. We'Re going to use this bold hold again to lay down those stray edges, honey, that's trying to run away and then i'm going to smooth them out with that same baby, hair brush with the spatula and then go over it after so now that i have the Wig on it's time to go ahead and adjust it, so it's going to sit exactly where i want it so before i do any gluing or anything at all, i just want to try it on and line it up and, ladies, don't be afraid to try your Wigs on and line them up first and see what is given and where you need to lay things before you actually do it, because you will save yourself so much time, hassle and effort, because then you'll have to rip the whole thing up and start over again. So, just you know don't be afraid to try it on first to see where you need to lay it and yeah you'll be good. So today i'm doing a glueless install, so i will not be using any glue to actually physically adhere the wig. That was just for the wig cap portion, so i'm just lining it up to see where i need to start. You know laying it due to the cap being under there. I don't want you to be able to see that. So that's why you see me lining it up kind of over the size trying to cover those points of demarcation within the construction of this little wig cap. I just made on my head, so you just see me basically using that volume maniac to go ahead and tack down the wig, since this is a glues install, and here you just see me snipping off a piece of extra cap. Ladies, if you find that you need to take off some of the cap under the way, that's perfectly fine, it's better to get it out. The way before you actually glue the wig down then to find out later because it'll mess up your whole install and you have to start over um. I love using a rat tail comb for this step because i feel like it really melts it into the scalp. So i definitely recommend doing that. Now you see me taking that bold hold and i'm just going to make a few tiny dots around my temples and my forehead, and this is just going to reinforce everything just a little bit more, because i find that sometimes, when i do glue this, when i Sweat a little bit, it will begin to lift, but this is going to give us that extra barrier and layer of security and literally, ladies, if you decide to do this step, please make sure you only use a little bit because if you glob it all on, It'S not going to turn clear, it's going to still be white, it's going to be caked up and it's not going to be cute. So you see me just taking off that elastic band just because it melts everything so much better. And then i took my rat tail comb to kind of give it that extra melt within the scalp and then same method for cutting the lace as it was cutting the scalp, of course, except the only difference would be. I mean. Obviously it doesn't go through our ears and all that mess, but you guys get the point of this pretty much self-explanatory. I'M just cutting it. So it's comfortable for me and to where i won't have too much lace out, because i hate that it's so annoying. So now you just see me hitting those ear tabs because a lot of times those will not stick, but that's perfectly fine. You can easily just spray it again with the holding spray and take a blow dryer and just go ahead and hit it again. It dries pretty quick, it's a small space, so it's pretty easy. So that's what i did now, i'm just repeating those same steps on this side of the wig. So so so here i'm taking that same fit me powder and i'm just going to go ahead and go over the spots that i feel need a little bit of coverage to make it match my skin tone. So that's what you see me doing here, just taking a little um makeup brush that i use for my hair to fill that in so y'all see me tying my elastic band back on because this this is your best friend when you are applying a frontal. Even a closure, just a wig of any kind that has lace. In my opinion, it is literally the best at melting. So, as you all can see, i went ahead and added some wispy baby hairs and um the baby hair process. I could do a video on how i did the baby hairs on that when i reapplied the wig to show you guys, but i only did two because i didn't want to do too much so now. I'M just gon na try to frame my face a little bit, so i'm taking this razor comb as you can see, it wound up being a fail, because i wound up actually stretching the curls out more, which i did not want to do, because it was going To get big and frizzy um, i wanted it to kind of be more uniform to keep the curl pattern, so i'm just like okay, let me take some scissors. This cuz, i don't want my whole head to be big and blown out like that. So i just took these scissors and i'm just trying to cut a little bit just to frame my face just a little bit not too much just to give it a little bit of shape in the front, so i'm just playing around with it and yeah. This wig is bomb y'all, i loved it. The lace was actually really really nice. This wig, i definitely recommend i'm gon na give it a five out of five. I really love it. The lace color is workable. It'S super cute. If you like, big hair, it's giving me all the feels i need, and it looks so natural the part and everything the construction of the wig is super comfortable. I just love it. Thank you guys so much for watching and make sure y'all go out and get this wig. You can get it at sam's beauty, warehouse located in melrose park illinois or you can order it online. Thank you guys so much for watching. I hope you guys enjoyed this video bye.

Comments
Keona Michelle: Very cute style and I would definitely rock this. You did a great job. Thank you so much for sharing.
Dianne November Songbird: New subbie. Beautiful unit and great job slaying it.
Cee Gee: You wore this wig the best out of everyone I’ve seen.
JT Two: Absolutely beautiful!!
the kiara danielle: Looks so cute!!
ItzSadiyaSowe: In LOVEEEEE!!!! How long did it take to ship because I am definitely getting thisd
Jamie: This looks so cute on you!! How long did it last?
Lauren: This was helpful, thank you!
Movement By Myself: Where did you get the elastic band from?
Jazs: How’d you preserve it at night since you glued it on?
Hannah Perry: nice install i did wanna say it's not glueless tho if you're using glue i kept getting confused as to why you were saying glueless and continuing to apply gottobe
Tahkeia spencer:
Sweet Ashleyy: what color is this unit?
Mya E: Big head friendly? I wanna get it and my head's like 23"
SKOUTTVFE !!!!: I See You L Town
Nnikah Ellerby: What’s the link for this link? It’s not in your description bar boo.
Katy Girl: 1b is NOT brown. 1b is BLACK! No brown.
Antoria McReynolds: Hey now .
This World IsCrazy: No.link....bye