Its Icy Szn | Ash Blonde Highlighted Wig Install | Alipearl Hair
- Posted on 02 November, 2022
- HD Lace Wig
- By Anonymous
Shop Now➤https://bit.ly/3MRiRdy
Hair Info: 24'' blonde highlight straight 13*4 lace frontal wig, 180%density
❤#AlipearlHair Official Store:➤https://bit.ly/3sinYu0
Up To 50% Off, Lace Frontal Wigs!➤https://bit.ly/3VRWNnt
In FB Group, EXCLUSIVE DISCOUNT! ➤https://bit.ly/3O1I8ku
1. 24h Flash Sale!
2. Free Hair and Cash Back!
3. Unlimited Coupons!
#alipearlhairwig #alipearlhightlighthair #alipearlhdlacewig
Instagram @alipearl_hair: https://bit.ly/34I3Oyd
Youtube @Ali Pearl Hair: http://bit.ly/2H0Gmmc
WhatsApp: +86 15890076489 E-mail: [email protected]
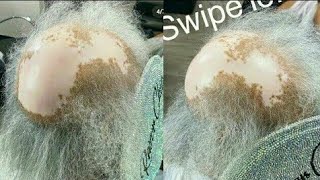
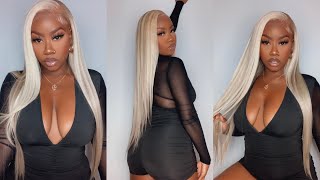
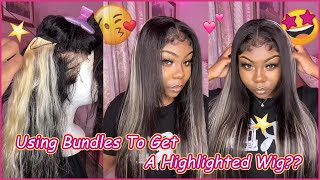
Hey guys, it's Zoe welcome back to my channel, I hope you're all doing amazing. Today, I'm going to show you guys how I turn this wig from that to this um, I'm obsessed, if you guys want to see how I got this look and all the details on the hair make sure you keep on watching me standing here so jumping right Into the unboxing, as you can see, this hair is from Ali Pearl. Ali Pearl always eats with their colored. Wigs, like I've, said this before I'll say it again. These lot know how to dye some hair, but anyway, this is what I got inside the bag. The usual - and these are the details of the wig - I've got a 13 by 4 24 inch and medium cap sized blonde highlighted wig, and this is all the packaging it came in. It'S always packaged nicely and beautifully, and this is the wig guys. It'S like a 6 13 but toned, but with like highlights, I don't know how they achieved this color, but you look yeah like look at the dimension. It'S not just a flat gray wig like it's got depth inside of it and I'm obsessed. Here'S the wig in some different lighting, so you can get a better idea and a close-up of what the highlights look like now. I didn't do anything to this wig except pluck it I didn't even wash it because the hair was just like ready to go um. So, to be honest, this would be a really good beginner's wig, if you don't want to like do the extras of bleaching, the hair bleaching, the knots um - and this is what the wig looked like once I plucked all the hairs at the front um as you Can see it's already getting scalp and it's only on the mannequin head like come on, please moving into the insole again, here's a close-up of the wig. Now this lace isn't HD lace, so I did have to do a bit more work on trying to get it to blend into my skin a bit more so so that I started off by grabbing my bonusoe foundation in the shade spice drum you can use any Foundation, you have as long as it matches your skin tone and I'm going to go ahead and grab a dense, Kabuki brush and I'm just going to tint all the lace and really press that Foundation into the lace. You want to be really careful with blonde hair or any 613 hair when tinting the lace, because if you go overboard, it can end up seeping onto the actual um hair, and this can make your wig look really like dirty and just like not fresh. You want to be really careful and precise when tinting your lace. I went ahead and put the wig on as you can see here and please. I was feeling myself guys, like that's a FaceTime, my MCM real quick, so you could see me before I installed this because it was not a joke. As you can see here, I just grabbed a detail brush and I just went ahead and just defined the part in a little bit just to help with the realism of the wig. Once I did this, I grabbed my little claw clip and I'm just gon na go ahead and section off each side before cutting off the excess lace on either side of my head. Once I do this, I'm going to go ahead and cut little slits into the lace. This is just going to make gluing down easier and more precise for me and for this I'm going to use the better the Melt with glue and I'm gon na take it on like. I don't even know what this piece of paper is. It'S like the back of an eyelash box, but anyway I went ahead and glued the wig down. I put about three to four layers of this glue um, and I made sure that I waited for each layer to dry completely clear before placing down the next one. Always make sure that I glue my wigs down section by section again, this is going to help with the Precision and and it will make sure that we don't place any glue where we don't want it to be. Every time I place the lace back over the glue, I make sure I grab a small little comb and just make sure I comb the hair in place, and this is also going to help press down the glue a lot better. I just did this exact same thing, all the way around the lace. Once I do this, I'm going to go ahead and grab my melt band, which came with the wig and I'm just going to tie that around my head as tightly as I possibly can, and while that sits on my head, I'm going to re-straighten the hair. A little bit um, it did have a few kinks in it from like being in the packaging and, like me, plucking it so I just went over it a little bit and I couldn't decide if I wanted this wig curly or straight so, like I started off With straightening it, but then I did go in and put some bombshell closing after about 10 minutes, I took off the milk bun, and this is what the lace is. Looking like. I grabbed my eyebrow razor and I'm just gon na go ahead and section by section cut off all the excess lace on the wig. You want to try and get as close to the hairline as you possibly can once this is done. I just grabbed my got to be hairspray and just sprayed it on any bits that were lifting a little bit and then I also grabbed a small, detailed eyeshadow brush and I'm just gon na go ahead and and just sort of tint anywhere that I can see That, like Shadow like where the lace is still a bit too light for my skin, so as you can see, I'm just gon na go in. You really want to take your time with this and make sure you're as precise as possible. Now here's me deciding how I want to style the wig I decided I want to just to the middle part, but add some loose bombshell weaves. I started off by just layering the front a little bit as you can see. I'M doing here, like I always say in my videos, guys I do not know how to cut hair, I literally just wing it and yeah. This is not this tutorial to follow if you want to know how to create face rooming layers, but as you can see, I just cut the hair in a diagonal line. Once I did that, I'm going to grab my one inch, curling wand from Lula bells and I'm just going to go ahead and create some pink holes. I let each section fall into my hand and then clip it with a little crocodile clip um, and I'm just going to repeat this for my whole entire head. I find that pinning the colors makes them last a thousand times longer, and it really allows for the hair to have a chance to cool down before you start manipulating the coals. I also wanted to add guys like this hair is really really really silky and soft. If you couldn't already tell from the video um and it held the curls surprisingly well, um, normally 613 hair doesn't hold the curl as well. For me, I found anyway, but you'll see in a second once I finish, curling all the hair. I just take off this melt band again and I start taking out these colors once they've all completely cooled down and as you can see, they are so much bouncier than they would have been if I hadn't pinned them now, it's time to shake my head and Create some volume I decided I didn't want to go for baby hairs for this wig um. I might add some later on, but I just kind of like this, like fresh, clean cut, look um, especially with the blonde hair. I feel like blonde hair sometimes does actually look better without baby hers, but let me know what you guys think and if I should add baby hairs to this, but yeah guys. This is the final look. I hope you love it as much as I do honestly. Like this is a 10 out of 10 for me, and I think blonde might have to be my new thing. Guys like this might have to be the new Zoe just icy white hair anyway. Make sure you guys like comment and subscribe, and I will see you in my next video

Comments
Kefilwe Sebolai: Thank you for the plug I’ve been looking for an icy blonde that has dimensions . Beautiful ❤
Ali Pearl Hair: Sooo gorgeous!!! Thanks for trying our hair
KayTheVirgo: love itt, def gonna get it for the winter! ❤
KayTheVirgo: Also it looks great without the babyhairs!
༺𝙯𝙚𝙭𝙡𝙞𝙨༻: this is the most gorgeous hair ever
SourCabbageFamily: No baby hairs, looks so beautiful, its? looks so pretty and shiny did you add anything to get that look?
She Woke92: From that to this looked the exact same to me
Ali Pearl Hair: BOGO FREE SALE! Sitewide *Limitted Offer* Starts On 2nd Nov.