The Perfect Fall Wig Part 3 : Coloring
- Posted on 07 January, 2021
- HD Lace Wig
- By Anonymous
Hi there, Beauties!!!!
Part 3 of The Perfect Fall Wig is Finally Here!!!
I’ve included all steps in here for those of you who would like to attempt this look! I hope that this is helpful! Feel free to ask any questions down in the comments section!! I try my absolute best to respond to everyone!!!
If you enjoyed this video, please don’t hesitate to hit that subscribe button and turn on your post notifications so that you don’t miss any of my other videos!!
OnnaLuxe Virgin Hair can be purchased at www.beautyXavi.net under the “shop OnnaLuxe” tab. ✨
This is a 5x5 Brazilian Straight 18” closure w/ 20”22”24” Virgin Brazilian Straight Bundles.
Thank you guysssss for 874 Subscribers!!!!! I’m literally sooo close to 1,000 and I couldn’t do it without those of you who love and support me!!!
#adore #clairol #fallwig #5x5closurewig #closurewig #glueless #613
#onnaluxe #beautyxavi
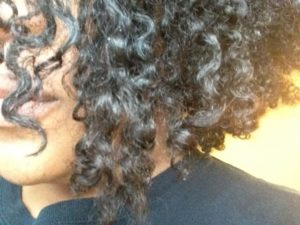
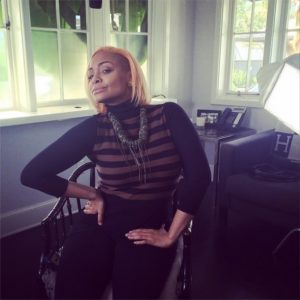
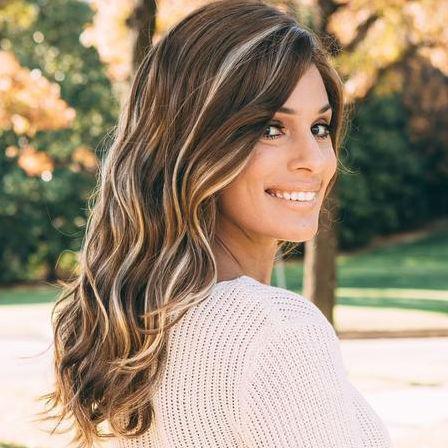
Hi guys part three of the perfect fall. Wig is finally here. If you guys haven't, checked out part, one or part two go ahead and go check that out and then come back to this video, if you guys haven't, subscribed yet go ahead and hit that subscribe. Button because i promise i got some fire coming, but let's go ahead and get started all right, so the first thing that i'm going to do is work on these roots and here's the color that i use for the roots along with some 40 volume developer. So i went on ahead and poured both of those contents into this mixing bowl and i just went ahead and mixed it up until it was completely mixed up y'all and please don't ask me um what the measurements were, because i promise i do not remember, but The instructions are on the box, so i just went by that. So i'm going to go ahead and start with my 20 inch bundle. Like i said, i was working my way down instead of working my way up so um, i'm gon na go ahead and do this bundle and then i'm gon na move to the closure. Next, i don't know why i didn't do the closure first. I think i just didn't feel like it at the time it was like really tiring. I didn't want to mess up and get it on the lace, but um yeah. So this is going to be. Our 20 inch bundle all right. So now i'm just going to go ahead and make sure that the bundle is folded up evenly um. I didn't want to make it too too perfect, because i didn't want it to go like like straight across so y'all are going to see me kind of tease. It out a little bit, not tease it out, but y'all see what i mean, but um yeah. I just went ahead and folded it in four sections and i'm just gon na go ahead and work. My way through the bundle do all right. So after i did that side, i went on ahead and flipped it to the other side and i'm going to go ahead and make sure i do this throughout the entire bundle. So you guys are going to see me just keep flipping and folding the bundle just making sure that the entire bundle, the entire roots of the bundle is covered, so do alright guys. So this is what you'll be working with um the the camera wasn't really capturing the exact color that this was turning, so it was really getting on my nerves. I couldn't get the camera to really show it, but it was a nice color um it just wasn't. The color that i was going for so you guys are going to see me like dip the roots in a different color later on in the video but um, i'm still, including all steps just in case. If you guys want the exact route that i took. Y'All and here i am trying to adjust the lighting trying to get you guys to see what color it really is, but of course it never worked. So i just gave up and um you know, went on about my business went on to the next step, so the next thing i did is um. I took the t-pins, my blockhead and my closure and i went on ahead and you know pinned it down. I didn't put a plastic bag over my blog kit, because this is the blockhead that it's just already ruined anyway, but i still would suggest it just because it can get like really messy. It'S annoying to have to try to clean up a little bit so um yeah. So what i'm doing right now is just making sure that it's lined up really good parted in the middle, because we have that blonde patch in the front. So i wanted it to be completely centered, so i'm trying to make sure that the part on this closure is absolutely perfect. Alright. So after i did that step, i went ahead and parted off my little triangle section that i wanted to use for the patch again trying to make sure that it is completely perfect because i didn't want it to be, like you know, slightly to the side or Just not all the way in the middle, so you guys are going to see me trying to make sure that that part is perfect. Okay, so now that i have it parted off the way that i want, i'm gon na go ahead and put it into a braid just so i don't get it confused with what i'm about to do next. This is just me showing you guys what these roots are. Looking like, after about 30 minutes and again, the camera did not capture the exact color, so i don't know what to really say you guys, and this is how it looked after i rinsed the dye out and again, the camera did not capture the exact color. I actually liked the color it just was not the color that i was going for this would be a nice color like if y'all saw what the actual color looked like. This would be a nice color for like a full head, but not for this exactly because it just would have thrown it off. So that's why i went ahead and did the roots again, but um i'm still going to go ahead and continue with the same process. Um with the same color, so that's what i'm doing now going through the closure and just getting those roots. And last but not least, i'm gon na go ahead and do my 24 inch bundle and if you guys watch part two once again, i was working my way down instead of up so the 24 inch is always going to be the last thing that i do Alrighty, so this is what our closure is looking like, after about 30 minutes, so i'm gon na go ahead and rinse. This color out here again still messing with the lighting trying to make sure that y'all can see the color, but i was just unsuccessful guys um because it just was not looking the same on camera as it did in person like and same thing with the closure. Still messing with the lighting all right, so moving to the next step, i'm going to go ahead and take my 40 volume developer and a little bit of bleach powder and mix that up really good, and this is what i'm going to use to really brighten up. That patch, i actually didn't use any toner. All i'd used was the shimmer lights, shampoo and conditioner each time after i bleached, because i was just trying to get it as bright as possible, but i did not buy any toner and y'all. I'M sorry for being out of frame a few times and y'all not getting to see exactly what i'm doing um yeah. That was my bad. I really thought i was in the camera, but i wasn't so. That is why i'm kind of like slightly going out of frame a few times all right. So now that that's done, i'm going to go ahead and redo the roots. I went on ahead and used the honey brown and i'm just gon na go ahead and do the water color method, of course, because a girl was tired after this, so i just went ahead and did the water method, but um yeah. So, of course, i just had my boiling water and i just poured the color into it, so i'm just going to take each of my bundles and dip them where the roots stopped from what i did the first time and i'm just going to see if that Gets closer to the color that that i wanted and of course it does, because this is more so the color that i was going to and, like i said, i left all steps in because y'all know color can be tricky and i just want y'all to get The if y'all want the exact results i want y'all to get the exact results so just making sure i included everything as y'all can see here i was like super careful with the closure. I didn't care about staining the lace because it was a light brown color and i felt like it was going to either tint the lace to my skin tone or slightly lighter, like it wasn't going to be that much of a big effect. So i just you know just made sure i wasn't really getting it on the bleach part, but the roots and the lace. I wasn't really worried about alright. So here are the three colors that i use for that orange after i finished dipping them in the orange. I went ahead and added sienna brown. I did not take a picture of it and i'm so so sorry guys, but i added that at the end for those dark ends like that, but the color was the adore brand sienna brown. After that, of course, i shampooed the hair conditioned the hair, make sure it was really good and i went ahead and constructed the wig. You guys have seen me make five by five closure, wigs a million times, so i didn't do it on camera. But here is our finishing results. This is um the hair, just air dried. I haven't straightened it. I haven't done anything to it, but this is just absolutely gorgeous like when i finished it y'all. I was in love like y'all. Let me know in the comments how i did because i feel like this is bomb like. Maybe i'm just gassing myself up, but it's nice but yeah. So here is after i completely straightened it out. All i did was add a little um. What do you call it? I used like a dime size of the biosilk um serum and i just put it on on the hair and i went ahead and straightened it and guys. This is the results and it is absolutely gorgeous, and i really gave myself a hat on the back for this, because i was like definitely a satisfied customer - and i said this in my part, two video, but i'm gon na say it for y'all one more time For the people in the back do not attempt to do this if you're not using 100 virgin, hair and honestly y'all. The only other company that i know for a fact gives 100 virgin. Hair is kendra's, boutique honor looks or kendra's boutique um. Those are the only two companies that i recommend, but of course i want y'all to shop with me because you know why not but um, just if y'all just don't want to shout with me, i'm still going to let y'all know. Kendra'S boutique is good as well, but that is the only other company that i recommend and if you guys remember for the part one of this video, it was basically my pregnancy announcement. So i want these curls are what i had in my hair for our photo shoot. Of course they dropped by the time we got to the beach, because you know the water and the wind and all of that mess, but - and i also didn't put any hairspray on my hair cause - i just knew i was gon na straighten it afterwards. But so that's why my makeup is done. The curls are popping, you know, that's why i'm looking all cute, but thank you guys for watching. Please don't forget to like comment and subscribe and i will see you guys in my next video

Comments
Comstance Jemkins: Gorgeous Sis.. Well done
Elle Rose 🌹: This is really pretty!
Perplexedhoney: Wow you did amazing!!
Y. Adjei: Great job! ♀️
6georgiapeach: You did an excellent job Please list all products especially tge dye.
Shameeka Benard: Measurements are so important when you’re a beginner I wish we could have gotten that info but other then that great video
Saywhatyoumean001: I love this color
Tray Tray: Perfect
Angi: Beautiful
Kayla Hodge: beautiful
TiaRenee: Can you list the name of the dyes that were used?
Keara Stephens: Did you tone the wig?
Jayla Anderson: How did the hair not get stiff ? is it because it’s 100% virgin hair ? or is it a certain conditioner you use?