Detailed Swoop Bang Tutorial | Step By Step! | West Kiss Hair
- Posted on 07 December, 2022
- HD Lace Wig
- By Anonymous
▬▬▬▬▬▬▬▬▬♛#westkiss♛▬▬▬▬▬▬▬▬
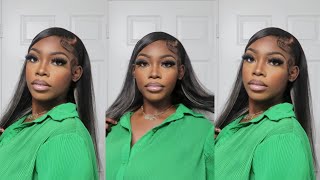
Hair details: 180% density HD straight 13*6 lace frontal wig 22inch
Video Hair Direct Link➤https://bit.ly/3iMUdNc
Hot selling HD lace wigs➤https://bit.ly/3tSKxXG
★westkiss official hair store➤https://bit.ly/3DqFscd
Affordable 37% Off Curly lace wig➤https://bit.ly/3tTI5jF
Up to 43% off Lace Wigs➤https://bit.ly/3IW7cH1
Hot curly lace wigs➤https://bit.ly/3tW2Xad
#westkisshdlacewig #westkisswig #westkisslacewig
#WestKissHair Official Site Huge sale Big Discount
Join Our VIP FB Group Now (Free Giveaway )➤https://bit.ly/3lzmAA8
❤Follow West Kiss hair on social media :
Instagram @westkiss_hair_store: https://bit.ly/2OlKstu
YouTube @West Kiss Hair: https://bit.ly/2Ol5U1m
Wholesale WhatsApp: +86 13323741050
Blow dryer: https://www.blowpro.com/products/titan...
Products used: Mr. Pen- Elastic Band, 0.6", 11 Yards, Black, Elastic Band for Sewing, Black Elastic Band, Elastic Straps, Stretch Elastic for Sewing, Fabric Elastic Band, Waistband Elastic https://a.co/d/9kZJuXQ
Motanar Professional Grooming Scissors for Personal Care Facial Hair Removal and Ear Nose Eyebrow Trimming Stainless Steel Fine Straight Tip Scissors Men https://a.co/d/8aqqqhI
Nairobi Wrapp-It Shine Foaming Lotion, 8 Ounce https://a.co/d/7LH6UBX
Fantasia Liquid Mousse Spritz 2 oz. Super https://a.co/d/cA9NLIE
Ruby Kisses Cream Foundation 3D Face Creator 2-Color Foundation and Concealer, 12 Hour Wear Long Lasting, Medium to Full Coverage (Level 15) https://a.co/d/0Pgtw7S
Aunt Jackie's Flaxseed Recipes Curl Mane-Tenance Anti-Poof Defining Curl Whip, Smoothes and Defines Dry, Frizzy Hair for Natural Curls, 15 oz https://a.co/d/gItGfeW
My Socials
IG: @kamanijean
Twitter: @kamanijeann
TikTok: @manijean888
Wig IG: @wigssoldbymani
Email me for business inquiries only [email protected]
Hey guys and welcome to my channel welcome back if you are a returning viewer, so I told you guys I was going to drop a swoop Bank tutorial. So if you guys would like to see how I did this step by step with this West kiss wig 22 inch straight keep on watching because it looks so natural and so cute molded all that. So, let's get straight into it. I am putting my cap on so I'm just stretching this cap around my head, getting it nice and fitted, especially around my ears boom, taking my scissors and cutting around the ears so that we can have a nice station foundation for the um product. We will be using for our body cap, so I'm going to be using my red ebb and wonder lace spray. I have been using um glue lately for my cap, but I'm like I'm not really feeling how I'll be leaving such a cast like afterwards. So I'm like, let me just go back real quick use, the red ebbing, Wonder, lace, spray, but I'm using just a little bit around and I'm using my finger to help mold it around exactly where I want it to be in front of my hairline and then I am using some of that Erica hold me down glue around the sides because y'all know, if you don't know now, you do. My caps do not be staying down. I just use spray, so I'm like. Let me go ahead and do some of the glue on the sides just a little bit, not just smooth it out with my finger. So I'm blow drying this on a cool high setting. With this new blow dry I got from blow Pro will be linked down below, but um yeah. I'M sorry! I got a new blow dryer, because the last one I was using it was so ass, like this one really gets cool, so it's perfect, but anyways, I'm taking my little scissors and I'm cutting off my cap super easy to do because, like you can obviously see Where the product is - and you just want to cut it directly off boom, just like that look foreign to blend this cap into our skin, I'm using Ruby, kisses cream foundation in the shade rd15 and this fluffy makeup brush, and I'm just smoothing that around the cap. This wig cap is super duper. Sheer you guys here is what the wig looked like after bleaching and plucking it, the wig, looked really pretty plucked before plucking get, so I didn't really do too much plucking. I did just enough for this look, so this is what the wig looks like on my head after tinting it with rd15 and now I'm getting into cutting around my ears, because it's just way easier to install a wig when you cut around. Firstly, before actually putting the wig on - I honestly probably shouldn't, though, because sometimes when I pull my wig forward and apply the glue it'd be like longer on one side and short on the other side, because when I put it up, I wasn't really paying attention. So maybe I should try it the other way, but it is easier in a sense of like you know, you can see exactly where your hairline is going to be and how it's going to lay when you and more comfortable when you cut around your ear first. So I'm doing that getting that out the way just make sure you pay attention when you actually put the wig on so it's symmetrical and even but look another big ass wig. Oh my gosh, but it's something about being high. Listening to music doing my hair. I don't know what it is, though, something is in the weed like I'll, be getting a little bit too anxious now, like wheat, is supposed to calm anxiety, not created, like I realized uh. Maybe this wasn't such a good idea today, but it's okay. I remained focused. So I'm taking a several rubbing alcohol in a cotton pad and I'm just cleaning around my skin y'all know mandatory for your legs too late. It'S not going to stick. We have oils on our skin and then the makeup we put on the cap like it was a lot going on. So you just want to make sure to clean it off anyways. So I'm using Erica J holding me down glue in the watermelon scent and this Popsicle stick and I'm just smoothing this glue around. I did three layers today: nothing crazy, just three! So yeah, you just want to make sure it's just really smooth it out, and you see how I'm like keeping the stick right next to the hairline because yeah I don't want this to be too far up too far down like I wanted this to be a Perfect lay so I'm using the blow dryer now in a cool high setting to clear it not to clear but to blow dry it until it is clear and dry sticky. You can touch it to make sure it is sticky and tacky before actually applying your next layer of glue. I recommend doing that because you don't want to just be you know what I'm saying free ball in this because, like once it's set in stone. It'S really not going back, I mean it is, but that's frustrating make sure to like pay attention and really get it right. The first time focus focus but yeah you guys. This is my second layer just keeping this glue spread out around my cap a little bit on my hairline, not a little bit but yeah above my hairline. You guys see what it is, I'm not going to explain it. Y'All see the glue, y'all see the glue, so that's the placement that I'm using so once it's all the way dry, I'm pulling this wig forward and placing it on the glue exactly on the hairline the glue exactly on the hairline. That'S the only way my wigs be coming out. Looking like the Lacey, looking correct, I mean like in my eyes perfected for me, so I'm using my band, I let that sit for about 10 minutes and it's looking really late. I'M taking my scissors and cutting these two pieces in the front and then taking my eyebrow razor and cutting off the first half of the lace I like to do it like kind of in an upward motion to really get that lace. The off like you, want to get close, but not too close, but when you place the wig exactly where it's supposed to be, you don't really have to worry about if you're cutting it too close or too. You know what I'm saying it's just going to you're going to know like it's just going to make sense so yeah, it's really important to really place that glue exactly where the hairline is and where you want it to lay foreign taking some more of that glue. But I'm making sure to use a small amount like a really thin layer, so it won't be like glumpy and like clumpy and just doing too much because we don't need a lot. So I, after I blow dry that on a cool setting, I just place it down with my finger and I needed some more glue in the front as well. I didn't want to cut the because y'all know. In my last video, I cut the lace off and I didn't need to cut the lace off. All you had to do. All I had to do was put some more glue and lay it down so yeah. You guys that's what I just did blow dry. That and now I'm taking this fluffy brush and some more rd15 and really kind of lightly fluffing it onto my skin, not my skin gosh mine, hairline and then I am using the red Urban Wonder, lay spray with my finger and I'm just tapping this product around The lace, so it can be even more melted, even more seamless, okay, foreign T is basically over I'm leaving this band on for like 10 minutes or really, however long it took me to do this part, so it was probably like 12 13 minutes. So, as you guys can see, I'm using this ragtale comb and I'm using the end of it to really make my part, I'm looking in the mirror, trying to see exactly how I want it to be curved. So this is how I did that really precise with it like. I want my to be making sense so yeah I'm pulling up my baby hairs. Now I don't know what it is, but I just have been making like super thick baby hair slightly. They haven't been thin. The way I like the way I be wanting them to be, even though I don't mind the baby hair, sometimes I'll be one of them to look super natural, even though they still be looking super natural. But you know what I mean: it'd be preference. You know it's different, a lot of different styles with baby hairs that you can do so for this look. You guys see the map out of the baby hairs, so I've been noticing my baby hairs, don't be looking as thin as I would want them to. Even though the thick baby hairs be hitting, it hits even more when they're kind of thinned out but still swooped and still like you know, molded and fluffy, and all that good stuff, there's a lot of different kind of ways to do baby hairs so anytime. I do it, they always look different. I don't know why, but they always do, but I think it has a lot not a lot to do, but it does definitely have to do with plucking, because I feel like when I pluck less or yeah when I plug less the baby hairs come out thicker As you guys can see here, I am plucking some of these hairs out, though, but yeah when I plug less. My baby hairs come out more thick and when I pluck more, they come out more natural. Looking like not natural looking, let me not compare it thinnest to Natural, but um yeah. So basically, what I'm trying to say is don't be scared over not over plug but don't be scared to plug because I'll be getting scared to pluck because I hate over plucking. There'S no coming back from over plucking frill, so I really just be trying trying to do the minimal plucking. So it just looks natural, but yeah don't be scared to pluck y'all anyways. I am right. I wrapped up my lace again using my icy Fantasia holding Spritz and I'm letting that sit there, while I'm getting this part together. So I parted out this hair and I'm using my character, wax stick to help mold it towards the back. I didn't want to have a lot of hair in my swoop because it was just going to be harder to do, and I just straight up didn't have an energy for that plus it'll be easier for you guys to know how to achieve the swoop without using. So much hair, so yeah you guys I'm trying to get it together, the part - and that is what it's looking like. This is just me, showing you guys how you guys can do the swoop without actually molding it boom, like just like that super cute super natural, like it's giving Aaliyah like super natural, but I'm taking some of that wax. Stick putting that piece back that I didn't take before and yeah that's how we're mapping that right on out now, I'm cutting out these baby hairs with this eyebrow razor, I recommend using a fresh one at all times when it comes to baby hairs because I'll be Having to tuck and pull like that is annoying, but I cut them right above my eyebrow, I think that's the perfect length, probably a little bit higher, which you guys will see later. I cut them a little bit shorter throughout the process, but yeah guys. This is the length that I'm cutting my baby hair same on the other side as well. All right now, I'm using my kiss Pro flat iron and half an inch to curl these baby hairs upwards in the front, missed a little spot. So I'm curling that one too and on my sideburns I like to curl them under just like that. Sometimes I curl them twice to really make sure it gets that fluff that extra fluff doing the same thing here and boom voila fluff them out a little bit by combing them out, and I'm using my ORS holding gel my olive oil holding gel. Usually, I've been using foam recently, but I'm like, let me just mold them like. Let'S get this to look super molded we're doing a swoop like why not so I went back and used my gel foreign like how they were looking. I feel like it could look more swooped into the wig, so I took some a little bit of hairs. Just the exact amount I'm using here, I'm going to cut those off and then add that to the swoop. But while I'm doing my baby hair is I'm not going to speak, you guys just to watch? Okay, oh also, look I cut off some more baby hairs in the front so that they could just look more natural. They was just they wasn't given to me. I wanted it to look way better, so I focused and yeah. Let'S watch and learn foreign foreign, foreign okay. So now, let's get into the spobe the fun part of this video, I'm taking my flat iron and start earning the front piece that I want for my swoop, I'm also hot combing in the direction that I wanted to go really slow. Y'All see how it's not moving like that was not a pause but yeah I'm putting my hair up, so it won't be in the way, so we can really focus on the task at hand. So this is what it looks like. This is what your parts look like: boom doesn't have to be perfect and I'm plucking some hairs out just so it can look a little bit more natural to my liking. I just peep some ears that just didn't need to be there, so I'm using my holding spray. These will be linked down below and I'm just using my comb to kind of just push that product through and I'm using my hand too to mold it like I'm. Holding it the thing about swoops is you have to do it over and over and over again to get it right like it's, not just a one-time swoop, you got ta, do it over and over. So I thought you know. Maybe using a hard brush would help mold it as well, so I went in with that and yeah I took it to in the process of it, so I can just see what I want it to look like and how it should lay but yeah. It'S really just a process of using your spray combing it through molding, with your hand, blow drying it and doing it all over again. So that's really all I'm doing oh foreign. This was the perfect placement for the swoop, like I like how it was placed on my forehead just the whole look of it like it looked good like I should have just left it alone, but no, I wanted to add more holding spray, which I cut. That part out, because I don't want you guys to do what I did because now the soup didn't look how it did before. I probably sound like such a perfectionist, because it's really no different, but I could tell the difference and it looked different. So once you have it in the position that you wanted to be in just make sure to blow dry, it wrap it up and then you'll be good to go. But I used some foam to kind of help, smooth it out some more and my blow dryer on heat, okay, not cold, but heat y'all see how the blow dryer light up, though I know y'all seen that, but all I do to keep this place is use A bobby, pin and kind of like an adult word motion and just clipped in the back. I used two and a boom voila, but I'm using some holding foam, some more of that and I'm using it around my hair, as well as on the um swoop again, and then I'm going to tie it up to really make shirt. It looks flat like I need my wigs to look flat. I don't know about y'all, but it's something about wigs that don't be looking flat. I I can't do it so I wrap that up with the satin scarf and I'm blow drying it on heat once again and once that's set once I felt like it was dry enough. It looked really good, like y'all, see the smooth from the side, but I'm doing some slide um what you call it layers real slight, nothing crazy, because I am using these little scissors. I need to go. Give me some regular size shears, but I just haven't, went to do that yet so I'm using these little scissors for the layers which it didn't need to do, because I wasn't trying to do nothing crazy anyway, so yeah, I'm just you just want to Glide it. Like that's, all you got to do is Glide okay and I'm using my flat iron here and pressing my hair out. I know I told y'all in my last video I'll, be flat ironing my wigs off the camera and on my mannequin head, but I'm like you know what let me just do it while I'm sitting here, I didn't want it to look super pressed out anyways. I wanted to kind of look blown out kind of natural like not too sleek, so I kind of left it how it was, and it wasn't that much of a task for earning it. It really wasn't so I'm just pressing it out here, adding a little bit more layer, so I can be even to the other side and pressing that out to give it a little swoop, not a spool, but a little. You know curling it under so that the layers can really show. Then I took a piece out and I curled that with my flat iron, but so I was really feeling the soup. I thought it looked really cute so yeah on to the final steps, I'm using. Actually Rd one to five for my part with this little brush here, I just thought like it will look more natural if I use rd15 first and then went in with a little bit of a lighter concealer. So that's what I did in the lighter concealer that I used was rd09 and then I used some of that black hairspray to really get those over bleached knots. Looking for correct because yeah no and then some ebony spray to mold all that in place and my comb to flatten everything out. Lastly, I'm taking my caracare wax stick to help smooth everything out in my hot comb. Yeah finishing touches nothing crazy, but it looks super good like wow, I was really we got ta take this little part over here. Okay, back in the game - and this is the finished look. I hope you guys enjoyed watching this and learned something from this because I sure did enjoy filming it for y'all, because it's looking really good, really professional make sure to check the description box for all the information on this hair from West kiss 22 inches. I cut a little bit off tried my best to show you guys what it was. Looking like and I'll see you guys in my next one
Comments
Kennedy Rianne: i’m so proud of you mani!! do yo shit every time!!
Beats Bii Neek: Def giiiiving❤️ ur tutorials
April and Chrissy: Great job!!!!
BEAUTIFUL Queen: Love it
Britney: I was just watching another one of your videos. The side parts be giving on another level
de’bohray marie: barrrreddd as always
Heiress Monay: You did so good and something definitely in the weed
Wiggins Hair: You are so beautiful!!
Yvonne Toney: Can you do a skunk wig?
Life As Nikki: Where do you get that wig cap from?