How To Transform An Old Wig | Lazy Girl 30 Inch Wig Install
- Posted on 03 December, 2022
- HD Lace Wig
- By Anonymous
------------------------------------------------------------------------
Instagram : @ dieyna_sow
Tiktok : @ dieydollasign
Email : [email protected]
-------------------------------------------------------------------------
––Music Credits–––––––––––––––––––––––––––––––––––––
Last Last- Chadna remix
–––––––––––––––––––––––––––––––––––––––––––––––––
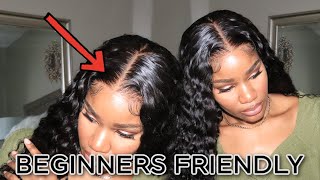
Hey guys so today I'm going to be showing you guys how I revamped a two-year-old wig. If you look at my Instagram, you see that this wig has been through it. Literally. Every single picture has this wig, so without too much talking, let's just get started. As I said before, this wig has a huge mileage and I can't start anything without a good, deep conditioner. So these are the items I use so after all the annoying part of trying to dry down the hair um we can get to the fun part. As you guys can see, the lace is literally orange, like let me tell you, I'm gon na work, my magic, because this wig is going to look literally unrecognizable after this. The thing I use to be able to make the lace look better and this tin spray. So basically, what I do is that I just like put a comb in and then just spray down the hair on the edges. Just so that it looks a little Fuller and it looks like I never really up the lace or anything. I put a comb in between because I still want that sharp line. I want that sharp part and I have to keep it that way. Did you guys see that, like? Let me know if you guys saw that, because that is magic. So then, what I do is that to even more basically to find the part, I will just add some concealer to make it as defined as humanly possible. I'M really taking my time on this and I'm using a lighter concealer after that. I'M just going to use this um sweeties tweezers to basically pluck out the part and just make sure that everything is straight. So now we're gon na get to the most important part and my favorite part honestly the straining process. This is an art like you really have to take your time with it. I use this Heat Protector from Chi. Honestly, I think I use all of the products from Chic, because they're so good. I also have this olive oil sheen spray, which my trick is to spray on the comb and not directly on the hair, because you don't want the hair to look greasy and then this, let me tell you this is the star of the show this straightener. It will get you right and what I do is I put the comb behind the straightener and basically pass on the hair. I take a really small section, because I really want to take my time on this and make sure that the hair is bone straight. I usually go through the same part, maybe twice or three times, if necessary, but no more than three times, because we don't want the hair to be fried. You guys see that you guys see how luscious that looks. I didn't even know if luscious is the right word for this, but wow just wow, and then you have to do this through the hole um for the whole head. So you really have to be patient and really just section it off uh in the right way. I'M going to be showing you guys how I do it with, I think two more pieces and then, after that, we're gon na head to the frontal - and I know oh, this is another trick that I really like to do is basically spray that olive oil sheen Spray directly on the barrel, because I want it to be sizzling like I literally want this to be so hot, because I don't want to be passing it through um the hair too many times, then I'm going to be spraying the sheen spray. Again. Now that I'm watching this video, I use a lot of this Sheen spray, and this is basically just any Sheen spray that you can get at the beauty supply store. I really like this one because it doesn't make the hair too greasy the other ones. I tried kind of make the hair greasy but yeah as for the frontal part of the hair. You really have to take your time on this one, because this is actually like. Actually, the most important part of the whole install at the end of the video, by the way I didn't mention, but I'm going to be showing you guys how I do a quick lazy girl install because this is the install I do. I don't want to burden myself with all the gluing and tang, and it's just I'll show you guys my easy method. My eyes are clearly deceiving me because ain't no way this is the week we started off with look at how this wig literally transformed itself. I'M actually so shook now. This is the icing on the whole cake. What I really like to do for hair - that's really long, is that I really like when the hair is basically cut squared. So that's what I do here. I basically cut out some ends that look kind of dead to me and I basically just bump the ends a little bit. I don't know I feel like this makes the hair look a little Fuller at the bottom. I leave now for the Lazy Girl everyday install. What I like to do first, is that I will tint my lace in this case, I'm going to use the tin spray that I showed you guys in the first place. I have the foundations as well, so you guys can like pick whichever works better for you, but in this case I use the tin spray. So what I do is that I'm, basically just gon na pin my hair back with these clip-ins that I basically got from Amazon or, like I don't even know where I got them from to be honest, I'm gon na use this elastic band, but first of all, I'M basically just gon na push out the hair, because I don't want the edges to look dry but yeah, I'm just going to take my got to be free spray that every girl has and I'm just gon na spray that literally on top of the lace. That'S it literally. That'S it. I'M gon na put in my headband, I'm not doing the whole bald Cowboy, the whole annoying glue part. This is all I'm doing, just got to be free spray, headband and then wait a couple minutes. I mean you could always use a hair dryer, but I don't know. I think I use a hair dryer off camera, but yeah. That'S it and then, after a couple minutes you can basically just take it out, push out the hair. That'S a bit dry because we don't want dry edges. No one wants that. I am then taking this powder. That'S a little darker than my actual skin tone and I'm just gon na put that directly on the lace. Then that's it melted. I have this mini iron that I use for clothes, but it works so well with hair. So I'm just gon na iron down my hair, but aside from that that was it. I really hope you guys enjoyed this video. If you did don't forget to subscribe, follow me on my socials and definitely leave me a comment down below and I'll see you guys in my next video bye, I'm awake

Comments
Zahra Sow: the content we love to seeee
A47M: Your video in totaly english it's very coolll
Bingél: Hey diey