Melt Your Lace Frontal Wig For Beginners Body Wave Install Ft. Alipearl Hair
- Posted on 19 September, 2022
- HD Lace Wig
- By Anonymous
How To MELT Your Lace Frontal Wig For Beginnersl ft. Alipearl Hair
As always thanks for watching! xoxo
Make sure to subscribe and like this video!
Shop Now➤https://bit.ly/3c2WSmg
Hair Info: 22 inch body wave 13*4 HD lace frontal wig 180% density
❤#AlipearlHair Official Store:➤ https://bit.ly/3QEIW0A
Up To 50% Off, Lace Frontal Wigs!➤ https://bit.ly/3KbjWeY
HAPPY ALI PEARL HAIR 8TH ANNIVERSARY
1.No-Threshold $30 OFF For All Items, CODE: Ann30
2.Win Free Order: Pick 1 lucky Girl Every Day
3.Win $100 Huge Coupon: Pick 5 lucky Girls Every Day
Products Used:
Lace Glue: https://lacebegone.com/products/lace-b...
Lace Melt Spray: https://lacebegone.com/products/lacebe...
Spritz: https://a.co/d/bmfAsMv
Ebin Red Lace Spray: https://a.co/d/2etbNAi
Ruby Kisses Level 15: https://a.co/d/fsNDTMA
Melt Band: https://lacebegone.com/products/lacebe...
Lace Tint (Shade Bronze): https://truconnoisseursolutions.com/co...
Check out other wigs I love and products on my Amazon storefront link: https://www.amazon.com/shop/influencer...
MUST HAVE WIG PRODUCTS FROM AMAZON
My wig resale site: https://shopaleshab.com/
Hair TikTok https://www.tiktok.com/@leshhaaab
Personal Mini Vlog TikTok: https://www.tiktok.com/@lifewlesh
Instagram: https://www.instagram.com/leshhaaab/
Email: [email protected]
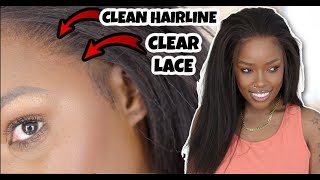
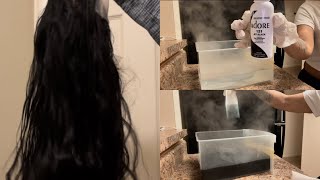
This video is sponsored by ali pearl hair. This is a 22 inch body, wave 13 by 4, frontal hd lace. If you want to know a few tips on how i melt my wigs keep on watching and i make a lot of videos on wig installs, but today, i'm digging straight into how to actually like melt melt, your lace. What are the key tips that you need to know and what products do you need to use to really get your lace to melt flawlessly? So if you want to see how i do that, definitely keep on watching this video first things. First, you want to start off with a ball cap. You want to use one a little bit lighter than this, but you know that's all i had so. We had to improvise want to start off by cleaning your skin as well. Get all those oils off your skin and i like to use skin protect before i put my glue on this is optional, but i feel like it gives your install like a little bit more longevity. I recently got this true match: lace, tint and i went ahead and tinted my lace before putting the wig on in the shade bronze and this wig had a little bit too much hair on the hairline. As you guys know, and if you don't know, i have a lower hairline on the sides than in the middle, so i went ahead and cut out the middle on the extra hair and i left the sides, as is so. I could put it on and it would be sitting correctly, i'm going in with my even lace spray in the ray can and just going ahead on that hairline to prep it up for the hot comb. So this part is essential for when you're getting ready to melt your lace, because you want all those flyaways out the way you want all the hairs to be comb back push back. So you can see exactly what you're doing as well as cleaning your skin and doing the skin protectant. That also is essential when it comes to laying your lace and melting, your lace, because if your skin is dirty, your lace glue is not going to work or any adhesive that you're us using spray, whatever you're choosing to use is probably not going to lay down The best so cleaning your skin and prepping, your hairline are the first two things that i definitely recommend when it comes to making sure your lace is going to have that super super melted look. So this is what it's looking like after i've, hot combed everything and now i'm just prepping it to do the adhesive, i'm going to be using this lace be gone glue. I love this glue. Um, definitely check out her on tik tok. She sent me all her products. I had already bought her glue myself, but she also has a lace spray that you guys are going to see me use and a lot of other things definitely go check out her site. But right now, when we're getting into melting the lace, you want to put small dots or a zigzag, whatever works for you on your glue all across the hairline and spread that out. I like to make sure that i have at least a one inch band thick of glue, if not an inch, then a half an inch whatever you want to call it. You don't want to go down too far, because then your wig will be sitting on your forehead and you don't want that. Okay, so i did two layers of glue. It depends on how long you want to wear it on, but you know i'm only keeping mine on for so long. So i did two layers of glue pulled my lace down and using my comb, the back of it, i'm just going to press the lace into the glue where it's sitting at now. It'S okay! If some of the lace is not sitting in the glue, i will continue to talk about that as we going in the video. So, as you can see, the hairline is like down to my eyebrow. Let'S not worry about that. Just pull the lace down into the glue and keep it even with the middle and same thing for the other side, keep it even with the middle and just pull the lace down. What other, whatever hairs are sitting out, is whatever hairs that are sitting out. They do not matter because we will fix that so using my comb. I just comb through and just press the lace into the adhesive due to the wig cap. Sometimes you will get this little white residue where the glue is at, but it will end up completely drying down. So i like to press my fingers into the lace just to make sure that it's laying down. I know they say not to do that, but you know that's how i do it and then i'm taking the rat tail portion of the comb and just parting out the hairs that are not actually sitting in glue. So, as you can see like this, hair is like all the way down to my eyebrows. It'S not sitting on nothing! You don't want to go back in with glue and lay this down, because your hairline is not actually down there. When we laid our glue out, we laid it out based on our hairline, so that was kind of your guide to know. Okay, let me go ahead and cut my lace like there is no hairline down here. So when you're doing your wigs, you want to. You know, compare your hairline as much as possible, make it look as real as possible, and that's the best way to do it is to copy your hairline. So after i've sectioned out all that hair that doesn't need to be there. I go in with my elastic band, and this is just so. I can get those hairs to lay down get the lace to melt down into that glue before we get to you know doing other things. I left that on for about five to ten minutes and came back to be ready to cut my lace off so everywhere that we section out all that hair is getting cut off. There is no glue on it, so there's no reason to let it stay there. So i'm just going to continue to do that across the whole entire hairline. So this wig i mentioned the specs at the beginning of the video it's supposed to be hd lace. Um to me this was not hd laced. It was given very much more transparent. That'S just my opinion. I think the hair quality was very, very silky. I'Ve worked with ellie pro before and i really did not care for their hair, but this time i really liked their hair, like it was nice silky, smooth full from the beginning to the end. The only thing i didn't like was the fact that i don't really think it's hd lace. So here we are. This is where i'm using the melting spray and i'm just taking a cotton round and just patting the spray into the lace. So at this portion you can use anything you choose to use, spritz, even red can black can whatever you want to use and then you're going to go in with your elastic band and just lay that down sometimes i'll use a hair dryer and go over and Dry it out other times. I will just let it air dry, while i'm styling my unit, so i went ahead and flat ironed my wig off camera. While i was waiting for that to dry and the spritz technique right there that's essential for getting your wigs to melt. Ever since i started using spritz or any type of melting spray, it has made my wigs like melt so so so much better after using that melting spray. I like to go on with my hot comb, yet again, the hot comb, and that elastic band is my best friend. Y'All are going to see me use it so many times throughout my videos, and i went back in with a little bit more lace, tint on my lace as well as this makeup i like to use ruby, kisses or my foundation, but this ruby kisses is the Level 15 shade um ignoring a little bit of hair in there, but it's the level 15 shade and i just take a fluffy brush and go along the hairline. This is a real techniques brush, but it doesn't really matter you can use any brush. Go along the hairline just to like get rid of that little bit of halo effect and i take some concealer a little bit lighter than my skin tone, not too light, and i go down the part and i like to rub it in with my fingers. So it doesn't have like harsh lines and it looks a lot more realistic, and this is the end result of doing everything. I really like the way that it came out again. I would recommend to use a lighter wig cap, but that's all i had because it will show your plucking a lot better, but all in all, i like the way that it came out, and these are tips that i follow every single time. I do a wig install and i have no issues when it comes to melting, my lace. So, if you're having problems - and you know these are things that you're trying to work on - definitely follow some of these tips and try to incorporate it into your wig install routine and i'll, see you in my next video bye, you

Comments
Andrea Scott: I love it, it looks sooo natural thanks for sharing
Ali Pearl Hair: Awesome! Thank you so much for trying Alipearl Hair.
SIMPLY MARVELOUS 4: Love it tfs
Daybe Baby: Would you ever do the invisible cap method ?
Tracy Hudson: Please what is some strong lace glue I have oily skin