Best Highlight Bodywave Wig On Amazon Ft. Unice Hair Amazon
- Posted on 12 January, 2023
- HD Lace Wig
- By Anonymous
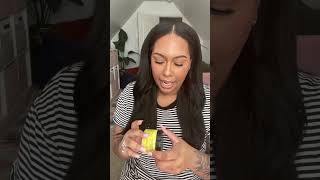
➺Today I’m installing this stunning chocolate brown blonde highlight from Unice Hair Amazon. This is the best bodywave wig I've ever tried and it melted perfectly!!❤️
____________________________________________
Hair Details: 20 Inch Chocolate brown/blonde highlight 13x4 wig, 180% density
Same wig in video #unice Chocolate Brown Blonde highlight wig:https://amzn.to/3GZCMGa
10% OFF Coupon on UNICE Amazon Product Page
#UNICE Website:❥https://amzn.to/3Ad2Fyb
#unice #Hot Selling Wigs:https://amzn.to/3YjH8OX
❥Follow our social media account:
#UNICE Tiktok:❥@uniceamazon :https://www.tiktok.com/@uniceamazon
#UNICE Facebook:❥@unicehairAmazon https://www.facebook.com/unicehairAmaz...
#UNICE Email:[email protected]
#unice whatsapp:+8613290756878
____________________________________________
Follow my socials:
➺ Instagram: @Kiannamorae FOLLOW MY NEW INSTAGRAM: https://instagram.com/kiannamorae?igsh...=
➺ Snapchat: Kiannamorae
➺ Tiktok: Factualbrat
____________________________________________
➺ EMAIL FOR BUSINESS INQUIRES ONLY:
____________________________________________
FAQ:
➺Age: 18
➺Ethnicity: Jamaican
_____________________________________
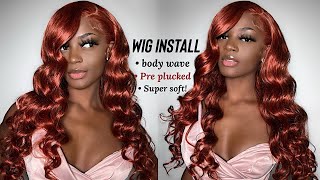
Scratch next, what's up YouTube, It's Your Girl, Kiana Murray and I'm back with another video. So today we have a chocolate brown blonde highlight wig from the family. You nice hair on Amazon, and I forgot um to include my unboxing footage. I think it got deleted. So I'm just showing you guys everything that I got with the wig. It came this nice Christmas Box. I got an edge band, wig cap, of course, and I got a makeup brush and some lashes so right here I just sprayed some even spray onto the lace to kind of get the flyaways out the way from when I'm about to bleach it, and then I'm Just gon na go in with my bleach, starting at the back of the frontal working my way up to the front. This unit is a 13x4 body wave wig and it is 150 density in the length 20 inches. So I'm working my way up with the Bleach. I'M making sure that it covers every single part of the knots and then, after that, I'm just going to place my foil paper on it and wait for about 35 minutes before I decide to rinse it off all right so boom. This is the wig when it has been fully. You know, rinsed out, plucked everything I did pluck off camera, I'm just showing you guys. The knots and I'm gon na go in with my Ruby, kisses cream foundation lightly, pushing that into the lace. I don't want too much and then I'm going to use that brush that they sent me and I'm gon na put it in my makeup powder and set it and, as you can see, it is a perfect match to scalp. So now we are about to start working on the actual install I'm gon na. Take some rubbing alcohol really scrub my scalp and get off all that extra makeup, and you know Gunk this on my face because I'm actually using glue in this video. So after that's dry, I'm just pulling the wig down to kind of see where it lays at um the hairline is smaller head friendly. I would recommend it for smaller heads as it does stop ear to ear for me and I have a pretty small head. So I don't really have to cut much at the size, as you can see from right here. I am literally barely cutting anything and then after I sniff that piece off. It goes perfectly around my ear and I'm just going to do the same thing on the other side, I knew this install was gon na, be fire when the wig was looking this great and it wasn't even on my head yet so what I'm doing right here Is I'm just cutting off that excess lace? I'M not gon na need that much to work with, and I'm gon na put some mousse on the front of the hairline and just brush it back to make sure that all the flyaways are like out the way. Once I start sectioning the lace and cutting it after that, I cut my lace into three sections just because it makes it way easier to work with. Sometimes when you take all of the lace from ear to ear and try to lay it down, it doesn't go. How you want it to so I like to use three sections or you know you can use more if you want just so, you can have better control over it and then, after that, I am going to put my hair up and begin getting ready to pull The wig, so the first section that I always start with, is the middle I'm using my red even glue at first. It wasn't coming out because there was like a little lump in it, but I took it out and now I'm spreading that out with the end of my Edge brush. I don't use the red tail most times because when I use like this much glue, the rat tail does not end up spreading it out evenly like I wanted to so after that's dry. You know I fainted a little bit when it's almost clear. I like to brush the hair back to make sure it's not sticking to the lace, and then I like to just pull the lace over to where I need it to be. And after that I have a seamless hairline, as you can see, there's a strand right here that was sticking down. I decided to just take my brush, you know brush it back, make sure that none of the hair is sticking out of place, and I like to just go in again with my comb and really push that lace onto my skin smell too, and I'm taking a Little dance break right here. I was really feeling myself with this hair. Like you, nice hair has never ever ever disappointed me. That'S probably why I love working with them so much, but I'm gon na go in with my next section. I put a lot on the side just because the sides are always the first to lift for me and I like to make sure my sides are very secure. I know the install is looking a little sloppy right now. You guys are probably like what the hell is she doing. Don'T don't worry about that? Don'T worry about that. You won't see. Just you just got ta trust the process. I know it looks sloppy. The way that I do it, but trust me, you don't have to do all those extra steps you don't have to do all those extra steps to get a melted, install. That'S still clean. It'S gon na look clean in the end. I promise y'all see how brushing it just makes it look so seamless into the hair like it just it just it just gives it that that um, I don't know how to explain it. It just gives it that that extra-ness it does. It makes it look a lot more clean and, after that, I'm gon na put my hair up just to do the last section, I'm gon na take my glue again, pull it back to where I feel like it needs to be, because I, like my glue to Spread a lot, I don't like it to be more at the front. I prefer for it to be more at the back, like touching the lace, so that way it doesn't look like tacky once I put the lace over it so after I pull it, make sure that it's in place, I'm gon na secure that once again by brushing It and then going on my comb and then after that, I'm going to unwrap my Edge band that they gave to me in the box and I'm going to use that same Edge band and just tie my weight down tight to secure it. Let that sit for about 10 minutes while I'm melting, it so 10 minutes and then we'll be back well. This is what the wig looked like after I took that edge band off my camera cut off, so I didn't get to record me taking it off, but right here, as you can see, the lace does look very very good. Only thing I have to do now is cut it, but I'm just taking some mousse and really brushing the hair back right before I cut it. So that way I can see the lace perfectly and I can cut exactly where I want to so I'm cutting off that excess. Once again, we don't need that and then I'm gon na actually cut this big part into two sections and just start working with those smaller sections. The more that I go along, I'm not too sure if y'all can see this part, but I'm basically just going in my little. You know zigzag motion. I came close to the camera. Do y'all see how melted that lace is the more that I come close to the camera. You can see that it really is on my head now. I know what y'all saying Kiana that looks: white and ashy like a skinny polar bear. That'S fine that doesn't matter that doesn't matter because guess what we're gon na fix that it's! Okay! If it looks a little bit ashy right now, I wasn't really liking how um the scissors were giving me on my eyes. I didn't like the effect it was giving me the scissors just weren't working on the sides for this install, so I decided to go in with my eyebrow razor that usually does help. Sometimes sometimes I use scissors. Sometimes I don't. This is what the wig looked like when I was fully done, cutting it and I'm just going to take some even spray and secure wherever was not secured or wherever was kind of lifting up. My last video, I said that I was trying this even black can, for the first time just know, I'm never going back to no other brand and I'm spreading the excess onto my lace. After that I tied it down with just a regular elastic band. I like to use these ones whenever I'm using my melting sprays or, like you know, doing my touch-ups and I like to use the ones that the brands give me on the glue so right here, I'm just using my wax stick and slicking the hair down. Just to get it ready for actually you know being styled. So this is what the wig looked like when I took that band off. As you can see, most of that whiteness is gone. Most of that whiteness is going, I'm going to go in again with my wax stick and now I'm going to go in with the hot comb. I'M gon na go on my hot comb and I'm just going to make sure the hairline is as Sleek as possible. I'M trying not to burn myself because the front of my hair is still a little bit wet. I did do some Spritz on my hair um, the Fantasia Spritz, the melting Spritz everybody uses. I use that whenever I want to get the whiteness off. I did use that off camera just to be mindful, so it wasn't just the black spray that got rid of it and right here, I'm parting out my edges on each side trying to make sure they match up because, like I said in my last video, I Need my edges to be twins, not sisters, there's a difference. This is like the third video where I'm talking about my Ig getting hacked, but I made a post yesterday and 200 out of my 400 followers like this, so I felt you know very special about that. That made me very happy to know that my engagement is that good and right here, I'm just cutting my edges with my eyebrow razor. I wanted that, like you know soft effect, I didn't want my edges to look as hard in this video and after that, I'm taking a whole bunch of moves, because I noticed um doing my edges works better when the hair is like fully saturated and mousse, and Then I'm just going to take my brush and swoop swoop swoop to the gods till I feel, like my edges, really do look like twins and not sisters. I don't want them to look like sisters. I want them to look even on both sides so yeah. This is me just going back in after that, I'm taking the even spray, and I'm really just setting those edges, so that way they can actually last and they won't lift or get out of shape after I'm done like this is really the point in the video Where you can start to see the vision coming together, like you get to see it, and I put my melt band on back again just to really melt those edges when I take it off, look at how soft and clean that looks so now, it's time to Just style the actual hair and then we're gon na be all finished. What I decided to do was I decided to actually layer the hair and do some curls, I'm just spraying my heat protectant on there y'all know that's only heat protect knives. I forgot the name, but I will put it in the description box below only heat protection. I use only one that gives me the best curls after I section out the hair, I'm just going to be taking my curling wand and I'm gon na curl them kind of like away from my face. I curled them at first and then afterwards is when I realized like oh my gosh. I should try layers because I have never ever ever tried layers on a body wave wig and I've always wanted to try layers on the body weight Wing. So I'm like you know what this is: a great quality Amazon wig. Let me go ahead and try it, as you guys can see from me dropping this curl right here, the hair curled perfectly. Like I'm talking, I had no issues curling this hair. I was really surprised this was the fastest that I've ever curled a wig. Actually it takes heat well, it did not burn. There was nothing wrong with it and it held a curl beautifully. Those curls are actually still in my head right now, so yeah after one side was fully finished. This is how it looked, and I decided to just go in with the scissors try to layer it. I am not a pro, as I said before, this is my first time doing it, but it turned out so freaking cute and then, when I curled it, that's how it looked so I decided you know what I'm gon na clean up my part and I'm gon Na do the same thing on the other side. Thank you all that body when I brush it into place like it's so pretty so pretty so I'm just sectioning out the hair and doing the exact same thing that I did on the other side. I was feeling myself so much here that I actually ended up curling it backwards and I curled it completely wrong. You could tell from right here with the fact that the hair wasn't sliding that my movements were off and then look when I did it look. What happened when I did it, I took it out and I was like what the like exactly so. This was the finished product when I finally fixed it. This is, you know just a video of me feeling myself and then I'ma start getting into it right. Now. All right, so we're really about to get into this hair first off y'all, see how I finally did layers, because I don't usually do layers, I'm not very good at layers um. I ended up cutting this tie too short, but it's whatever y'all for 20 inches 21. Now come on now: okay, I don't know if it's just me, but this hair. Oh this hair rub this hair stiff wear like what I feel like y'all, really be simple: y'all really be sleeping on Amazon. Wigs say it again: y'all really be sleeping on Amazon, because this is the Amazon thing from United here. Gorgeous wait just look at how bouncy it is how well it curled this hair curled like absolutely. I didn't even have to do anything. This is the fastest. I ever curled hair lace, melted. I know you're in part of the process. Y'All, probably think the lace was not gon na melt. Listen, my process is different and it definitely melted. This is most definitely transparent, lace. I know some vendors like a zombie lion. This is real transparently, you could tell especially from the quality of it. I am absolutely amazing. Is it cold like what? Oh, my goodness this is probably. I think this is the best Amazon wig I've ever had like and the way the color job was done. It'S perfect um the knots bleach perfectly for one check it out in my description box below love. Like absolutely love, I highly recommend this thing. It'S probably one of my favorite looks yet and I finally mastered how to do layers. It wasn't even that hard on this hair, the color job is amazing, like it just complements my face so well. This color goes with every single thing: it is 20 inches. It is 180 density and is a 13 by 4, transparent lace, frontal from the company nice, hair y'all, know hold on hold on. Who else do you know that has a you nice hero? Who do you know that? Has a nice hair robe, nobody, nobody, okay um! I hope you guys enjoyed this video, don't forget to like comment and subscribe. I love you guys. Bye foreign


Comments
Nadine Grant: I love that look. That wig looks great on you
Kemesha Johnson-Braham: Love this ❤
Kemesha Johnson-Braham: You are so beautiful child ❤❤
Indolent okra: 10:15 lool