*Detailed Wig Install* 24 Inch Silky Straight Platinum Blonde Highlighted Frontal Wig| Arabella Hair
- Posted on 14 January, 2023
- HD Lace Wig
- By Anonymous
This video will be very detailed. Getting back into my step by step videos. I used bold hold liquid gold which is NOT a glue for this wig install. This is considered glueless to me and many others on youtube. No adhesive was used only the liquid gold which is considered to be a gel. I'll be showing every step along with how to customize your wig to your hairline and how to get it to be silky straight. This wig came already colored beautifully from the company. No work was needed on that part.
Thank you for watching as always! Make sure to like, comment, and subscribe and follow my socials xoxo
TikTok: https://www.tiktok.com/@lifewlesh
https://www.tiktok.com/@leshhaaab?is_f...
Instagram: https://www.instagram.com/leshhaaab/
WIG DETAILS
************** #ARABELLAHAIR OFFICIAL ************** ╱
The hair I'm using in the video➤https://bit.ly/3FvMj5R
Hair info:13x4 Lace Front P18/613 Blonde Highlights Body wave wig 22 inch
Exclusive discount Code: AYTB get 18% Off
—————————————————————————
- Installment is available.Afterpay&Klarna&Credit card
- Free return service in 30 days
- Fast shipping service in 2-5 days
HOT STYLE RECOMMENDATION!!
[Top 1.]13x4 Loose Wave wig➤https://bit.ly/3hz6uaR
[Top 2.]5x5 Real Glueless Lace Body Wave wig➤https://bit.ly/3HA4w4M
[Featured]Honey Blonde Piano Highlight Color wig➤https://bit.ly/3PvoXBF
360 Lace Body Wave wig➤https://bit.ly/3V0SNiD
Chestnut Dark Brown Color Wig➤https://bit.ly/3hw09x1
[Pre-colored] Balayage Highlight color wig➤https://bit.ly/3uPJHuu
[Melt HD Lace] Body Wave wig 210% density➤https://bit.ly/3W7flzS
#arabella hair social info:
Youtube: https://bit.ly/3Ou6vZe
Instagram:https://bit.ly/3QnQuEi
Tiktok:https://bit.ly/3zZbYSU
Contact for promotion:
Email: [email protected]
WhatsApp:+86 18937456160PRODUCTS USED:
PRODUCTS USED:
Hot comb - https://a.co/d/fNs64F9
Conair Infiniti Pro Brush Dryer: https://a.co/d/ezLsEl6
Babyliss Flat Iron : https://a.co/d/7KTaymw
Sebastian Shaper Hairspray : https://a.co/d/9glQ7d0Bold Hold Liquid Gold_
Design Essentials Silk Essentials Blow Dry Spray :https://a.co/d/3VgHon8
Silk Serum: https://a.co/d/42fUx2h
Spritz: (mini bottle) https://a.co/d/axFRy7e
Check out products I love on my Amazon storefront
link: https://www.amazon.com/shop/influencer...
TIME STAMPS:
INTRO 00:00 1:29
WIG PREP: 1:29
EAR TABS: 4:04
CUSTOMIZING THE HAIRLINE (LOW HAIRLINE FRIENDLY): 5:27
MELT DOWN : 9:26
STYLING: 10:30
EDGES :19:06
FINAL LOOK : 24:00
FOLLOW ME
TikTok: https://www.tiktok.com/@lifewlesh
Instagram: https://www.instagram.com/leshhaaab/
Collabs: [email protected]
About Me:
Age: 24
Sign: Gemini
State: Virginia
Camera: Sony ZV-E10
DISCLAIMER: I am in the Amazon influencer program and some links are affiliate links, meaning I do receive a small commission by you purchasing a product or just by clicking on my link. No purchase is necessary.
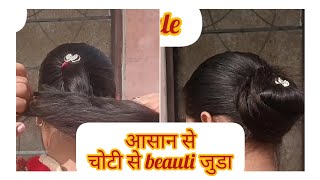
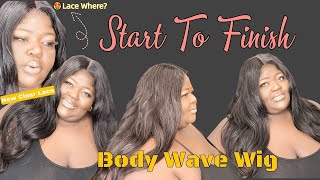
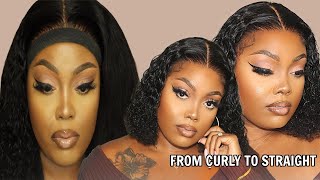
Y'All, better go get you one of these, so you can have silky silky, hair and half the time like crazy, okay, okay for the whole week, plus, what's up y'all welcome back to my channel to get into the second install of the day you are haven't seen The blog, if y'all, haven't seen the blog wig that I installed that I'm doing all these ways in one day so hurting other wigs so make sure y'all watch the you know, videos back to back next wig we're getting into. Is this wig right here? It is like a platinum blonde grayish with black dark brown Roots. This is from Arabella hair. This is a full frontal on the inside guys, so I'm gon na go ahead and cut my ear tabs out and everything and just pretty much um, you know fit the width to my head. Before we get into the install. I am going to be doing a glueless install using my boho liquid gold for this, because I'm just installing it and taking it right off. I am going to be adding wigs back to my wig site. I just been waiting until I could get more like. I didn't have a lot, so I have a lot of pro mom and picking up my promo again. So it's going to be plenty of content coming out, make sure you guys support, go. Follow me on Tick Tock and my Instagram reels have been so hard for me to get views on lately. So go follow me on Instagram and support me please. I would appreciate it so much, but I'll be going in with this. Even this is the tinted lace spray, and this is in the shade, dark brown and I'm just going to go on the inside of this lace with it I'm not doing the front. I'M only doing The Parting area the front I'll be putting my makeup on this. Wig does come with an elastic band on the inside as far as customization. I did pluck this wig and I did not reach the knots. This wig is a 613 wig at the base, so I'm going to teach you guys something if you don't don't know already. If you get a wig that is blonde or yellow on the inside, it is 613 base. That means that they put the color. On top of the wig, it did not start off black. So when you have a wig like that, you cannot bleach the knots I had to learn the hard way. This happened to me with another company. If you have a wig that starts off blonde and you put bleach on it, it will Rip all the hair out of the lace and you will be Sol okay. So when you have a wig like this, where they put the black the brown or black color on top of blonde hair, and then they tone the rest, you're gon na have to use a color remover, which is what I did. If y'all want a video on how to color remove color from wigs, let me know I will make a video on that, because I don't currently have one, but you put the color remover on the bottom and it will remove it from it. So you'll get that bleach knot, look without having to bleach knots because you're not bleaching them you're, just taking the color off. So let's put the wig on and section out the ear tabs now I know I have a low hairline if you're new here I have a low hairline, my hairline is low on the sides and good in the middle, so usually I'll always have to fix. My wigs to um my head because they're never right like they never come down far enough like this wig right here already can tell I'm gon na have to do some maneuvering, so first things. First we're going to cut the ear tabs. You want to part trust me y'all, you want to part if you don't we'll, have a bunch of hair everywhere. This just makes your job a lot easier when it comes to being like clean with your installs, so part your hair right in front of the ear and then you're gon na cut straight up where you parked at so then you don't have as much Fallout and That fits perfectly around the ear and we're gon na. Do it again on the other side, so again, parting right in front of the ear, and I tried a new plucking method. Tell me what y'all think I'm trying to go for the more natural look, not as like plucked looking. If you know what I mean on the opposite side, it's hard for me to cut this way. So I start in the back. I'M gon na cut noise in the back and go around this way and there we have our stuff. So this is transparent lace on this wig and, like I said, I have a low hairline, so I need the sides to come down in the middle to be cut out, so we're going to go in here where my hairline ends up and suction out some hair. I usually always add some extra plucking in the middle, because I know that I'm going to have to do this and it's okay, because most people's hair naturally is um, Fuller in the middle. So it never really bothers me, and you want to just section it out where your wig cap ends at and that's pretty much where this is. If you can't tell you know, get up on it, look in the mirror, make sure you're in the right spot or you can add some extra hair just in case you're scared that they're going to do too much because you can you can always you know you Can always cut off more, but you can never put it back so now. What I'm going to do is I'm going to take my pinking shears. I'Ve been liking to use these lately. These have a zigzag. So your lace, like you, don't have to zigzag it yourself and I'm just going to cut and leave a little bit of lace but cut as close to the hairline as possible. And you always want to part the hair out. Because, if you don't, what will end up happening? Is you'll? Have this hair right at the edge that is cut at the like in between use my regular scissors for this? If you cut, if you don't part the hair, what you'll have is some hair that is cut in between and it'll look like it it it's been like shaped up like a man's haircut almost because you didn't section out the hair. Well, it won't look like you've plucked that area, so we've cut out the metal now. So my ball cap is ending here. It ends back here, so I'm just going to pull this in front of it just a little bit. So I can make sure I'm lining everything up good and then the sides have to come up here, something on this side open it up, making sure it's fitting good make sure that the hairline is nice and crisp and everything is out the way. So I'm using that evening, red lace, spray and I'm about to hot comb, everything back, so we can get into the actual install portion, I'm using the vocal Liquid Gold. I don't know if I said that already, but this is what I'm using to lay my wig down. I never do crimps like I feel like that would be so cute. Maybe I should do crimps. I don't know. I think I'm gon na do straight. The middle part, the super molded edges, yeah, that's what it's looking like. My hot foam has a short in it and it's so crazy because I was saying in my other video when I was in the beauty supply store the other day, picking up cereals. I literally went down the Hot Tools aisle and said to myself. I should buy another hot comb. I just said that I think I've had this one. For a year she she's been through the works. Okay, she has been through the works. I really need my battery to charge because my light on my phone for my Tick Tock is not a good thing. What some content you guys would like to see for me, I would love to start creating like some different kind of videos. I feel, like you know, hair videos are repetitive, it's the same thing over and over and over again, and I can only teach y'all but so much that's why I try to do like different hairstyles and stuff, so it can be um. You know not so so much the same, don't let me know the bowl hold you want to go in front of your wig cap. Do not put it on your wig cap. Your wig cap will roll up. If you put this on it, something I don't know. Okay, y'all sorry, I'm sitting sideways my camera's about to die, but I just want to tell y'all something before I got off so I'm about to go in with this and blow dry, the hair and flat iron it and then I'll come back when I'm like doing The edges and stuff and I'll just make be very detailed with the rest of the install. You know the front delays all that, but I want to come in and tell y'all about this, because this product is like so freaking nice. It'S a great hot tool. I use it on my real hair um just to make things easier made my life easier, but I'm using this on my wig too, because it straightens it really really nice before I go in with my flat iron, I'm using my BaByliss Titanium flat iron here and Also using this here, both things can be found in my Amazon storefront go shop. Those two Duos even on your real hair, will be like so good, a great combo, I'm going to be spraying this on. First, I use this on my natural hair as well. This is the design Essentials silk line. I use this and the you know: silk serum to flat iron and blow dry, but you spray this on, while you're blow drying, and then you put this on with your flat iron just for a silky, install or silky hair. In general, so I want to go ahead and do that off camera and then I'll come back when um I'm done blow drying. So y'all can see what it looks like just with the blow dryer and then I'll come back on again with the flat iron. I may be able to show y'all a couple of clips of the flat ironing the hair. Both of my batteries are dying for whatever reason I'm stuck in this bad dilemma, so I'm gon na charge the battery and then come back when I have at least a little bit of charge, so I can show y'all just you know throughout the process. What it looks like and then I'll make another video showing y'all how to do that stuff, step by step like how to get your hair silky using this product and that product. This is just the hair dryer, the brush dryer, whatever you want to call it it's by Infinity Pro Conair. Do y'all see how straight this is. I wouldn't say you can go without the flat iron, because you know I would still want the flat iron just to run over the ends. This is like 613 platinum blonde hair, so you can see like the little Scraggy pieces but like them all come on y'all. Better go get you one of these, so you can have silky silky, hair and half the time like you know how long it would have took me to blow dry it up come on. I would just say to be aware: is that um it doesn't get your roots for real for real as good, because the brush you know like and it doesn't get super super hot. It gets hot enough, but not hot hot, to blow dry it from like super wet hair. So I always start with air dried hair, um damp, not soaking, wet and go in with a regular hair dryer just on the roots to touch the roots. From being so um like damp, because that's the only thing same thing happens with my natural hair is that the roots are still damp. But overall, I think this is a good alternative to using the hair dryer. So now I'm gon na go in with my Titanium flat iron fabulous Pro. This is the ceramic one and flat iron in sections using the thermal straightening Serum by Design Essentials, I'm on design Essentials, real bad y'all like real bad two pumps. I got my hair sectioned into two sections I like to focus on the top and the ends for real for real, like I'll blend it through, but I'll be wanting my hair shiny and the ends also are like the main important parts to me. But I know nobody want no scraggly in when I'm done flat ironing. I will trim the ends because I, like a nice blunt cut, healthy, looking wig trim your real hair y'all. Just like you trim the wigs trim both because you don't want to be holding on to length that look dumb like this is scraggly cut that make it look, make it look. Even I'm gon na go ahead and start flat. Ironing this I'm not going to add any additional products to it. This is going to be it. Someone listen to my music and Jam until I'm done and then I'll be back talking. There really is no method to the madness guys. I use a comb to Chase and flat iron, very normal foreign. I don't know. Thank you foreign. This is what we're looking like with flat iron and the blow dryer like do y'all see how silky that is, I'm just going to go ahead and just trim the ends real, quick, I'm going to come back in a little bit and finish the rest of the Install because it's 12 and I have a client and I need to be done so I can do her hair and then I have someone else at 3, 30., so um. I should be able to stop in between and finish this install and hopefully do my last install because I have one more to do for me like I have another wig to do, if not I'll just have to do it another day, because I like this wig, I only want to take this wig off, because I don't want those stragglies. I would rather much have just a straight install I'll, be back in a little plus it'll. Give me time for my batteries to charge up and we'll finish the rest of the loop get this lace. This thing been on here for, like so long, you know oh taking the same Foundation from earlier on the hand and we're gon na put some um, because this looks real dry chicken foundation and I'm going to go ahead and put that on the lathe. Get rid of that white foreign - I am, I am a Gorilla Snot and my moose, the OG's. No, this is what I used to use for. My edges like there was nothing that could top this to me. If you're doing like wispy edges, I recommend um hairspray, because you can't comb them out better versus this. This is, if you want your edges, to stay on Deck, hi foreign, together, hi hi foreign foreign, I'm about to go ahead and put makeup down the part and then we'll be doing the whole install. I wonder what the Ruby kisses shade as well. I think I'm gon na use the shade level 12.. The part look too wide, so I'm gon na go get my um matter of fact it's right here, so I can show y'all yeah, so black spray in the part together,
Comments
Darkskinn Tai: Can you do a review on Temu hair I recently found out about them…