Hairvivi Wig Install *Detailed* For Beginners | Full Wash Day Routine | Bintou Conte
- Posted on 15 January, 2023
- HD Lace Wig
- By Anonymous
IG: https://instagram.com/bintouxconte?igs...=
TikTok: www.tiktok.com/@bintouxconte
Email: [email protected]
Chapters
0:00 Recap
0:18 Hello everyone!
0:27 Long knotless braid takedown
0:51 Natural hair
1:00 Detangle
2:26 Blow dry
3:32 Cornwors
5:49 Wig unboxing
7:30 Cutting lace
9:23 Applying glue
11:08 Applying wig
12:12 lace melt
14:21 Styling
Watch me install a wig by Hairvivi with details for beginners. You'll also see my full day wash routine for natural hair.
Hair Specs
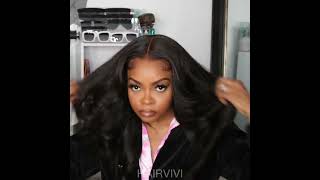
Hairvivi "Jayla" wig
13 x 6 frontal
18"
Dark brown lace (specific to me)
Code: HAIRVIVIGO for $30 off
Lace tape color: Mocha
Wig link: hhtps://bit.ly/3xPcyBV
Come closer hello, everyone welcome to a new video if you're new here my name is bintu in today's video we're going to install a wig by hairvb. The first thing I'm going to do is take out these braids right now. I have large, really long, knotless braids and I haven't had braids in so long. So when I got these like, I really wanted to salvage them for, however long um and then I got the wig and I just went back to wig life. So here I am taking the braids out and then I'm going to wash deep conditions all of that before installing the wig. Once my braids are out, I'm gon na detangle before getting into the shower, and just like that, my hair is shampooed, conditioned and deep conditioned. I love the deep conditioner in for maybe about 10-15 minutes in the shower. I just took a shower and then took it out after I finished washing my body here. You'Ll see me splitting the hair into four smaller sections and then I'm gon na start with the blow dry process. This consists of a leave-in conditioner. This is the do grow brand. I just put a small amount and put that small amount into one small section, and then I go in with the chi heat protectant. This is the one the red bottle: yeah, the chi heat protectant spray, that on my hair is a little damp, not too dry, and then I go ahead and brush it and then blow dry. Y'All know the process foreign might be from the Beauty Supply. It might be from TJ Maxx. Nonetheless, I really like it because it has a bunch of different attachment heads to it, and I really like that because you can do you - can use it for a bunch of different styles. But here I'm using like the comb attachment to blow dry, my hair and I do it in the the different sections it takes, maybe like 15-20 minutes to go through everything, and then I separate each part and just put it in twists. I don't usually do this. I usually like braid it, but I was like. Let me let me do something different. I guess um, so I just put it in twist just to keep it straight or keep it stretched. Still foreign. If you know me, you know this is the face of fatigue. So I'm gon na go to sleep it's the next morning and I got my glasses on so here. You'Ll see me just braiding my hair down into cornrows getting ready for the install. Thank you. My cornrows are actually really important to me because I don't get to see my hair often here. I am just oiling my scalp with this castor oil. I believe this is definitely from the beauty supply store, but I oil my scalp a couple times a week and I make sure that I do that because I don't get to do anything else with my hair. Now, I'm going in with some edge control. I forget what brand this is, but it's the Blueberry Bliss scent um, I'm sure a lot of people know what this one is called. I just figured and then I'm going to select that back with um an edge brush, so I've had this brush for years now and it very obviously broke, but I'ma still use it, because it's amazing, like look at that slick here, I'm just wiping my hairline with Alcohol on a cotton ball. I think this step is also really important, because I've experienced times where I'll just put my wig on without this step and it'll slip right off, come close. You enjoyed that unboxing. If you did definitely follow me on Tick Tock for other videos like that, but here we have this gorgeous gorgeous wig, what look at it and it smelled really good for whatever reason um. So I got one where, obviously it is pre-plugs the NASA pre-bleached and the lace is tinted to my actual skin color. When I tell you how to put my glasses on girl, how to put my glasses on to actually look at it like, obviously you can see the lace, but it's really. It really gives scalp once it's on just to give you all some specs on the hair. This is the Jayla wig, it is 18 inches. I will have it linked down below and the lace color is mocha. They also have true lace, tape that I wanted to try, but once I put the wig on like it just matched my skin color, so I didn't need it and I didn't even have on a wig cap. So it's really like it's a really a big deal. Like look at this hairline, the reason why you can't see my braids under is because they have like they have like a sewn in lit like wig cap in the wig. I didn't show that part unless you did see it, but it's like sewn into the wig here, I'm just cutting off the ear tabs, making sure the wig fits accordingly and then I'm going to adjust the adjustable straps. This wig actually fit really well. Once I cut the ear tabs off The Sideburns fit exactly where they're supposed to once I cut the lace off, it was like like see how you can't even see it for real. I had to put it on my shirt so that you can see it for real in order for me to cut the lace exactly where I want it. I have to cut the lace into smaller sections or like tabs and just cut the part where it meets. My hairline um and it's really unfortunate. I have one of those hairlines where, like it comes forward near the tip of my brows, but it's a little bit back in the middle. I don't know how to explain that, but I just don't have a straight across hairline, where everything is the same length. So this is what I have to do. This part was the most tedious, because not only could I not see the lace, I also didn't want to cut myself like cut my skin or cut too much cut it's okay, if I cut too little, but for me to cut too much would have been so Unfortunate because this lace is really really nice, so here I'm using an eyebrow razor just to go through and give it that Jagged Edge as opposed to a straight across cut and, like I said like, you literally, cannot see this lace on my skin. Look at how gorgeous this process took forever by the way. Next, I'm going in with this even lace Bond, it's called Wonder, lace Bond, but it's by Eben. I got this from the beauty supply store, I'm using that so Crystal wig back a little bit, I'm using that to kind of outline where I just cut the lace and and put it into that shape. This is what I was saying before about, like my hairline. Being weird, because where I am right now that is my hair, like I have to put lace on my hair, but I'm doing this because if I put it down any further, it would basically touch my eyebrows, especially right here would basically touch my eyebrows and you'll. See in a second so and now I'm moving the wig back and you can see in the middle of my head. There is so much space so much space, but on the sides there is very little space and that's where my hairline meets. But here I am just kind of spreading that glue and it's really nice glue because it dries really quickly or gets tacky really quickly, and I think it does have a really strong hold. I just have to be careful when taking it out so that I don't rip my hair now we're going in with the heavy duty stuff. Y'All already know the ghost Minds I'm putting this right, where I put that original lace glue and then spreading it backwards. So I did one layer of the Wonder, lace Bond and then I did three layers of the ghost Bond and then I go ahead and lay the wig down. I don't usually do it perfectly, so there will be some parts of the lace that aren't adhering to the glue that I have down. So I'm just gon na go over it and add some more glue. Usually it's on the ear tabs or The Sideburns. So I'm gon na go ahead and do that before I tie it down with the scarf. I couldn't find my satin scarf, so I just went in with a regular scarf. One thing I wish hair BB provided was a wig band because I feel like it would have been specific to their lace and that would have been helpful in the melting of the lace process. Nonetheless, it came out really nice like in this next clip. Look at this look at this: what wig? No, what wig for real, because this is so nice down to The Sideburns where they were lifting and I melted it down down to the other parts of the hair that aren't parted, where it's still given scalp like get into it here. You'Ll, see me hot combing. My hair, I just went in with the wax stick or a wax stick and um went through with the hot comb. I want it to be really flat, so the wig already is really flat for a frontal wig, but I wanted a flatter I feel like. I have a small head small face so, like everything needs to look a certain way for me, so I'm using the hot comb to go ahead and Achieve that look. Thank you. I also went in and straightened the hair just so that I could bump the ends. A little bit and to see, if you know the hair does well with heat, and it does really well like nothing changed. It got really straight and the ends were were bombed but also the Jayla wig has like bangs kind of, or you know like when you do two pieces on the side like this right here it got hair on the front. So I wanted to fix that up. A little bit, I bumped them bumped the ends, and I think it came out really cute. I am all done with this install. I absolutely love it. If I had a curling iron, I probably would have tried, like some face, framing curls, that I've seen the girls do, but no curling iron, but I absolutely love love, love the hair and when I do different styles, you'll definitely see that as well. Thank you all. So much for clicking on this video and I'll see you in my next one bye,
Comments
Jeannine J: the edge brush took me out! But yes the lace truly was made for us!!!! Good job on the install, we wanna see the half up half down look next :D
Jolene K: I love that you guys get their quality wigs
Bobbie Black: aye that wig was bomb straight out the package looked really good