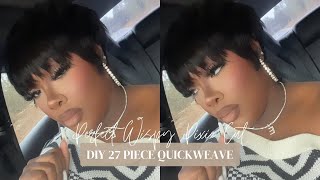
Bomb Red Brown Color Lace Front Wig + Bangs Cut Tutorial | Ft Megalook Hair
- Posted on 16 January, 2023
- HD Lace Wig
- By Anonymous
●▬▬▬▬▬▬▬▬▬✤#MegalookHair✤▬▬▬▬▬▬▬▬●
☞Get Extra 20% Off With Code:MYtb20
Same Hair I’m Using in the video:http://bit.ly/3kdHNBR
➤➤Hair Info: 13x4 transparent lace red brown color hair wig 22 inch
Official website:➤http://bit.ly/3W4aQ8g
#Balayage Wig:➤http://bit.ly/3QrpwMB
New pop wig:➤http://bit.ly/3IK5g83
Contact us:
Contact us: E-mail: [email protected]
Whatsapp: +8618903741680
YTB : https://goo.gl/8xk6nX
INS:https://www.instagram.com/megalookhair...
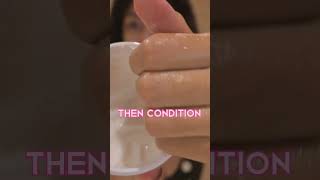
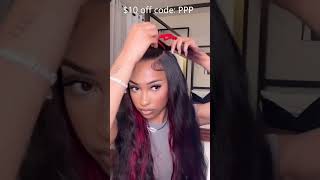
Hey guys and welcome back to my channel for today's video, I have this cute cute kind of burgundy, auburnish, um, copper, wig and I'm obsessed. I really wanted to try the side, bang type of look - and this is my first time attempting this. So it's probably not the best but I'll, be tweaking it up um throughout this week and try to make it perfect but really really cute wig. This is from Mega Look, hair and I'll put the link down below for the exact um same wig as this one, but I believe it is if they're 33 wig um in transparent lace and 13x4 um. I didn't really have any problems: um, it's just transparently, so you do have to tint it a bit more than HD lace, um and then the wig cap. The way it's made, I feel like there's a bit more lace, but I've noticed that's like pretty common with mega look videos, so it should be able to fit different head sizes and everything um other than that. This was really simple. If you guys want to know how I created this book and how I did this installed and keep on watching so I've already done the bald cap, like I normally do, and here is the wig. I just want to show you guys how I plucked it. It'S just like regular plunking, but I didn't bleach the knots it wasn't needed, but let's see looks a little bit yeah. I don't bleach the knots just because it wasn't that dark, so it felt like it should be fine, but here's how the colors looking really cute. It'S not all the way like a burgundy, it does have like a hint of like orange, very pretty um. I think I'm gon na go ahead and tint the lace before I uh glue it on just to make sure that it matches me better all right. So just just want to show you guys the lace type. It is a transparent lace that is pretty thick, it's on the thicker side, but um, it's not bad at all. It can make it work. I have tried this lace before um, and this was the highlight wig that I had tried the longer one um a couple months ago. That was the same lace, so similar vibe all right. Let'S turn this on. Hopefully, this one fits better than my last video. That was a little annoying. This wig does come with a band like bigger band. It definitely fits way better than my last install it's great. Now we just cut off this excess and Lace, or I want you to cut around my ears here. Let me fix the back first. Okay, I think I've cut the excess lace off um. It'S kind of oddly made um it's more of like the explain it. It just fits a little weird on your head, so you do have to cut and make sure it fits. You comfortably and I adjusted the straps in the back, so it's nice and tight. Now it is time to make those dots, so I know where I'm putting the glue yeah it's just too bad first or something like this. I would like them too far back because I just don't want glue around my hairline, so this is what I normally do. I feel like I'm definitely gon na have to cut some right here. It looks like I have two more cutting: oh, my goodness, lace on the sides. All right just make the dots all right. We'Ve got this. The marks I'm just going to clean this area up with some alcohol kind of hand, sanitizer and then I'll, be going in with my bolt, hold active and do about three layers: foreign band on, of course, using my melting bands and I'll be back in about five Minutes all right, so it's time to cut the lace, foreign and I'm going to use a combination of scissors and an eyebrow racer. All right, I might put a little bit of tint. Just a tiny, tiny bit just gon na make sure it blends is doing its thing, I'm just going to straighten the rest of the wig. So I'm going to straighten it and then curl at the ends and I'll show how I'm doing that as I go along. But first i'm gon na be putting the chi silk infusion and then just styling the wig, so I'm just like twisting the ends up like that. I don't want really. I don't want this to be perfect. Okay, I, like I'm, just doing little curls at the end foreign, so I'm going to cut this section shorter. I'M gon na plan with this wig is to cut it short eventually, but just for the meantime, I want to see it longer. So this is how we're currently looking not bad, definitely go working progress, type of look foreign area, I'm just going to straighten everything, do the parts to the bank and then curl take this off foreign part, I'm thinking of doing the side part, because I'm going to Do bangs as well I'm gon na do my wax sticked foreign. I realize I forgot my little little straightening iron curling irons, so I'm just going to use my big straightener to kind of get a little Bend and the edges and then I'll loose them up and lay them and try to finish the rest, real quick. It worked before I burn myself even more. Let me clip all this up a lot of bomb loose and I'm just gon na make some tint in there babies foreign wait for that. To do its thing. Okay, let me put some tint up here too. I'M gon na miss something like that. I might have to wait for that to dry, so I can finish the bangs, but I'll just put them aside right now, starting with me, I now know how to do this, so I just need a deep part. Then all of this will go to the side. This bangs here will become Banks and the rest, but maybe I should perform foreign or as bad as I thought they were going to. Okay, let's cut the banks, I'm scary! Oh, I already see the vision. Do you see it? It'S cute? Okay, let's I'm just worried about this part. I lost a picture, but let me just do this first, starting really long. Okay, it's actually working! You guys see it. Oh my gosh foreign! It'S actually not that bad! Let me make this a little shorter or something's Pokemon. I don't know okay, okay, so I think it is working. We might just add a little or not. I'M just leave it like this for now and then, if I need to add anything next time, I could probably foreign this thing's about to die soon. So let me hurry up just just layer. This is all I'm adding right now. Let'S see that should be good. Now we Style, I don't want it to be too styled. I feel like I brought the wrong tool. I should have definitely used curling iron. It'S okay still make it work, I'm going to show you what I'm doing all right guys. So I think this is the final look. I I think I'm happy with it, but I feel like I could also tweak it up and I probably will on my Tick Tock, if you guys go, follow me on there. It is the same. I think it's still delizo on there um and I should be - I don't know kind of want to fix it up. I might make it shorter or something, but for right now this is that may work so for as of right now. This is the final look. We are all done pretty, please, the palette looks just it's very, very cute. Only thing is like I wish. The lace was a little bit better, but I already knew that this was gon na, be um a transparent, wig uh, but other than that really cute. The hair feels really really soft, so good right now it was easy to work with and yeah. I hope you guys enjoyed this video if you did give me a thumbs up. Let me know if you want me to try other styles or if you want a tutorial on another type of style, if you did enjoy give me a thumbs up and also subscribe, if you haven't already but yeah, that is it for this video, if you guys Want to see pictures, um or videos on this hair then follow me on Tick, Tock and Instagram, I'm more active on there and yeah I'll see you guys in my next video

Comments
thatgurlcrisan: I love your videos❤
Elysia Jennings: Love ❤