Most Realistic Natural Glueless Kinky Straight Wig For Beginners | Sunber Hair
- Posted on 05 January, 2023
- HD Lace Wig
- By Anonymous
#lacewig #sunberhair #install
THE MOST REALISTIC WIG INSTALL! I'm falling in love with blowouts and wigs that look like scalp. Here are my tips and trick to install your hd lace units without using glue. I love it!
♡ Watch in 4k & Subscribe: https://www.youtube.com/forevercryssy
▬▬▬ WIG DETAILS ▬▬▬
Using My Special Code to get EXTRA 18% OFF:FO18
●▬▬▬▬▬♛ #SUNBERHAIR ♛ ▬▬▬▬▬●
♛All Wigs can be paid in 4 installments interest-free, buy now, pay later!
Direct link: ➤https://st.sunberhair.com/efpva
Hair Details: #lacefront Natural density 20 inches
https://www.sunberhair.com/ ➤ Hot-sale wigs: https://st.sunberhair.com/efpvc
Super Natural 13*4 Lace Front Bodywave Wig ➤https://st.sunberhair.com/efpvd
Invisible 13*4/13*6/5*5 HD Lace Wigs ➤ https://st.sunberhair.com/efpvk
★LIKE BEYONCE★Ameera Recommend #Pianobrown Water➤ https://st.sunberhair.com/efpvh
★Hot And Popular #Reddishbrown Body Wave Wig➤https://st.sunberhair.com/efpvi
Top Selling In Sunber Hair➤ https://st.sunberhair.com/efpvm
Just FIVE MINUTE #Vpart Natural Color Curly Wig➤https://st.sunberhair.com/efpvn
★Soft And Affordable Headband Wigs ➤https://st.sunberhair.com/efpvp
Best selling on Aliexpress store➤https://st.sunberhair.com/efpvq
Amazon Sunber Hair➤ https://amzn.to/3nG61TE
Social Media:
SunberHair YouTube Channel: http://bit.ly/3cB8r0d
SunberHair Instagram: @sunberhair: http://bit.ly/30lZfp8
#sunberhair#lacefront#kinkystraight
▬▬▬▬ MUST WATCH ▬▬▬▬
1. PLUCK LIKE A PRO: https://youtu.be/ouFJOAfWqWE
2. BLEACH KNOTS: https://youtu.be/nHxDaQWG9Tk
3. DETAILED INSTALL: https://youtu.be/583UXwGE4Hs
4. WAVY BOB: https://youtu.be/NRrgdRvpXTQ
5. SIDE PART BOB: https://youtu.be/XI_ZDURLc5o
▬▬▬▬ PROTECTIVE STYLES ▬▬▬▬
MY FAVS:
1. PASSION TWIST: https://youtu.be/7wMA_Qv2zjg
2. CURLY FRO: https://youtu.be/j8xHgc3ibys
3. NATURAL SIDE PART QUICKWEAVE: https://youtu.be/DIVAPv5YFX0
4. V PART + LAYERS : https://youtu.be/RYjHnb7-CBo
5. VERSATILE WEAVE: https://youtu.be/sRG_dfskG_4
6. KNOTLESS BOX BRAIDS NO BABY HAIR: https://youtu.be/vD14SlCCEuQ
7. BANTU KNOTS: https://youtu.be/JAbafgqWAUs
▬▬▬▬ ForeverCryssy's Social Media ▬▬▬▬
@ForeverCryssy
INSTAGRAM: https://www.instagram.com/forevercryss...
TWITTER: https://twitter.com/forevercryssy?lang...
TIKTOK: https://www.tiktok.com/@forevercryssy?...
TRILLER: https://triller.co/@forevercryssy
▬▬▬▬ Shop HERE ▬▬▬▬
♥ Business Inquires: [email protected]
♥Website: https://www.forevercryssy.com
♥Amazon Store: https://www.amazon.com/shop/forevercry...
FAQS:
Location: Atlanta, Ga
Height: 5'2
Main Camera: Canon T7I
Vlog Camera: Canon g7x Mark III
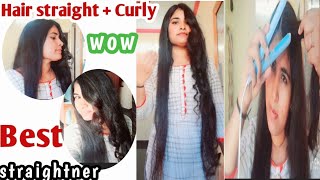
Foreign s, welcome back to my channel. If you are new here, welcome, first of all, happy New Year, it's 2023 starting off right. This is Summer's kinky straight unit that I'm going to be showing you. This is the length 20 inch, 100. Actually, 180 density, I'm actually going to show you how to completely transform this unit. I'M super excited to be working with kinky straight hair, just because it more closely mimics my natural hair texture, African-American, textured, hair or even like, if you're still wearing the relaxers, hey. Look. This may be a good alternative for you as well. I went ahead and I completely bleached the knots I do have a full video showing you that detailed process, if you do need more of a step-by-step tutorial, definitely go into the library and check that out. If not run this back a couple times, you guys will see you know that you got it right when it's stiff and I mean stiff thicker than Mayo. Okay, so straight out of the gate, I knew this unit was going to be beautiful, just because it did already look like it had been pre uh plugs, and so I wouldn't have to do too much to it. Let that sit for about 20 minutes completely wash conditioned uh the unit and then, of course, I've been obsessed with the true scalp tape. I don't believe this is something you necessarily need, but it's just something that I prefer to use so that I don't have to use any type of like wig cap or stocking cap and they can really do damage long term, so yeah 2023 healthy hair. You already know the journey we're on. I have my hair already pre-braided. I should have done those braids a little bit smaller, but y'all hey we're into it all right. If you guys need a video on how to quickly caramel your hair to kind of prep underneath the wigs, I have a video I'll, be sure to kind of link that one as well just check out the description box. If there are any coupon codes. Of course y'all know they will be listed in the description box as well, but this is a quick look at the hair, so it is not colored at all. I can tell that this is just a nice deep, dark brown and I do like that. Obviously, it is a little bit more on the reddish brown side just simply because of the light that I'm in in my bathroom, but I did notice straight out of the gate I was gon na need to trim these in. So you guys remember: I was the queen of always using some type of mousse to really just kind of get to the root of the hair, so we can kind of soften it up and really kind of tweeze. It today is no different. I did go ahead and just quickly do that, I'm actually taking my tweezers. These are like a slanted shape. I know. Sometimes companies will give you the flat ones, but yeah in this case. Of course they are slanted. I did quickly show you a lot of the goodies that came into the packaging like lashes. There is an elastic band, of course, a wig cap and uh, so on and so forth. Things like that, but y'all. I really really was excited to go ahead and just trim this up. I ended up taking this from like a 20 inch, probably to about a 17 inch by the end of this video. I did go ahead and just add some layers. This is not something you absolutely have to do, but I'm one of those people that really want my wigs to look more natural, um and yeah. So the way that I wear my natural hair is more than likely. I will have blunt and I don't really care for the wispy look just because I feel like it makes everything just flow a lot better and it looks a lot cleaner and Fuller from root to tip so yeah. So all that I'm going to do from here, I'm pretty much just checking my work. You guys will kind of see me go back and forth with the scissors all throughout this video just cleaning up as I go, I do have a more detailed layering tutorial. Of course listen! If you are new here y'all, we have everything you need from start to finish all right, I'm literally just going through the hair matching the left side to the right side, and you guys can see I'm just kind of pulling everything out going in a slanted motion. Nothing too crazy. This does not have to be perfect. I didn't end up adding layers all the way around. I like the perimeter of my head. I just added a few face framing layers, and so you guys can see typically I'll use like my razor comb to do this, but I really wanted this to be kind of, like a free hand, cut um and yeah. I mean this was really giving The Vibes of just like natural hair, so I already knew that the hair was going to be nice and full, and then once I go ahead and just kind of blow this out cause y'all keep in mind. This is like Midway Drive, so what I ended up doing is allowing this to kind of sit underneath my hooded dryer. While I did my makeup so that was about 15 minutes, so it did kind of get mostly dry and then of course you guys will kind of see me blow it out. So here I'm just taking a little bit of my mascara, which I have not had to do this in a while, but I ended up having some of that bleach seeped through causing over bleached knots. So whenever that happens, typically I'll go through with like some black hair dye and just kind of like touch it up and then, of course, wash re-wash reconditioned all that stuff. But in this case I just wanted to show you a really quick way to kind of get rid of it, but I just wanted to quickly show you something that it is that I do when I don't really have that kind of time right. So I did go through with my. I believe this is the EAP heat uh blow dryer, which did a great job of just blowing. Everything out you guys can see how it kind of has that, like deep wave blown out, look it's just really really textured. The hair was super full, like I said, 180 density um, and this is a 5x5 closure. So for those of you that are not really, you know doing too good when it comes to the the frontals, and you really don't want to have to worry about all the glue and just the mess every single day. I feel you, the closures are definitely a lifesaver. You can throw them on and go. You don't have to worry about gluing them down. You guys. I will actually end up showing you a trick um to really just kind of get these units to stick without being so freaking tacky to where you just feel like. Oh my God, I have to sleep in this wig. So I'm going to show you a really quick way to just kind of like Get it melted without it being like super permanent, so um you guys can see going through the hair. This probably took me about 30 minutes. When I tell you I was hot, your girl was sweating. Okay, I had to put the blow dryer on cool, but yes and then of course, I really wanted to make sure that the wig cap itself was um completely dry, so I took a little bit longer. There and then I attempted to pull this up just to see if it would look cute in like a ponytail yeah. It was just way too much hair. It was not doing what I needed to do now. This may have been cute with, like a headband. Y'All know the scrunchy ones: anywho, I'm gon na go ahead and take a foundation brush, doesn't really matter what brand um and then, of course, a little bit of hairspray. So in this case I'm going to be using the Broner brother to pump it up. I went ahead and just kind of pulled the wig directly over it. You guys it dries super fast and then, of course, I added just a little bit more over the top of the uh hair. Just so I can kind of further melt in, and I can literally see it melting as I was like applying this, so I wanted to make sure that it didn't like get stuck in the hairs and kind of give that weird. You know what I mean like just gelled up weave up look, so you definitely want to go through with a comb and then, of course, I just laid it down to rest. Okay, so anywho, I'm actually going through with my fhi flat iron. Just like, I don't even want to say quickly, because this was a bit of a process. If you are somebody that really want to keeps the texture - or you know, maintain the texture that the hair kind of naturally comes in, you could have just left it, as is completely after the blow dry. But I really wanted to give this more of a silk pressed. Look. You guys can already see how shiny vibrant look at that hair. Okay has a lot of body a lot of movement and y'all. I have not added anything to this hair at all. Obviously I do think there was a little bit of conditioner. That probably was weighing it down a little bit. I'M you know, okay, but outside of that y'all. The hair straightened like a dream, and the best part, is that I did not have to worry about any of those like really kinky edges that you tend to see whenever you're like working with kinky straight hair. So this company has done a great job, just at really kind of getting the hair to really mimic natural hair. So I'm okay, 10 out of 10 literally, so I am just gon na go through with the fine towards the top of the hair and also hit this with the hot comb. So you guys will kind of see me just going back and forth the closer that we get to the closure area y'all. I don't know if you can hear Dakota looking water in the background, but y'all. This is a Thirsty Dog. Why didn't y'all tell me Cane Corsos were like listen anyway. We don't get into it. Anywho, I'm just gon na continue to go throughout all of the hair, and I feel like overall, this process from like bleaching it washing conditioning blow drying flat. Ironing literally, is no different than going through with your natural hair. The only difference is you can take this wig off. You can take this wig off, you don't have to worry about the heat damage and then, of course the style is pretty much going to be set. So you don't have to worry about your hair, like poofing up in between time. If you want this to be even shorter to further mimic um, you know the length of your hair. In my case, my hair is a lot shorter than this. I probably would feel comfortable doing it just because the luster and I just feel like the texture, looks really really natural and honestly y'all. I really be thinking to myself like what is better the closures or the frontals and I'm kind of like I don't know, I'm going 50 50 because it really depends on the type of like person. You are. Are you somebody that doesn't mind high maintenance hair? You really want your hair to look super perfect every single day, you're going to dedicate the time to a closed well to a friend who I should say or do you want something a little bit more Carefree, wake up, go brush it down, and and that's it You see what I'm saying: that's a closure girl, if you ask me so it really just depends on the type of person you are but y'all look at this transition. Oh my goodness, yes, okay, and so you already know. I had to just clean up my work and match left to the right, continue to just kind of make sure that everything is shaped appropriately and then voila y'all. These edges looks super good. First of all, let's just keep in mind that this is still a glueless unit. I think I had somebody ask me: Chrissy how's this glueless. If you know I can't take it off y'all, it's just hairspray. That'S it! I'M gon na prove it to you in just a few minutes, but literally you'll be able to just take this right off without even thinking too much about it. All that I did in this case is go ahead and kind of just like brush the hair away from itself, just to kind of get it a little frizzy right there at the root I like to lay it down towards the side, instead of just going backward. Just in case the wind blows, you know, I don't want you to know that this is a 5x5 closure and then, of course, I hit it with a little bit more of the um the spray, but I use the brush to do it just so that everything Lays down flat y'all, yes, given the Vibes all right and look at the layers like I said I kept it really really soft. I didn't do anything too crazy, but I didn't know that I wanted to add some curls to this, but y'all I had to get my little photo op going, and I also had to just show you what everything looks like from the back. I will say that adding the I did add a little bit of like diamond shine as well to it that was totally unnecessary because the hair already had such great luster. I don't know if you guys can tell but whoo it's doing a thing, and so I did go ahead and just quickly add a few curls, because I really wanted to see how the hero behave actually being curled and if it holds a curl and what the Curl will look like so I just went ahead and took my fhi flat iron. Just to do some really really chunky ones. You guys can see. I kept the length in the hair with curling it. I didn't like go from the root all the way around and then, of course, I'm just going to go ahead and just brush this out. I'M doing everything towards my face because I really wanted the curl and that wave and texture to be towards the bottom of the hair. You guys will kind of see what I mean once I turn around, but super loving this okay, let's get into it. I don't know how y'all feel by now, but just remembering what this wig originally looked like when I first got it not really being sure what direction I was gon na go in with the unit and then now seeing get transformed into this. It'S just like. Okay, I see what we doing Chrissy, so I did go ahead and do the most dramatic head flip. Just because I wanted to kind of take this up a notch. You all the body it was giving. Okay shake it out, baby go ahead. Just for me, commercial. Is that what I remember I don't know yes y'all. I was absolutely in love. This hair has so much body. I was actually happy that I did the layers because, typically when it comes to the closure units, I'll just kind of keep them as they are and never really change them, but the layers really really helped and then I also just think trimming off the ends. Really. Just kind of took it exactly where I wanted to go and then, of course, y'all know the comb trick, because this is glueless all right. I love y'all, so much stay pretty leave me in the comments or questions down below and I will see you next time. Foreign


Comments
Christine D. Drakeford: Hi Cryssy... I'm new to wearing wigs (haven't actually started wearing them yet), and I'm looking to use them for protective styling... if you're able to see my photo, that is my real hair, and im trying to stop heat damaging it Nonetheless, I've been watching a ton of YouTube videos on wig installs, and out of all the videos, this is the 1st time I'm leaving a comment. Love the details in your video, the choices u made with the hair, and I like that it's not too long lol. I will be watching more & subscribing My only question is, can u link or give the exact names of the products u used (i.e. the flat iron, hot comb, hair spray)? I went to ur Amazon store, but those items aren't listed. Thanx in advance!
Angela Truly: Happy I found your channel. You transformed that wig into something special. Lol, the commercial had a white woman shaking her head was it for shampoo or dye? I am determined to learn the trimming and layering etc. because it makes the hairstyle look better. What type of scissors are you using? I am a quilter and I either have large sewing or small thread nippers. TIA
ROSE OLIVER: Wow beautiful beautiful own you thank you so much I really appreciate it
Megalook Wig: dear i am looking forward to your nice video honey
416BabyyGirl: I was going to get this but the wig linked on the site looks nothing like it?