Pre-Plucked Loose Wave Glueless Full Lace Wig Premium Lace Wig
- Posted on 28 June, 2019
- HD Lace Wig
- By Anonymous
Shop More Full Lace Wigs at https://www.premiumlacewig.com/full-la...
Hair Type:100% Brazilian virgin hair
Hair length:22 inch
Hair Texture:Loose Wave
Hair Color:Natural Color
Hair Density:180%
Silk Top:No Silk Top
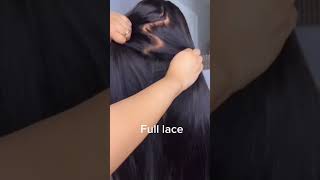
Wig Cap: Glueless Full Lace Wig
Elastic Band:Yes
Product ID: PW138
Direct Link: https://www.premiumlacewig.com/Brazili...
Share with friends with more sales from Premium Lace Wig as following:
WebSite: https://www.premiumlacewig.com
Facebook: https://www.facebook.com/premiumwig
Instagram: http://instagram.com/premiumlacewig
Twitter: https://twitter.com/premiumlacewig1
YouTube: https://www.youtube.com/c/PremiumLaceW...
Email: [email protected]
Whatsapp: 008618363908278
So before I get into this video, I do want to tell you guys if you are subscribed to my channel, make sure you have clicked that Bell. This is very important because if you do not click that Bell, you are going to miss every video that I upload for this week in this particular series, so clicking that bail allows you to get notification so that you can be alerted when I do upload a New video, so I'll wait, give you a second go ahead and click that bell. If you're not subscribed, go ahead and click the subscribe button, let's go to Instagram and today I'm going to search for style for today's video. If you all are new to this series, then basically, what I do is I find really beautiful Styles online. I am recreating them for this series for this week's no, no, no! I did a video yesterday, which was Tuesday, and I also did a video Monday. So I will be sure to link those videos at the end, this video Instagram and, let's see what we have. There are so many cute styles, but I'm looking for one that natural look but be really long and really pretty. So I think I found one: let's go with this style here, and this one is really pretty: it comes from Soviet hair dye official on their Instagram and I'm going to recreate this style. This is exactly what I'm looking for exactly and I feel like it will fit this particular style really well, when you are choosing your hair styles, make sure the hair goes with the style, because a lot of times you may try to achieve a style that does Not complement the actual hair texture, this style right here that I'm going to recreate is going to enhance it, and not only that this particular style also gives a really beautiful natural hair line. Look and this wig also complements that, so this wig is a transparent lace and it blends pretty good with my complexion when I originally got this wig, it was in a dark brown lace, so I'm not sure if they can't accommodate this. So if you are searching this wig on their website - and you don't see the transparent lace in this week option, I would highly recommend to email them. So let's begin this style and we're going to start off with some hair mousse part of this hair mousse. All over the front, now someone asked what hair mousse I recommend is not really expensive. I go back to consistently. Is this one from cream on a dial and shine foaming mousse? This is one that is, I feel like affordable and it works really good. Now, a lot of times when you are using hair mousse just know that the hair will get crunchy. It will get a little stiff, but with this particular one it doesn't like it hard and flaky or any of that, so it just kind of stiffens up the hair with a soft soft hold. So I'm going to start here at the middle. If you do not, like a middle part, definitely change it up, make it your own, create your own style. It'S because I'm doing a middle part on this wig does not mean you have to wear a middle part a lot of times. A lot of people think that, because I do something they have to do the same exact thing: no, no, no do what works for your face shape! Do what works for your hair. As you can see, you get a lot of partying with this wig. A lot of wigs come with a lot of party nowadays and yes, you can part it on any side of the lace. Next step will be to kind of mold out the front. So I'm going to use my hot comb for this now. So many people get on me about. Oh, I don't like straight roots. You don't have to do this again. You can take whatever I do and make it your own, but because I want a more a neat. Look. I'M going to use this because it's going to help me achieve the look that I'm going forward to make everything just set where I wanted to sit. So I'm going to come off the hairline for a second and later, I'm going to show you all a really cool tip so to make your legs blend and melt with your skin complexion, because I do have a little bit of white residue going on right there And I did not use any hair glues. All I use was got to be glues, freezing spray to glue down this wig. I have a video on this already I'm going to go ahead and start curling, this hair to achieve the curls today, I'm using a wand curler - and this is by Bellamy - and this is a really small curl. So, basically, you want to take really small sections of the hair who wants to take about that much hair and wrap it around the Barrow and you do not have to leave the hair on for too long. I have my setting all the way up on 400 and this helps on me to get through curling very faster, so you don't want to leave it on long. You want to take it off and then stretch it out and let it go now, even though the curls are coming out spiral. I will show you guys in a second when I'm done how to loosen it up some and make it. You know look a little bit more wavy, but when you first do it, it's definitely going to look very spirally. If you are enjoying these series that I'm bringing to you, do me a favor, give this video a like that way. I can know that you all want more hair videos or, if you just like the video and feel like I deserve a like just give me a like okay. So now that we have the curls, we are not done yet. So do not click off this video, because if you like this look then I mean you can go ahead and click off. But if you want the more loose way type of look with the define waves without the frizz, I'm going to show you all of that plus I'm going to also show you guys how to finish up the hairline. This right here is really tight. Okay, the curls are very tight, but they are bouncy they're, so bouncy I did cheat just a little bit and in the back of their bigger curls, because I figured all the curls that I did the small in the front. It'S going to cover up that lower back anyways, less defined without causing too much frizz and disturbing the natural flow of the hair. So it's two ways: I'm gon na try to do this. Okay, first, what I'm going to do! This is with a little bit of what is this. This is like this sheet: silk infusion generic virgin, hair serum and I'm gon na take about that. Much spread it out throughout the hair, so I'll split the hair in two and I'm just going to rub my fingers down the hair just like this, because if you take a comb to this, it will Frizzle you so over time. Naturally, the curls will drop into waves. I am going to take a comb, go into the root area, to separates everything and give volume, and I'm going to do the same as that thing to the other side start at the ends and just run my hands straight down the hair. You want to make sure to get this hair serum into the hair first before you do anything else and then take that comb and kind of break up those curls at the roots. Alright. So now that we have that done, we're going to go in and break them up just a little bit more loosen them up. Who wants to take some of this argan oil, hair mousse, and now I'm going supply this to the curls, and what this is going to do is loosen them up. It'S going to loosen up those curls so that they can drop more into waves and, like I said this will also happen over time. Since we put the hair serum on there, it will help the frizz, so you won't get so much wrist next that we're about to do now. I am gon na take a comb and I'm going to test it out with this comb. First, I'm just gon na run the comb through gently throughout the hair break in the curl. As you can see, I'm not getting a lot of frizz because I did put that hair serum on there. First, just gently go through don't do too much combing, just kind of pull the curls release, pull the curls release I'll show you again pour release. Pour release. Do not break that column completely from top to bottom. You will your tangles. Now we are getting back into the fun part, and this part is my favorite, because now we can go back to that hair line and just make everything look really blend it um. So I know it may look perfect right now, so I'm just adding some hair mousse right here and then because I want to duplicate this exact style. Also, take some hairspray spread, we're going to take that hot comb and be very careful after spraying that hairspray that you don't burn your skin, because the hot comb can be really hot when it comes to wet things. So we're going to lift up I'm also going to take this part of the hair go straight down and we're going to flip this I'll get a straight part. We'Re gon na flip this side on over okay like so and see how that gave is so much volume and then we're going to press the comb upwards and notice. I did not create any baby hairs with this style. I really like this a lot a lot like um, so now I'm going to show you guys how to blend this lace, because I do have just a tad bit of white going on right there, when you are choosing to use makeup to blend your lace, be Very careful because if you use powders what I find with powders is they tend to stick to the glue if you are using a hair glue or it tends to just look dusty and we don't want no dusty, look okay! So I'm going to use this graftobian palette palette number three. I also use it for my makeup all the time and what I like to do is just take a little bit of the color, maybe the second or the last color, and I will blend it right here on that lace and you want to use really really Small sections at a time, because if you use too much - and it's not the right color you're going to be left with some really ugly spots, that don't look good and this will also cover up any white residue that they got to be spray. Leave behind. I'M kind of like just dabbing around the areas where the white is, and, as you can also see, is helping to hide that don't use too much do not use too much Italian and then I'm just going to take the residue from the brush and kind of Go into the hair done all the way in because I know a lot of people will be like. Oh man, we will need to see closer, so you can see, as close as I can possibly show you right now and my camera. Definitely I need to figure out the settings because it definitely shows a lot of saturation like it's very saturated in color. If I don't use some saturation, then I look really pale, so I have to find a balance when it comes to it, so you guys can see the actual actual results cause. I know you seeing a little bit of oranjee from that bronzer. It'S not like that. In person, it's not like that in person, I promise here we have the finish results, and I hope you guys really like this. If so, give this video a thumbs up and do not forget that I'm coming to you guys tomorrow with the video all the way throughout the end of this week. And if you have not seen my previous videos from this particular series or last week's series. Be sure to catch up on them. I will put all the information for this week down below in the description box, and I hope you guys will have a wonderful day, and I will see you back in my next video

Comments
Tu Bailey: Girl, I almost passed out!!! You Did That!!! Thank you